This will be the fourth in a series of webinars that I’m doing for Signavio, this time focused on the high-tech industry but with lessons that span other industries. From the description:
High-Tech businesses are renowned disruptors. But what happens when the disruptors become the disrupted? For example, let’s say a global pandemic surfaces and suddenly changes your market dynamics and your business model.
Can your business handle an instant slowdown or a hyper-growth spurt? What about your operating systems? Are they nimble enough for you to scale? Can you onboard new customers en masse or handle a high volume of service tickets overnight? What about your supply chain; how agile are your systems and supplier relationships?
The first two webinars were discussing banking in February and insurance in March, and the role that intelligent processes play in improving business, with a brief mention in the March webinar about addressing business disruption caused by the pandemic. By the time we hit the third webinar on financial services in April, we had pivoted to look at the necessity of process improvement technologies and methodologies in times of business disruption such as the current crisis. Unlike a lot of industries, many high-tech sectors have been booming during the pandemic: their problems are around being able to scale up operations to meet demand without sacrificing customer service. Although they share some of the same issues as I looked at in the earlier webinars, they have some unique issues where process intelligence and automation can help them.
Tune in on May 20th at 11am Eastern; if you can’t make it then, sign up anyway and you’ll get a link to the on-demand version.
I had an early look at IBM’s virtual Think conference by attending the analyst preview today, although I will need to embargo the announcements until they are officially released at the main event tomorrow. The day kicked off with a welcome from Harriet Fryman, VP of Analyst Relations, followed by a welcome from IBM President Jim Whitehurst before the first presentation from Mark Foster, SVP of Services, on building resilient and smarter businesses. Foster led with the need for innovative and intelligent workflow automation, and a view of end-to-end processes, and how work patterns are changing and will continuing to change as we emerge from the current pandemic crisis.
Whitehurst returned to discuss their offerings in hybrid cloud environments, including both the platforms and the applications that run on those platforms. There’s no doubt that every company right now is laser-focused on the need for cloud environments, with many workforces being distributed to a work-from-home model. IBM offers Cloud Paks, containerized software solutions to get organizations up and running quickly. Red Hat OpenShift is a big part of their strategy for cloud.
Hillery Hunter, CTO and VP of Cloud Infrastructure, followed on with more details on the IBM cloud. She doubled down on their commitment to open source, and to how they have hardened open source cloud tools for enterprise readiness. If enterprises want to be flexible, scalable and resilient, they need to move their core business operations to the public cloud, and IBM hopes to provide the platform for them to do that. This should not just be lift-and-shift from on-premise systems, but this is an opportunity to modernize systems and operations. The impacts of COVID-19 have shown the cracks in many companies’ mission-critical capabilities and infrastructure, and the smart ones will already be finding ways to push towards more modern cloud platforms to allow them to weather business disruptions and gain a competitive edge in the future.
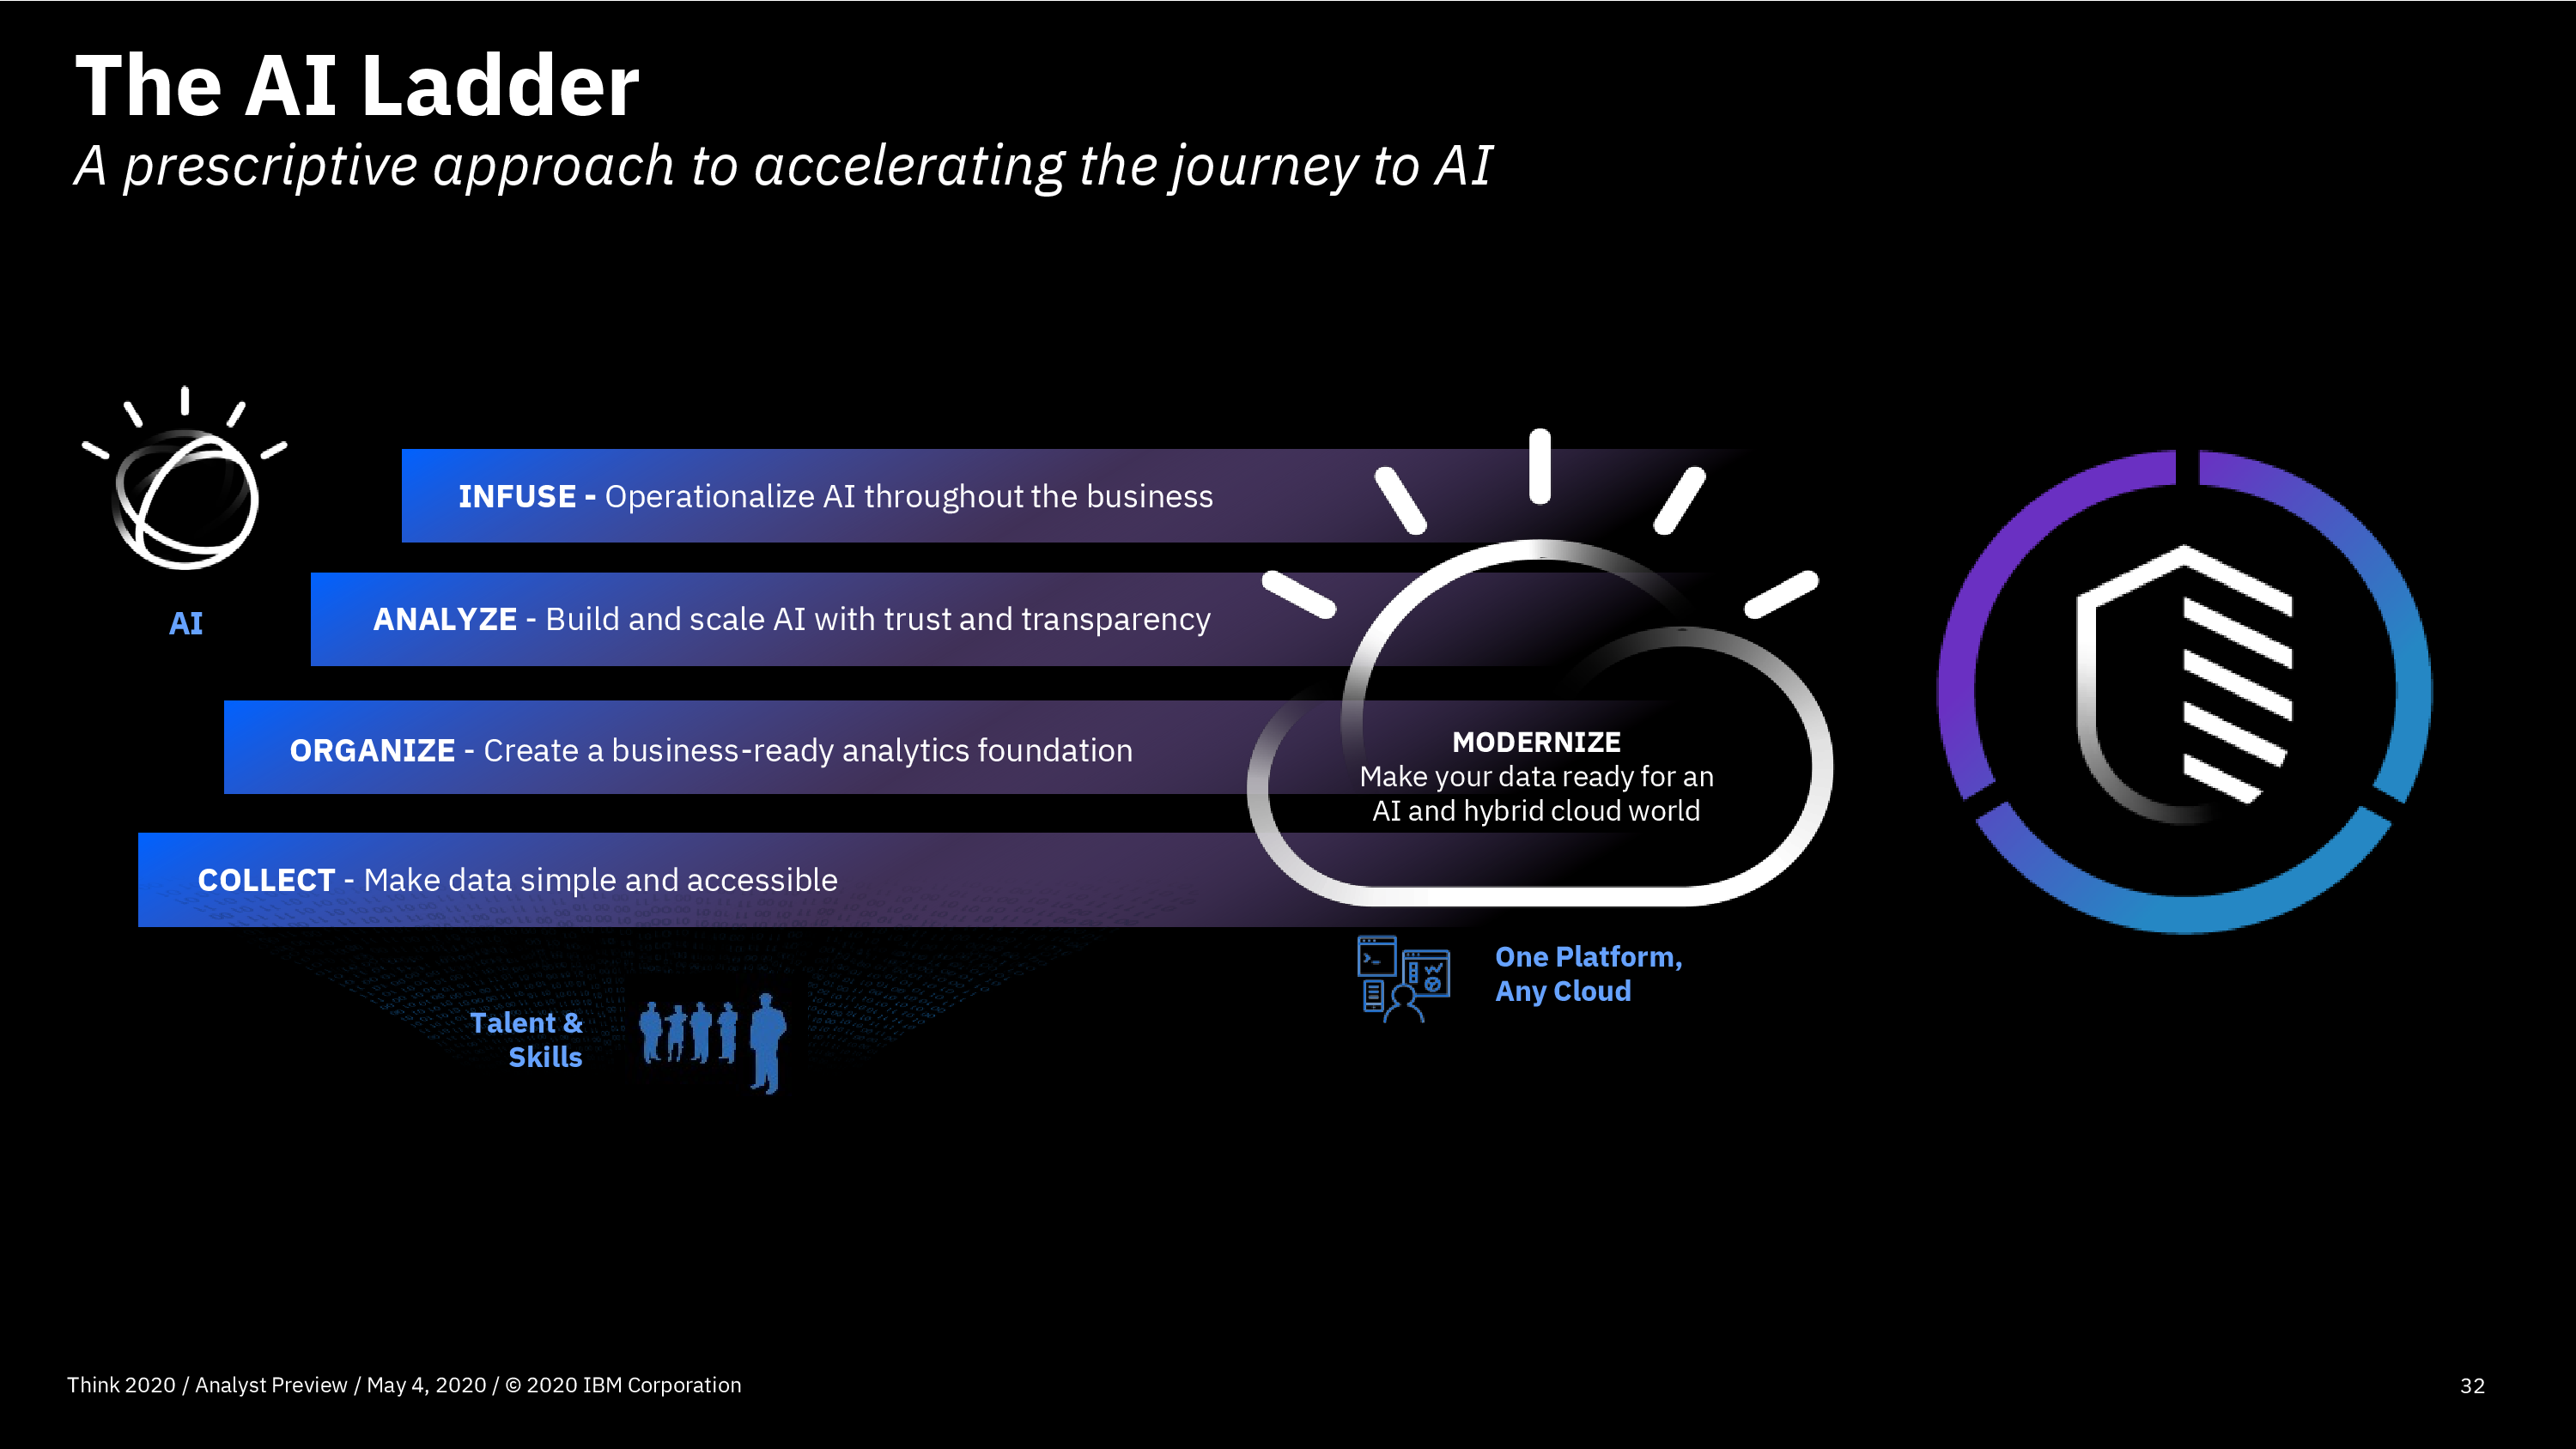
Rob Thomas, SVP of IBM Cloud and Data Platform, gave a presentation on AI and automation, and how they are changing the way that organizations work. By infusing AI into workflows, companies can outperform their competitors by 165% in terms of revenue growth and productivity, plus improve their ability to innovate and manage change. For example, in a very short time, they’ve deployed Watson Assistant to field questions about COVID-19 using information published by the CDC and other sources. Watson Anywhere combines with their Cloud Pak for Data to allow Watson AI to be applied to any of your data sources. He finished with a reminder of the “AI Ladder” which is basically a roadmap for adding operationalized AI.
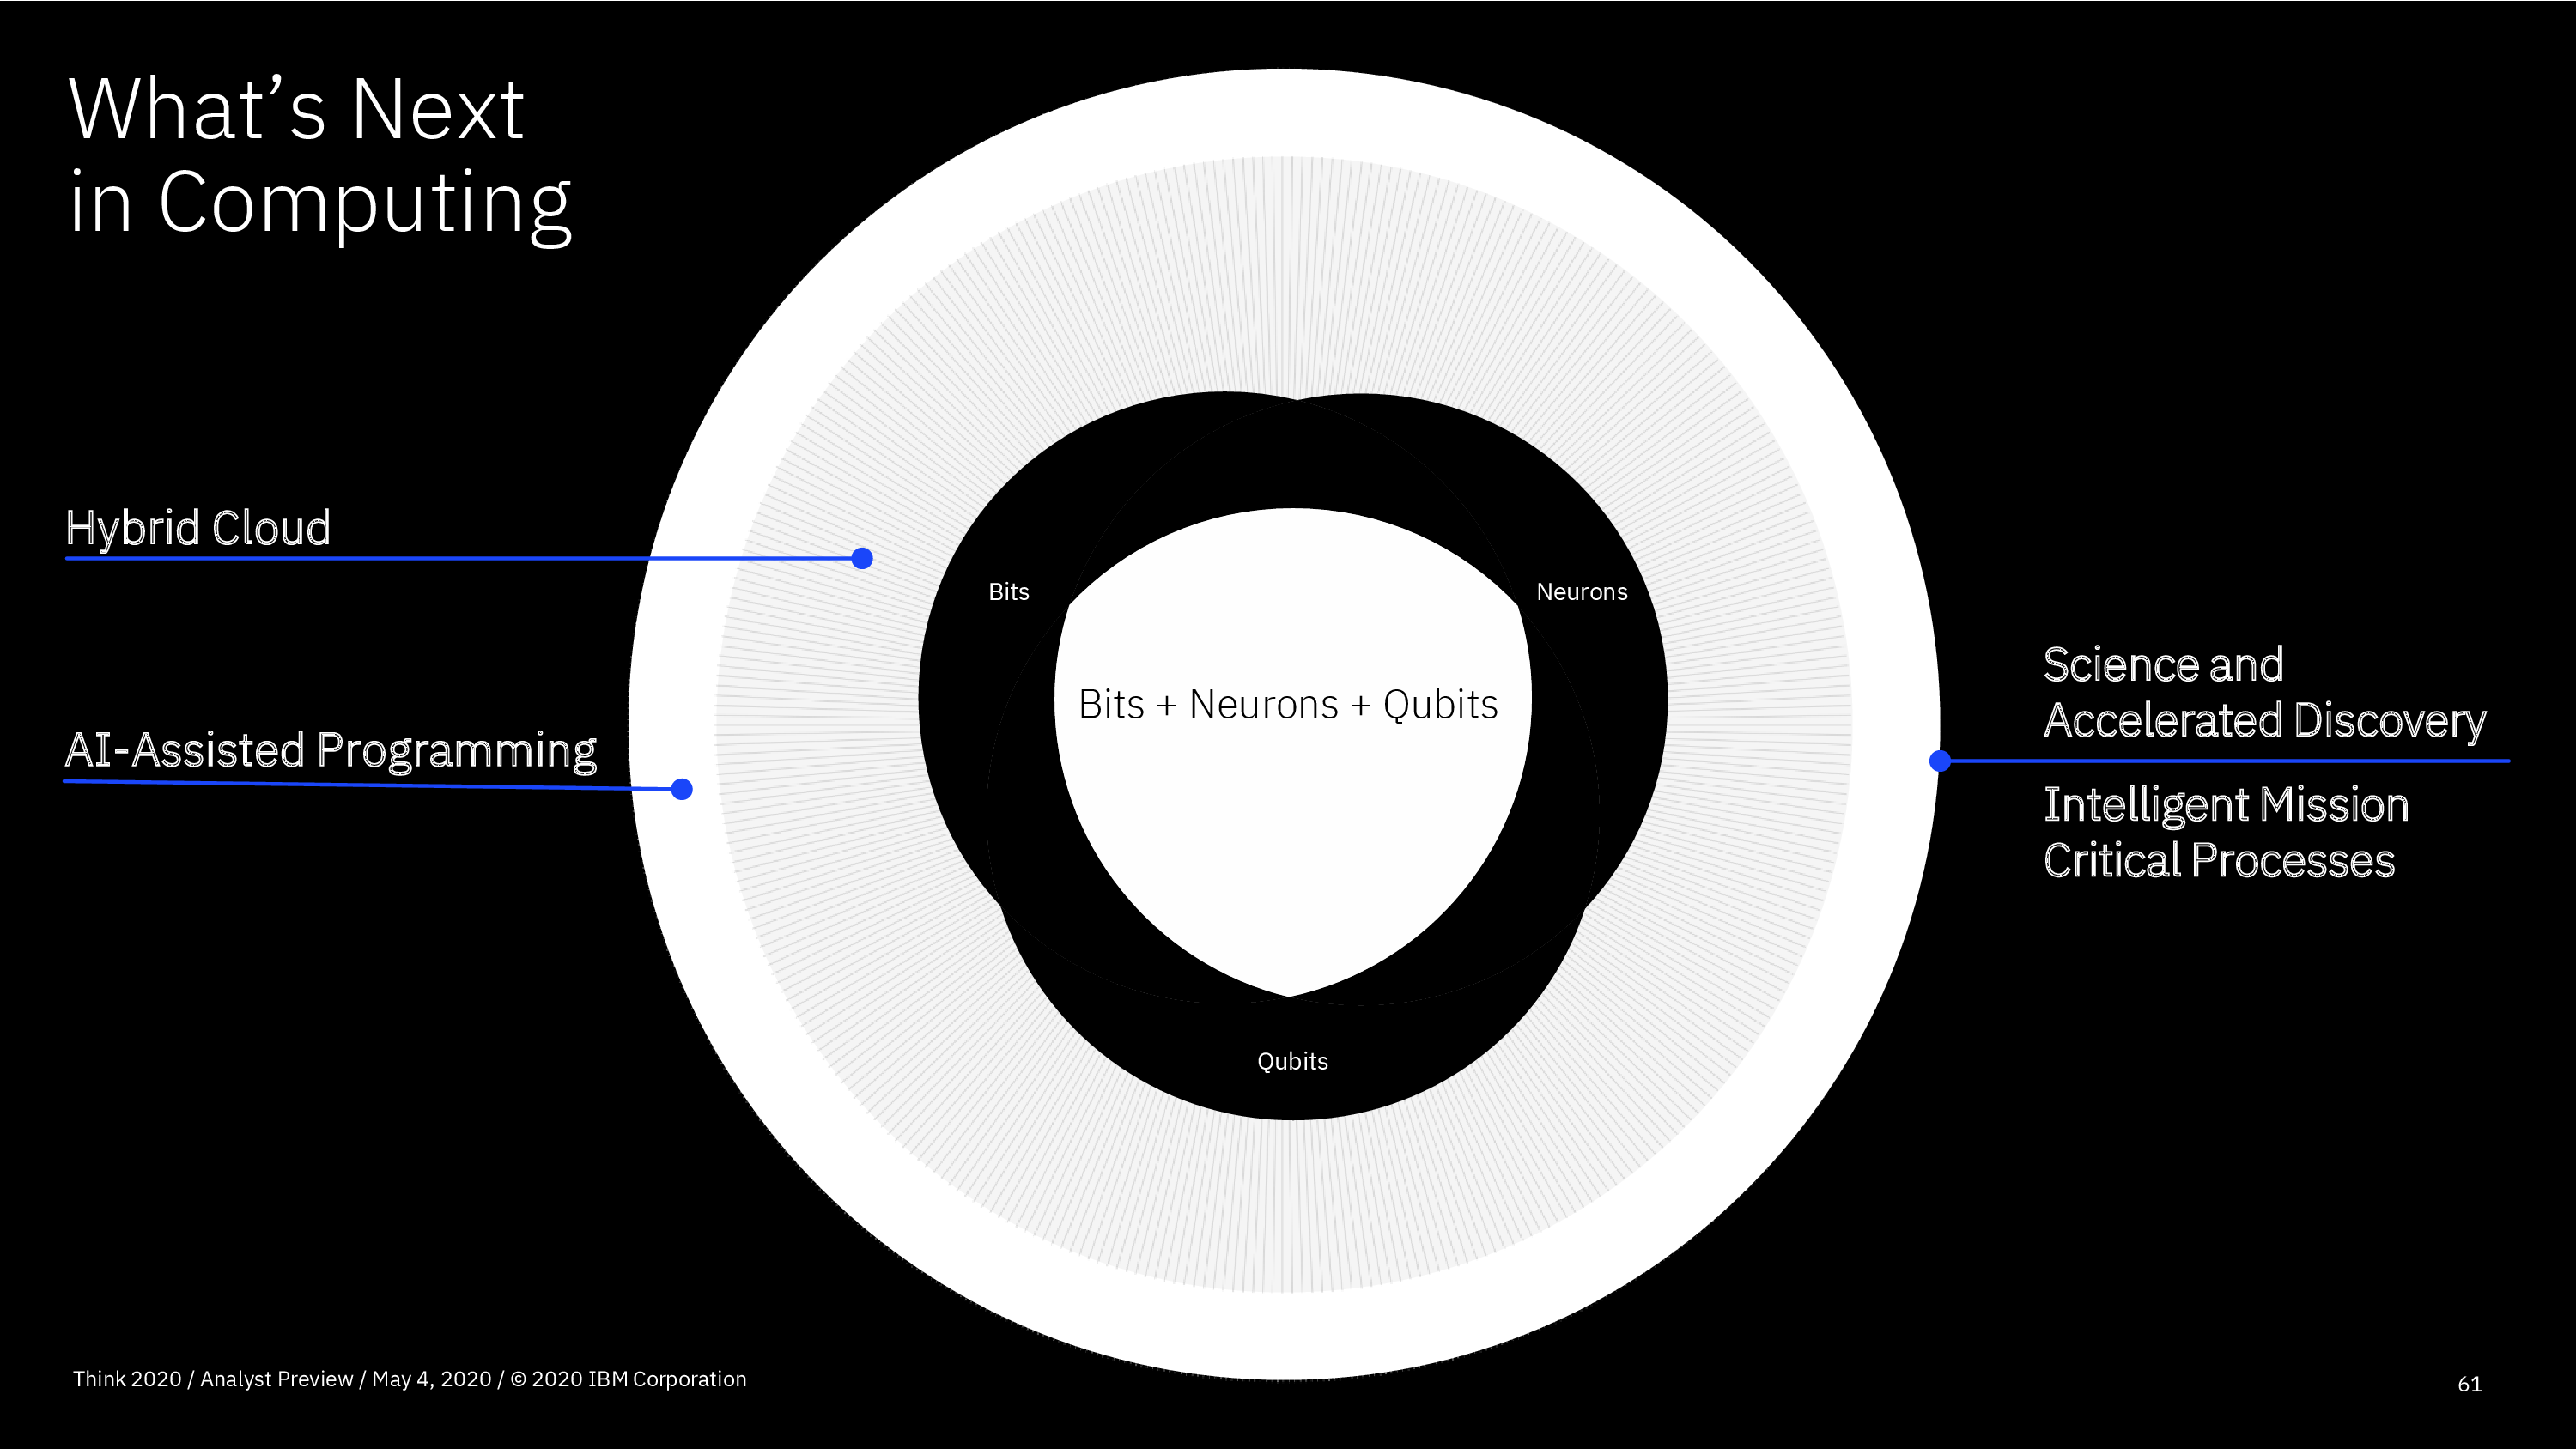
The final session was with Dario Gil, Director of IBM Research. IBM has been an incredible source of computing research over 75 years, and employs 3,000 researchers in 19 locations. Some of this research is around the systems for high-performance computing, including their support for the open source Linux community. Other research is around AI, having moved from narrow AI to broader multi-domain AI, with more general AI with improved learning and autonomy in the future. They are also investing in quantum computing research, and he discussed this convergence of bits, neurons and qubits for things such as AI-assisted programming and accelerated discovery.
This was all pre-recorded presentations, which is not as compelling as live video, and there was no true discussion platform or even live Q&A; these are the two common complaints that I am having with many of the virtual conferences. I’m expecting that the next two days of the main IBM Think event will be more of the same format. I’ll be tuning in for some of the sessions of the main event, starting with CEO Arvind Krishna tomorrow morning.
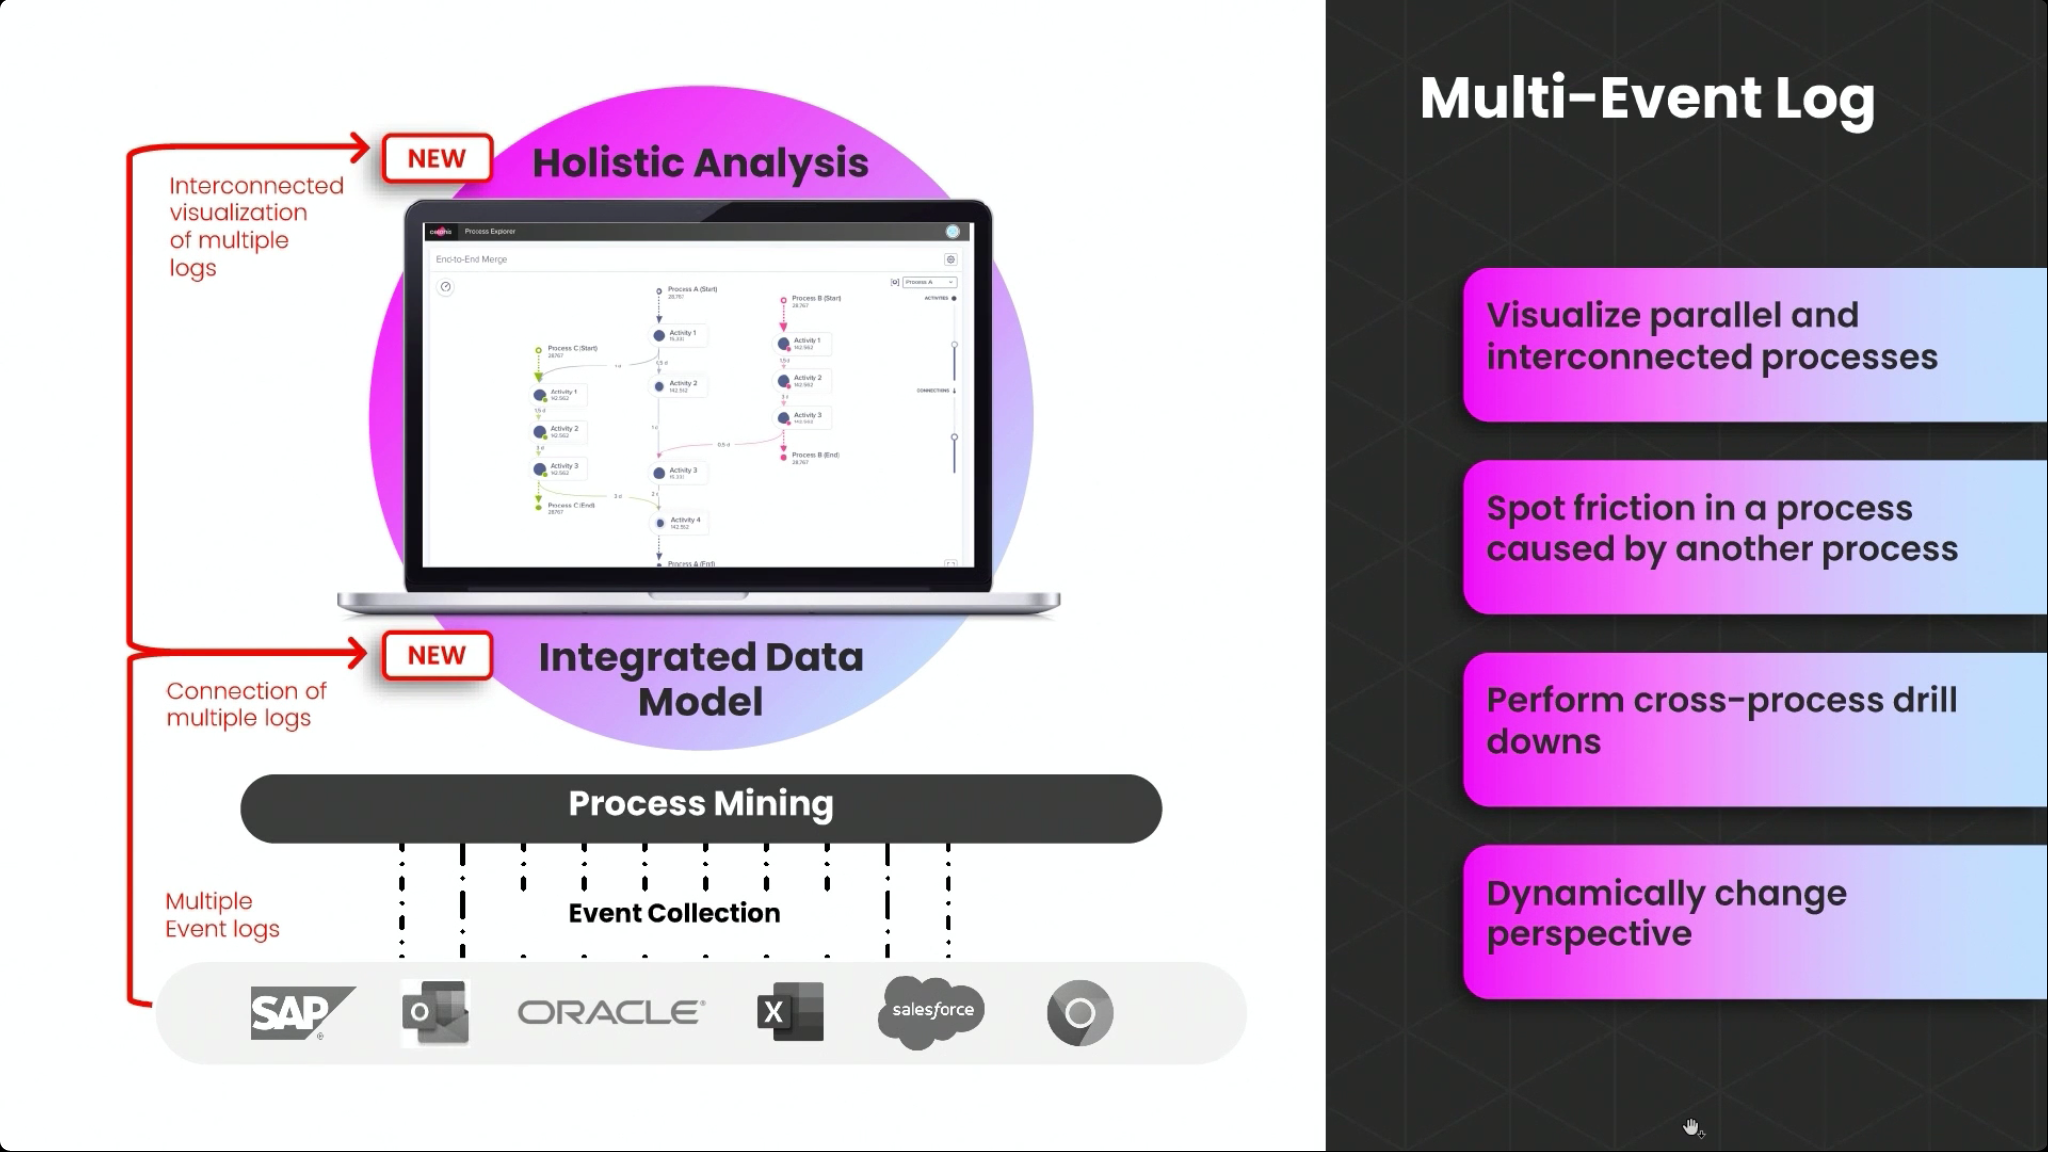
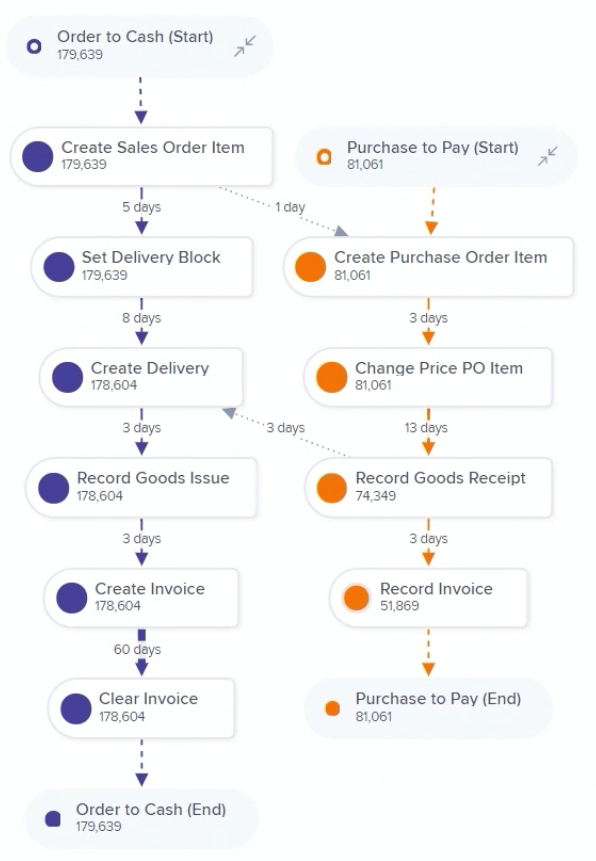
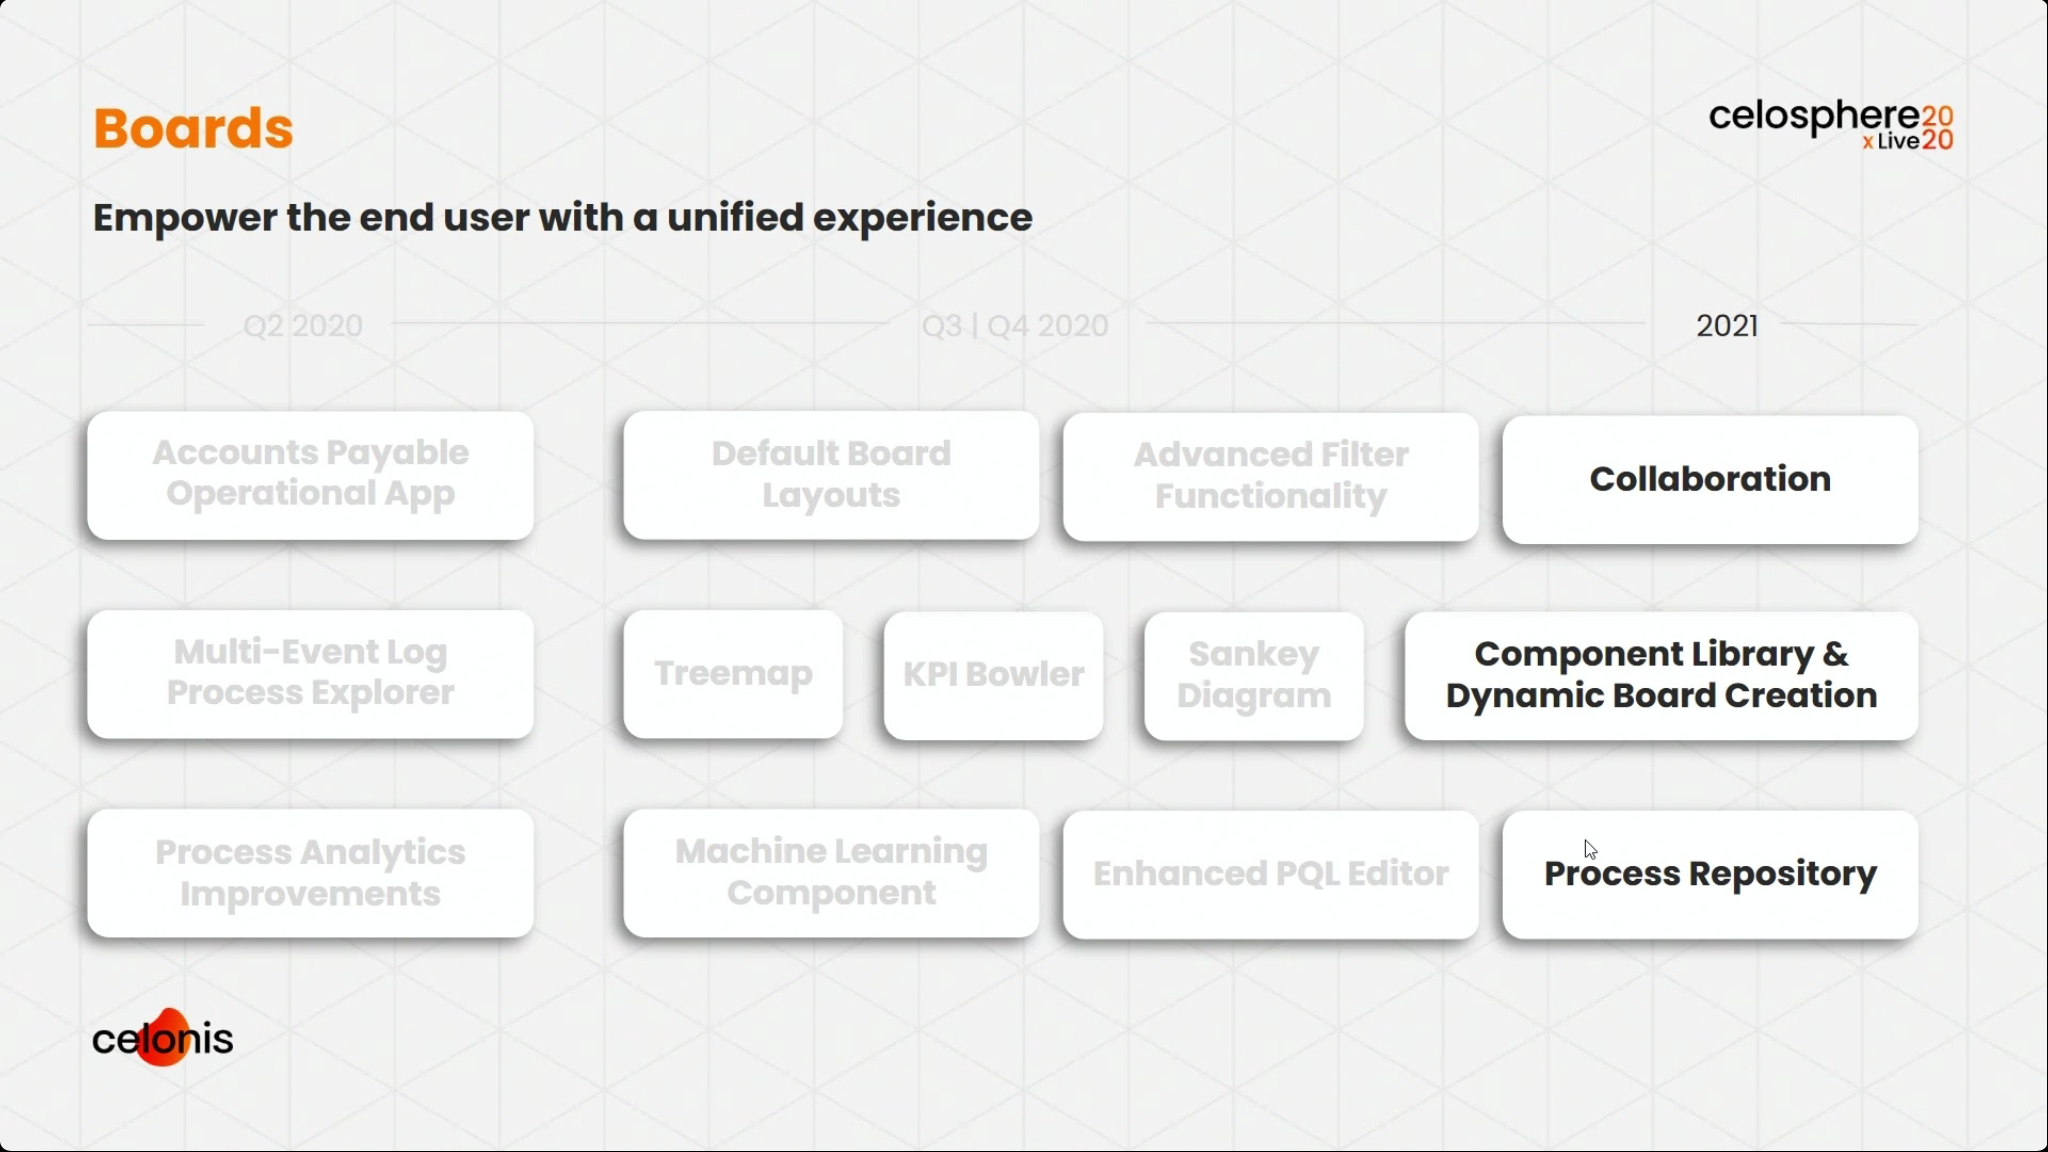
Traditionally, process mining is fed from history logs from a single system. However, most businesses aren’t run on a single system, and Celonis Product Lead for Discovery Sabeth Steiner discussed how they are allowing multi-event log process mining, where logs from multiple systems are ingested and correlated to do a more comprehensive analysis. This can be useful to find friction between parallel (inbound) procurement and (outbound) sales processes, or customer service requests that span multiple process silos. Different parallel processes appear in Celonis process discovery in different colors, and the crossover points between them highlighted.
Each of the processes can be analyzed independently, but the power comes when they are analyzed in tandem: optimizing the delivery time within an order-to-cash process while seeing the points that it interacts with the procure-to-pay process of the vendors providing materials for that order. Jessica Kaufmann, Senior Software Developer, joined Steiner to show the integrated data model that exists behind the integrated analysis of multiple processes, and how to set this up for multiple event logs. She discussed the different types of visualization: whether to visualize the different processes as a single process (by merging the event logs), or as multiple interacting processes. KPIs can also be combined, so that overall KPIs of multiple interacting processes can be tracked. Great Q&A at the end where they addressed a number of audience questions on the mechanics of using multi-event logs, and they confirmed that this will be available in the free Celonis Snap offering.
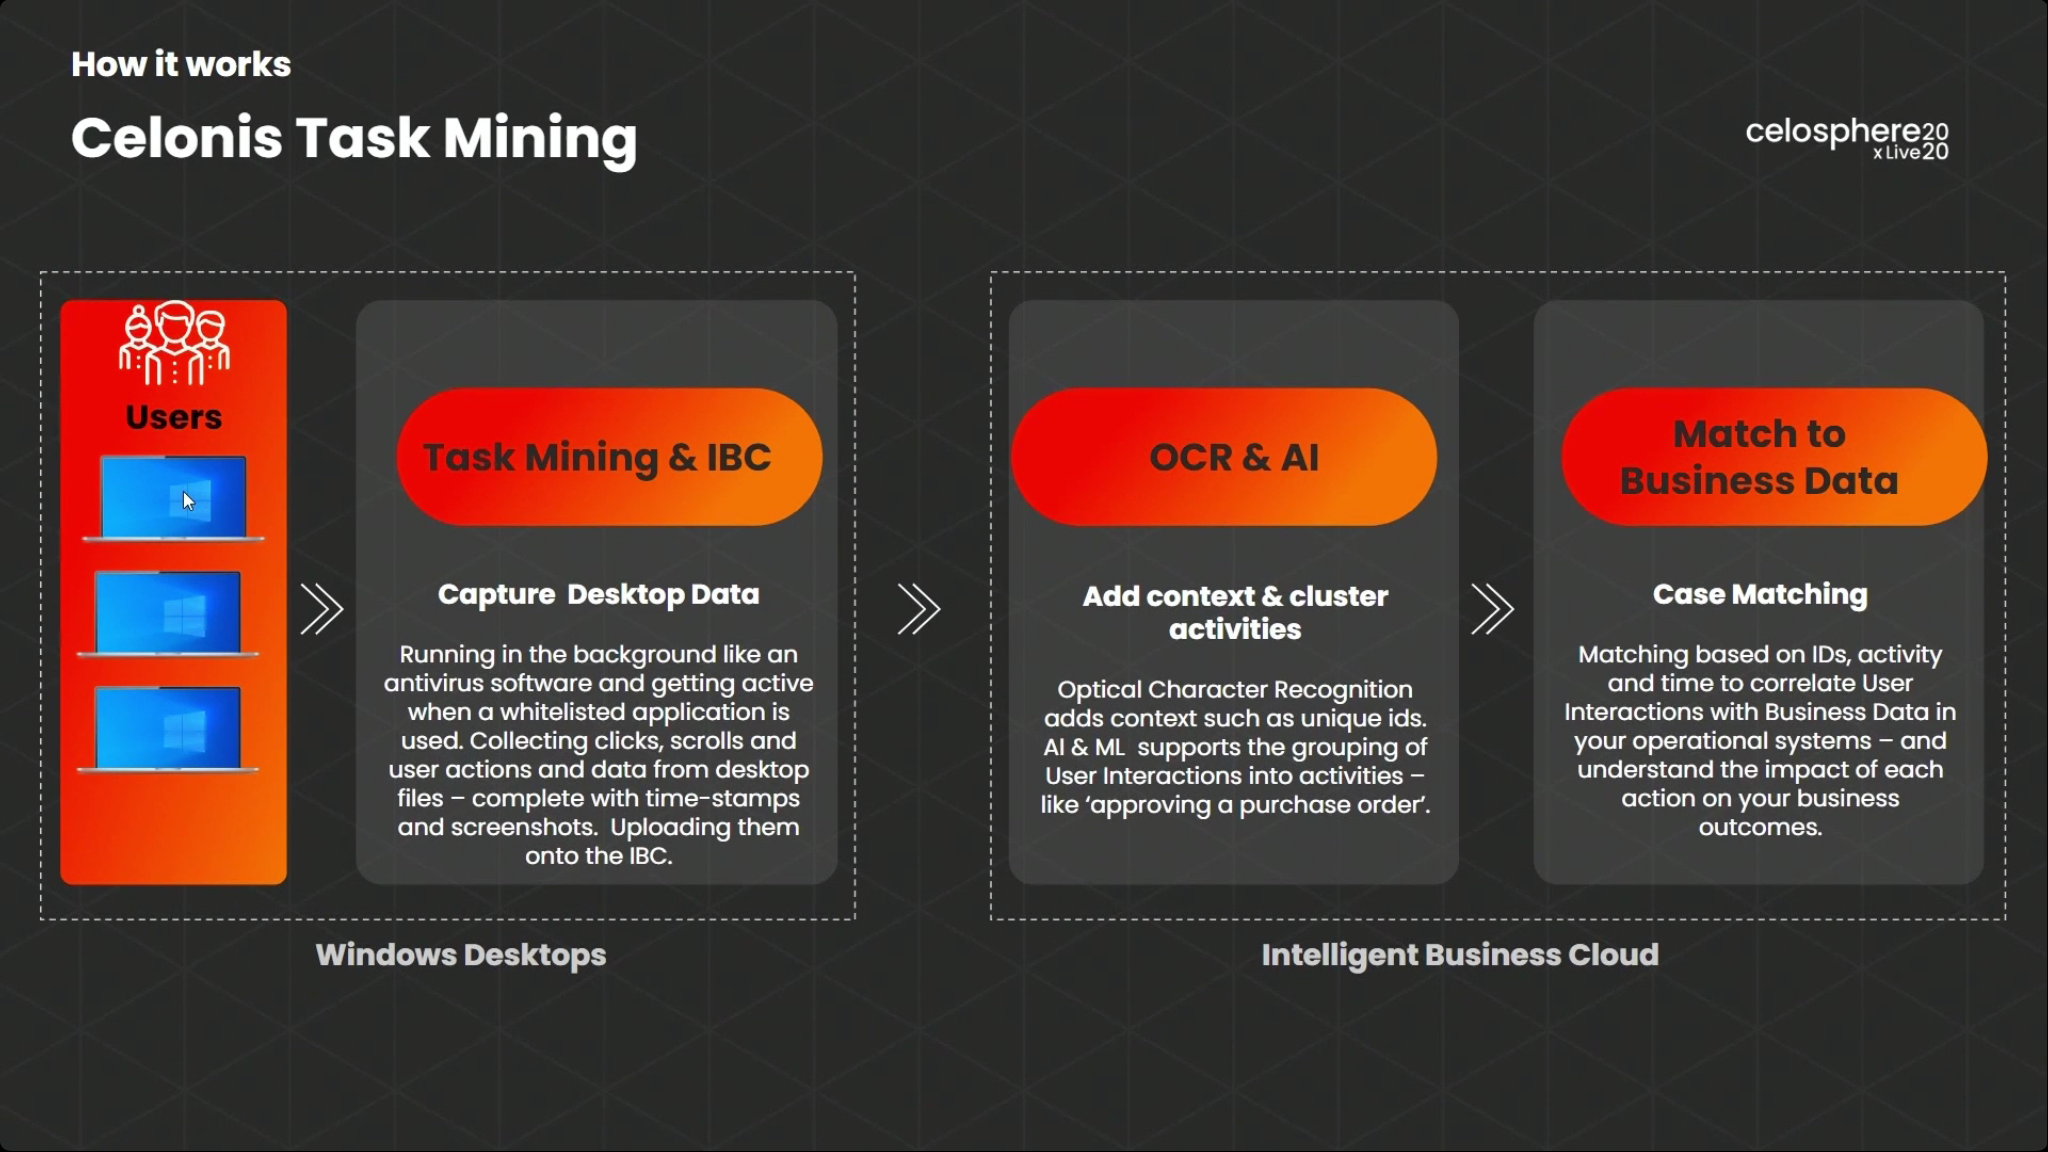
Another analysis capability not traditionally covered by process mining is task mining: what are the users doing on the desktop to interact between multiple systems? Andreas Plieninger, Product Manager, talked about how they capture user interaction data with their new Celonis Task Mining. I’ve been seeing user interaction capture being done by a few different vendors, both process mining/analysis and RPA vendors, and this really is the missing link in understanding processes: lack of this type of data capture is the reason that I spend a lot of time job-shadowing when I’m looking at an enterprise customer’s processes.
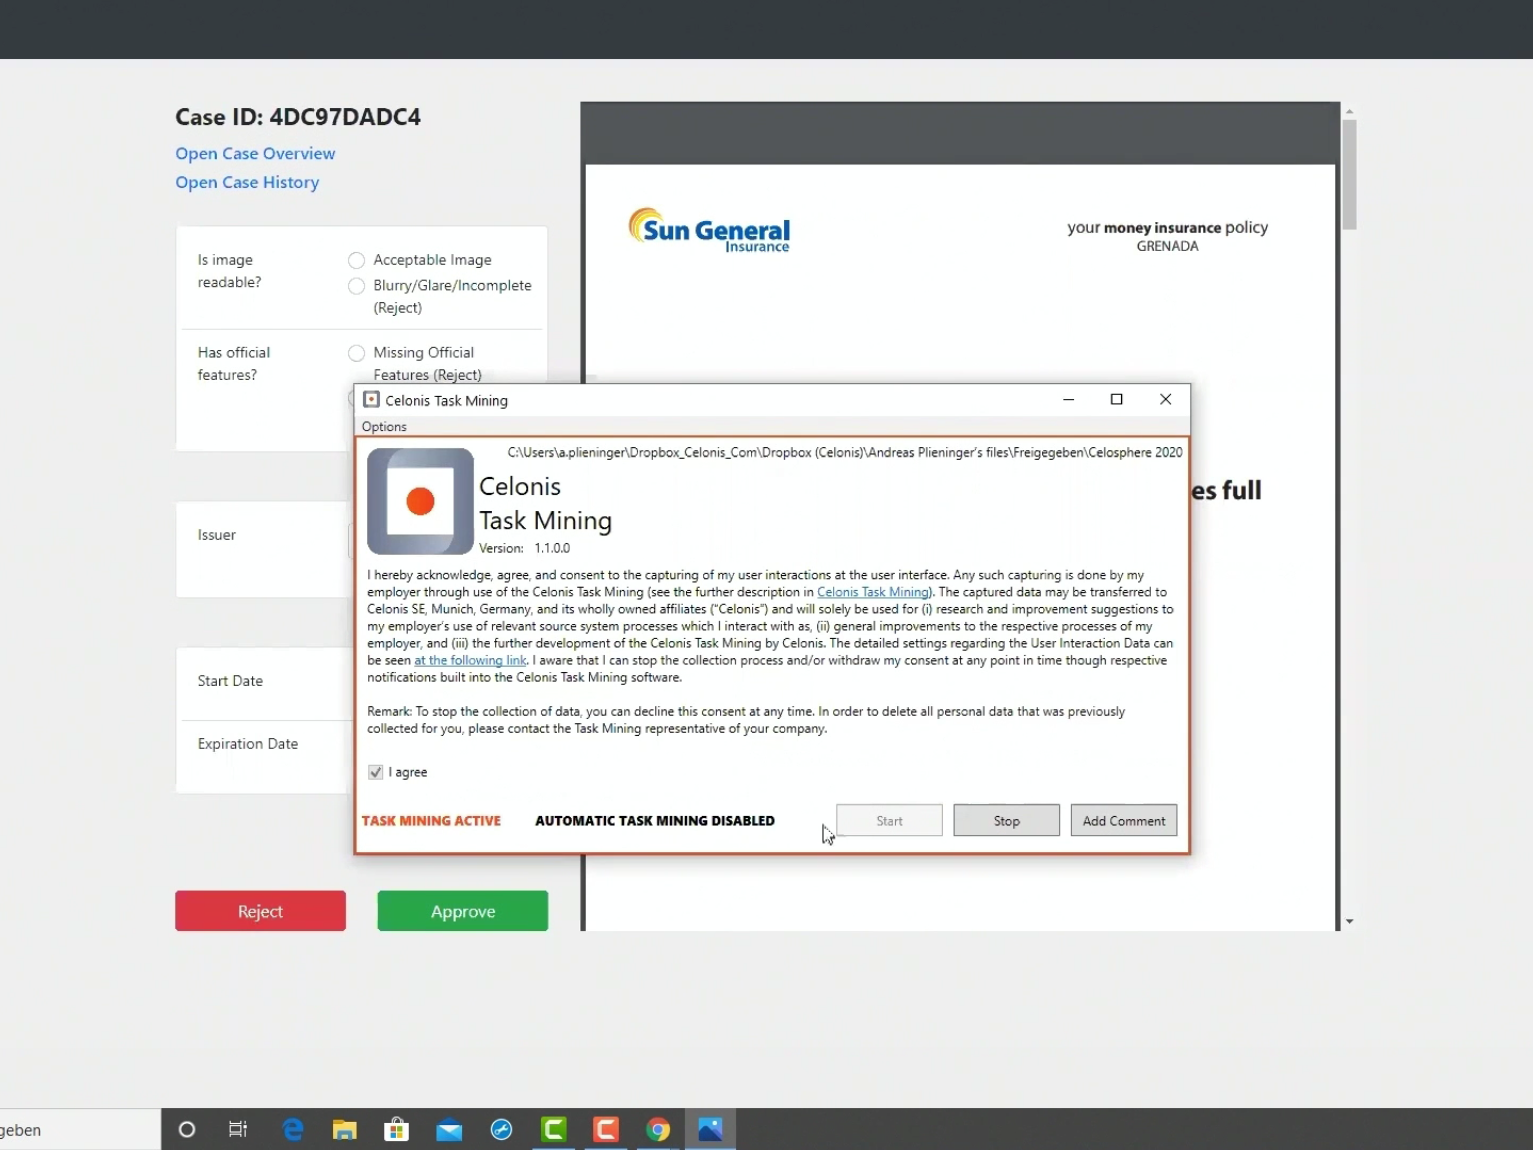
Task Mining is installed on the user’s desktop (Windows only for now), and when certain white-listed applications are used, the interaction information is captured as well as data from the desktop files, such as Excel spreadsheets. AI/ML helps to group the activities together and match them to other system processes, providing context for analysis. “Spyware” that tracks user actions on the desktop is not uncommon in productivity monitoring, but Celonis Task Mining this is a much more secure and restricted version of that, capturing just the data required for analyzing processes, and respecting the privacy of both the user and data on their screen.
Once the user interaction data is captured, it can be analyzed in the same way as process event log: it can discover the process and its variants, and trigger alerts if process compliance rules are violated. It’s in the same data later as process mining data, so can analyzed and exposed using the same AI, boards and apps structure as process data. Task Miner also captures screen snapshots to show what was actually happening as the user clicked around and entered data, and can be used to check what the user was seeing while they were working. This can be used to determine root causes for the longer-running variants, find opportunities for task automation, and check compliance.
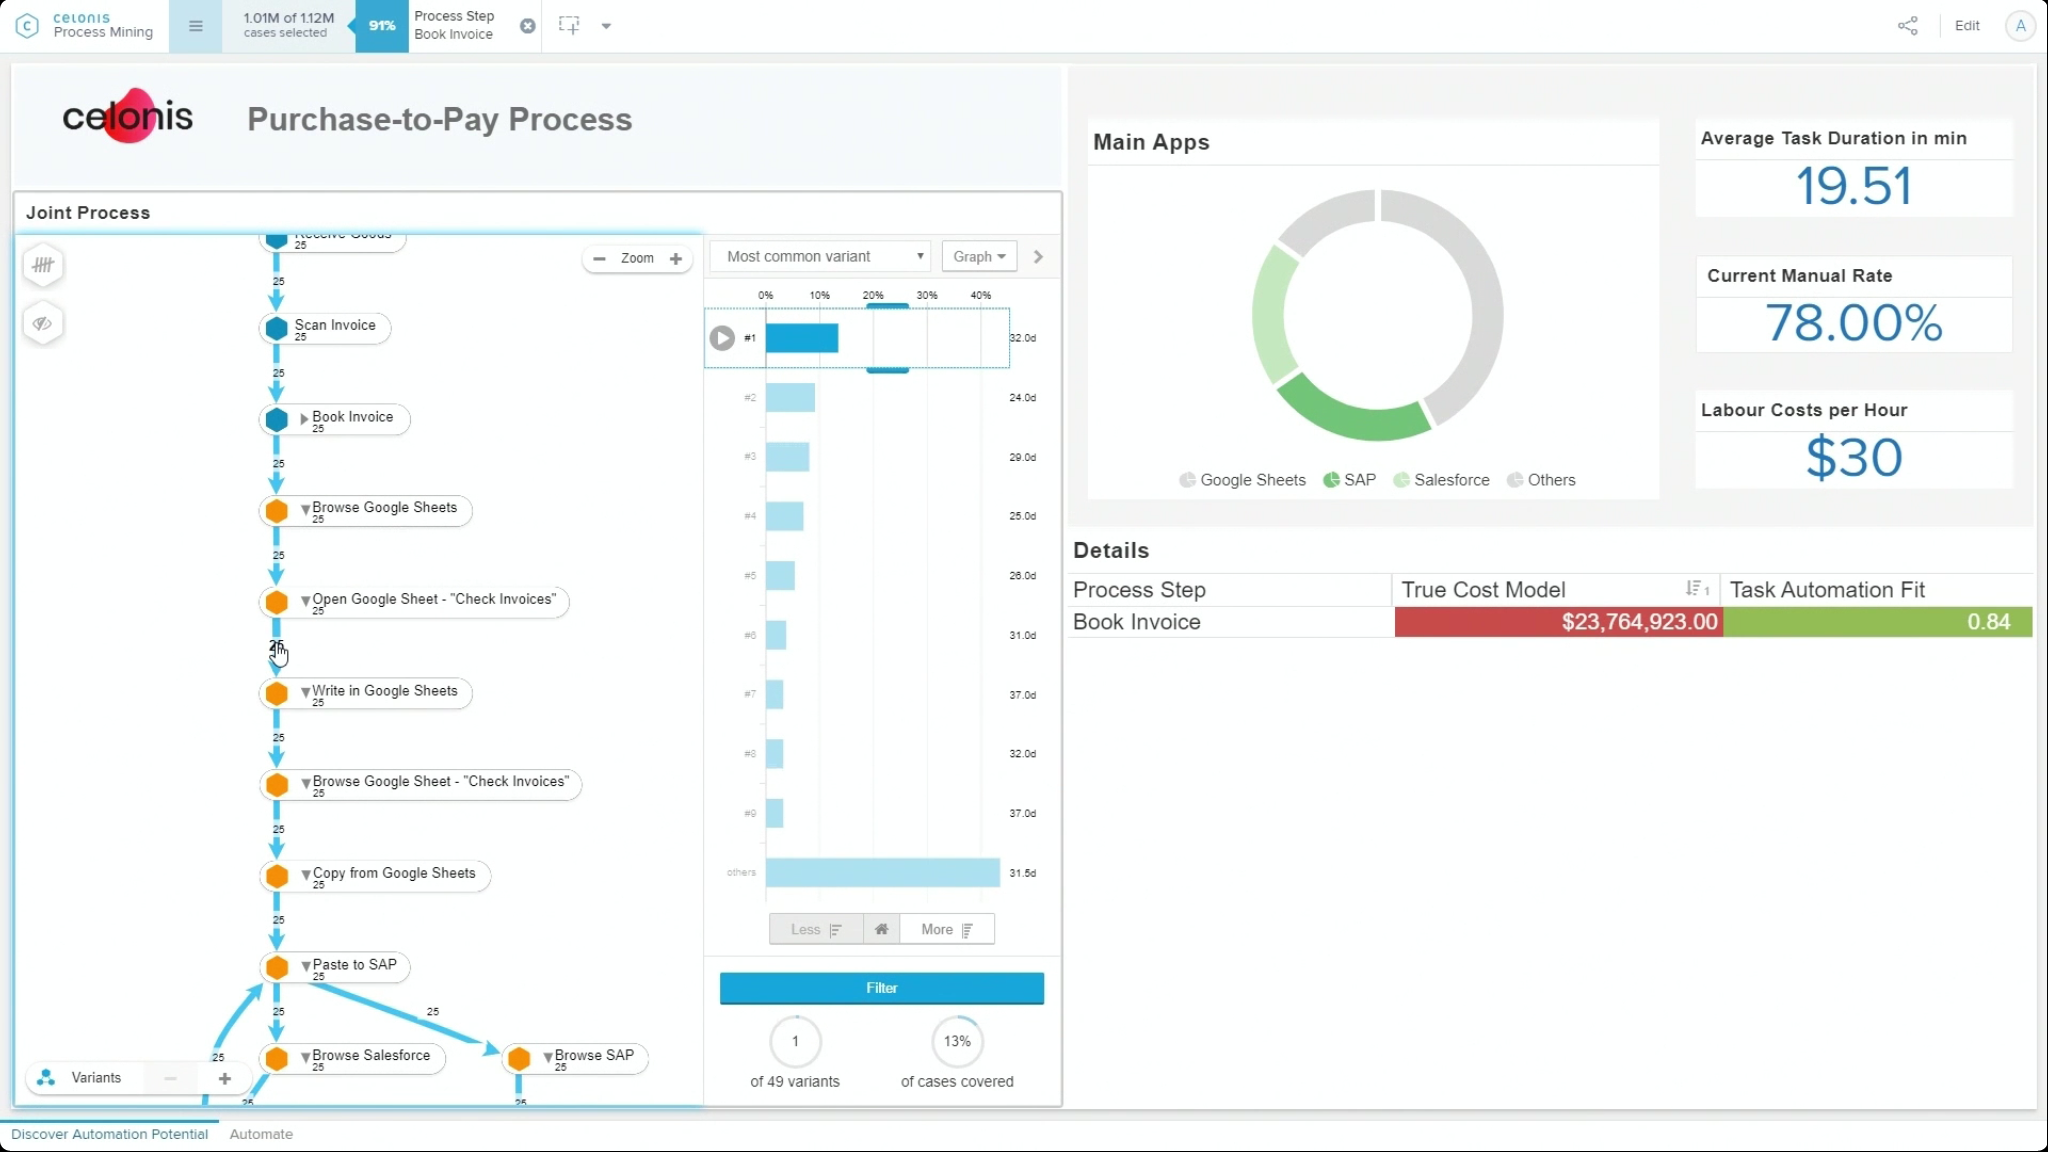
He showed a use case for finding automation opportunities in a procure-to-pay process, similar to the concept of multi-event logs where one of those logs is the user interaction data. The user interaction data is treated a bit differently, however, since it represents manual activities where you may want to apply automation. A Celonis automation could then be used to address some of the problem areas identified by the task mining, where some of the cases are completely automated, while others require human intervention. This ability to triage cases, sending only those that really need human input for someone to process, while automatically pushing actions back to the core systems to complete the others automatically, can result in significant cost savings and shortened cycle time.
Celonis Task Mining is still in an early adopter program, but is expected to be in beta by August 2020 and generally available in November. I’m predicting a big uptake in this capability, since remote work is removing the ability to use techniques such as job shadowing to understand what steps workers are taking to complete tasks. Adding Task Mining data to Process Mining data creates the complete picture of how work is actually getting done.
That’s it for me at CelosphereLive 2020; you can see replays of the presentation videos on the conference site, with the last of them likely to be published by tomorrow. Good work by Celonis on a marathon event: this ran for several hours per day over three days, although the individual presentations were pre-recorded then followed by live Q&A. Lots of logistics and good production quality, but it could have had better audience engagement through a more interactive platform such as Slack.
I’ve been attending the online Celonis conference for the past couple of days, but taking a break for Alfresco‘s short event, Alfresco Modernize. We started with an insightful keynote from CTO John Newton on patterns of digital transformation. As we likely enter a recession triggered by the global pandemic, he pointed out that most companies fail to execute properly through a recession, and showed some Harvard Business Review research on what actually works. This includes investing in digital transformation, decentralizing decision making, and being sure to retain knowledge and experience. The responses of digital leaders to disruptions such as what we’re now seeing focus on improving business processes, modernizing infrastructure, and making it easier to connect with customers and suppliers.
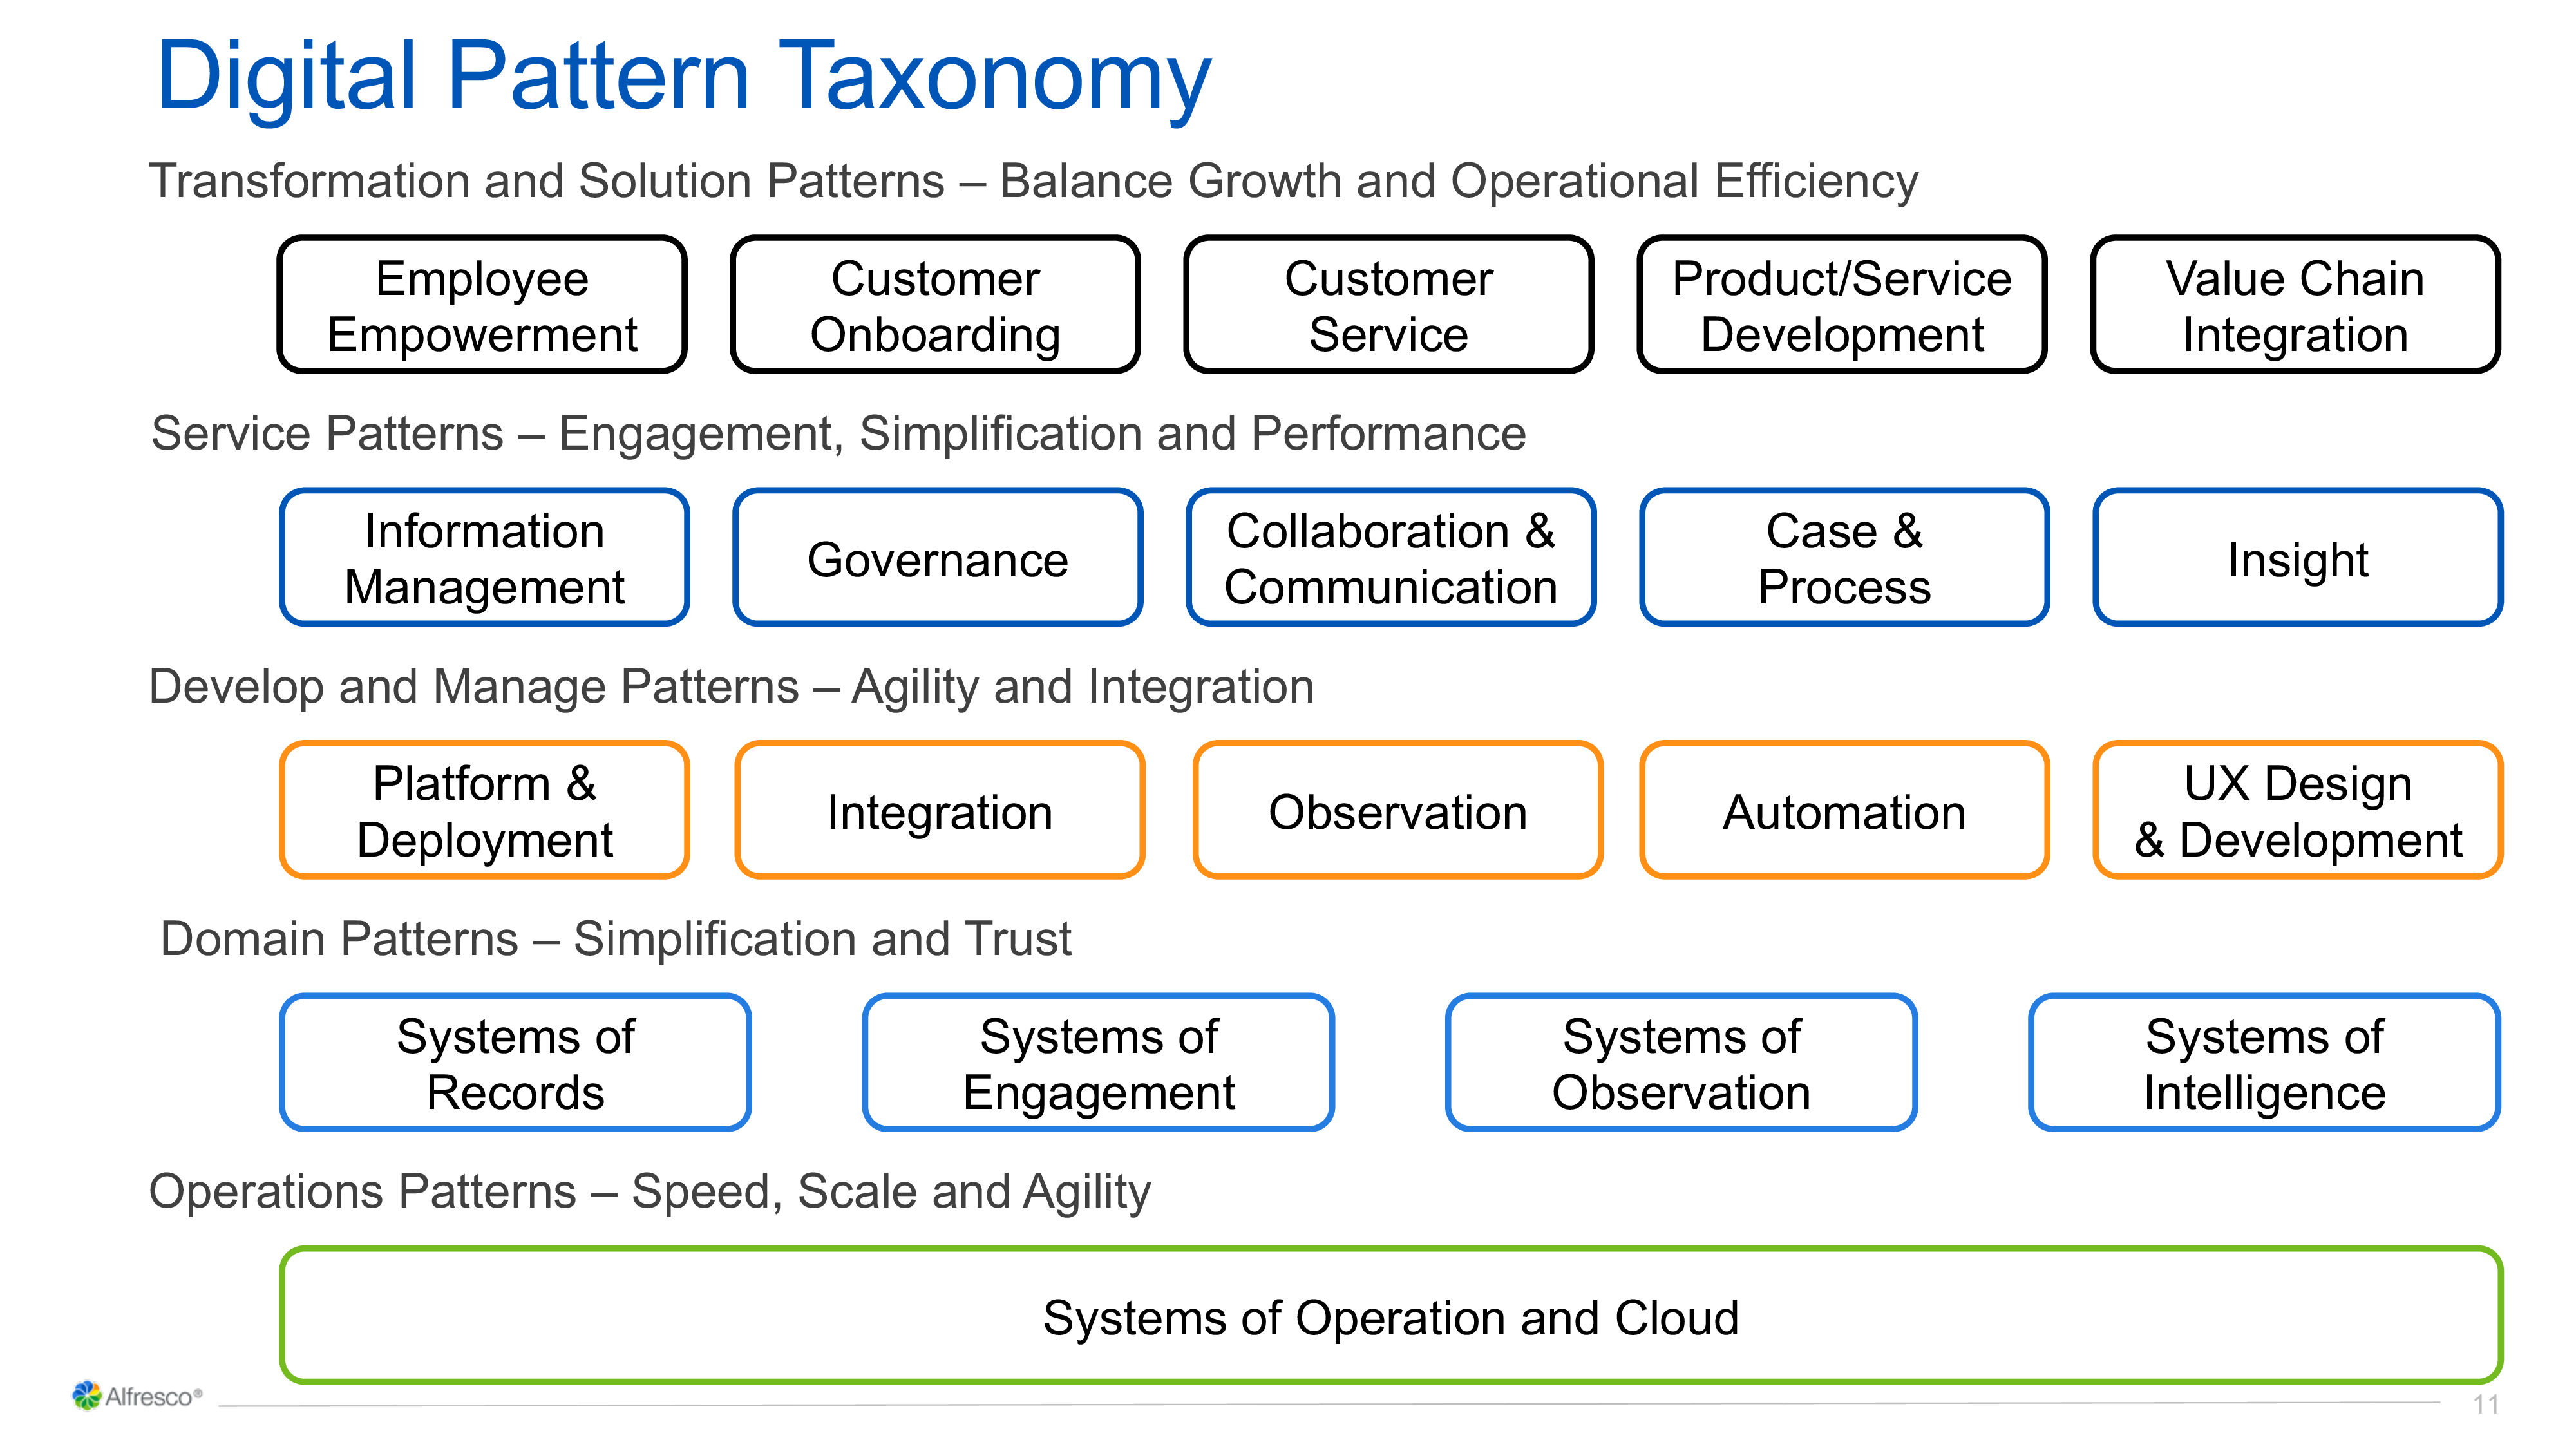
He discussed the concept of digital transformation patterns that can be derived from successful journeys, such as customer onboarding or improving manufacturing operations. He addressed the different layers of patterns shown in the chart at the left, and how they interact. We’ve used patterns in software development for a long time, and Newton shows us that it’s time to start documenting, understanding and applying digital transformation patterns. Alfresco wants to start documenting these in a very open source manner, and create solutions to address the common patterns.
Up next was a presentation by Dinesh Selvakumar, Global Head of Enterprise Content Management at Invesco, a global investment management firm. They are a relatively new Alfresco ECM customer, implementing in their own AWS instance during 2018-2019, and migrated content from other systems. They still have a lot of content silos, plus ad hoc routing and approval workflows, and have created an ECM CoE to improve standardization and governance. They want to integrate their systems to provide a unified user experience, and moved from an ECM mindset to that of Enterprise Content Services (ECS) that provides unified capabilities across the disparate platforms. They realize that there are some content and collaboration platforms that they’re never going to get rid of, but still need to have them integrated into the big picture connected by Alfresco. Eventually, enterprise content may be created in other applications, but then sent to Alfresco for enterprise-level management. They are quantifying the benefits of the move to an ECS, although some of the benefits are difficult to measure, such as decreased time searching for content. He shared some of the lessons that they learned and their key success factors, several of which are based on having a global focus and deployment.
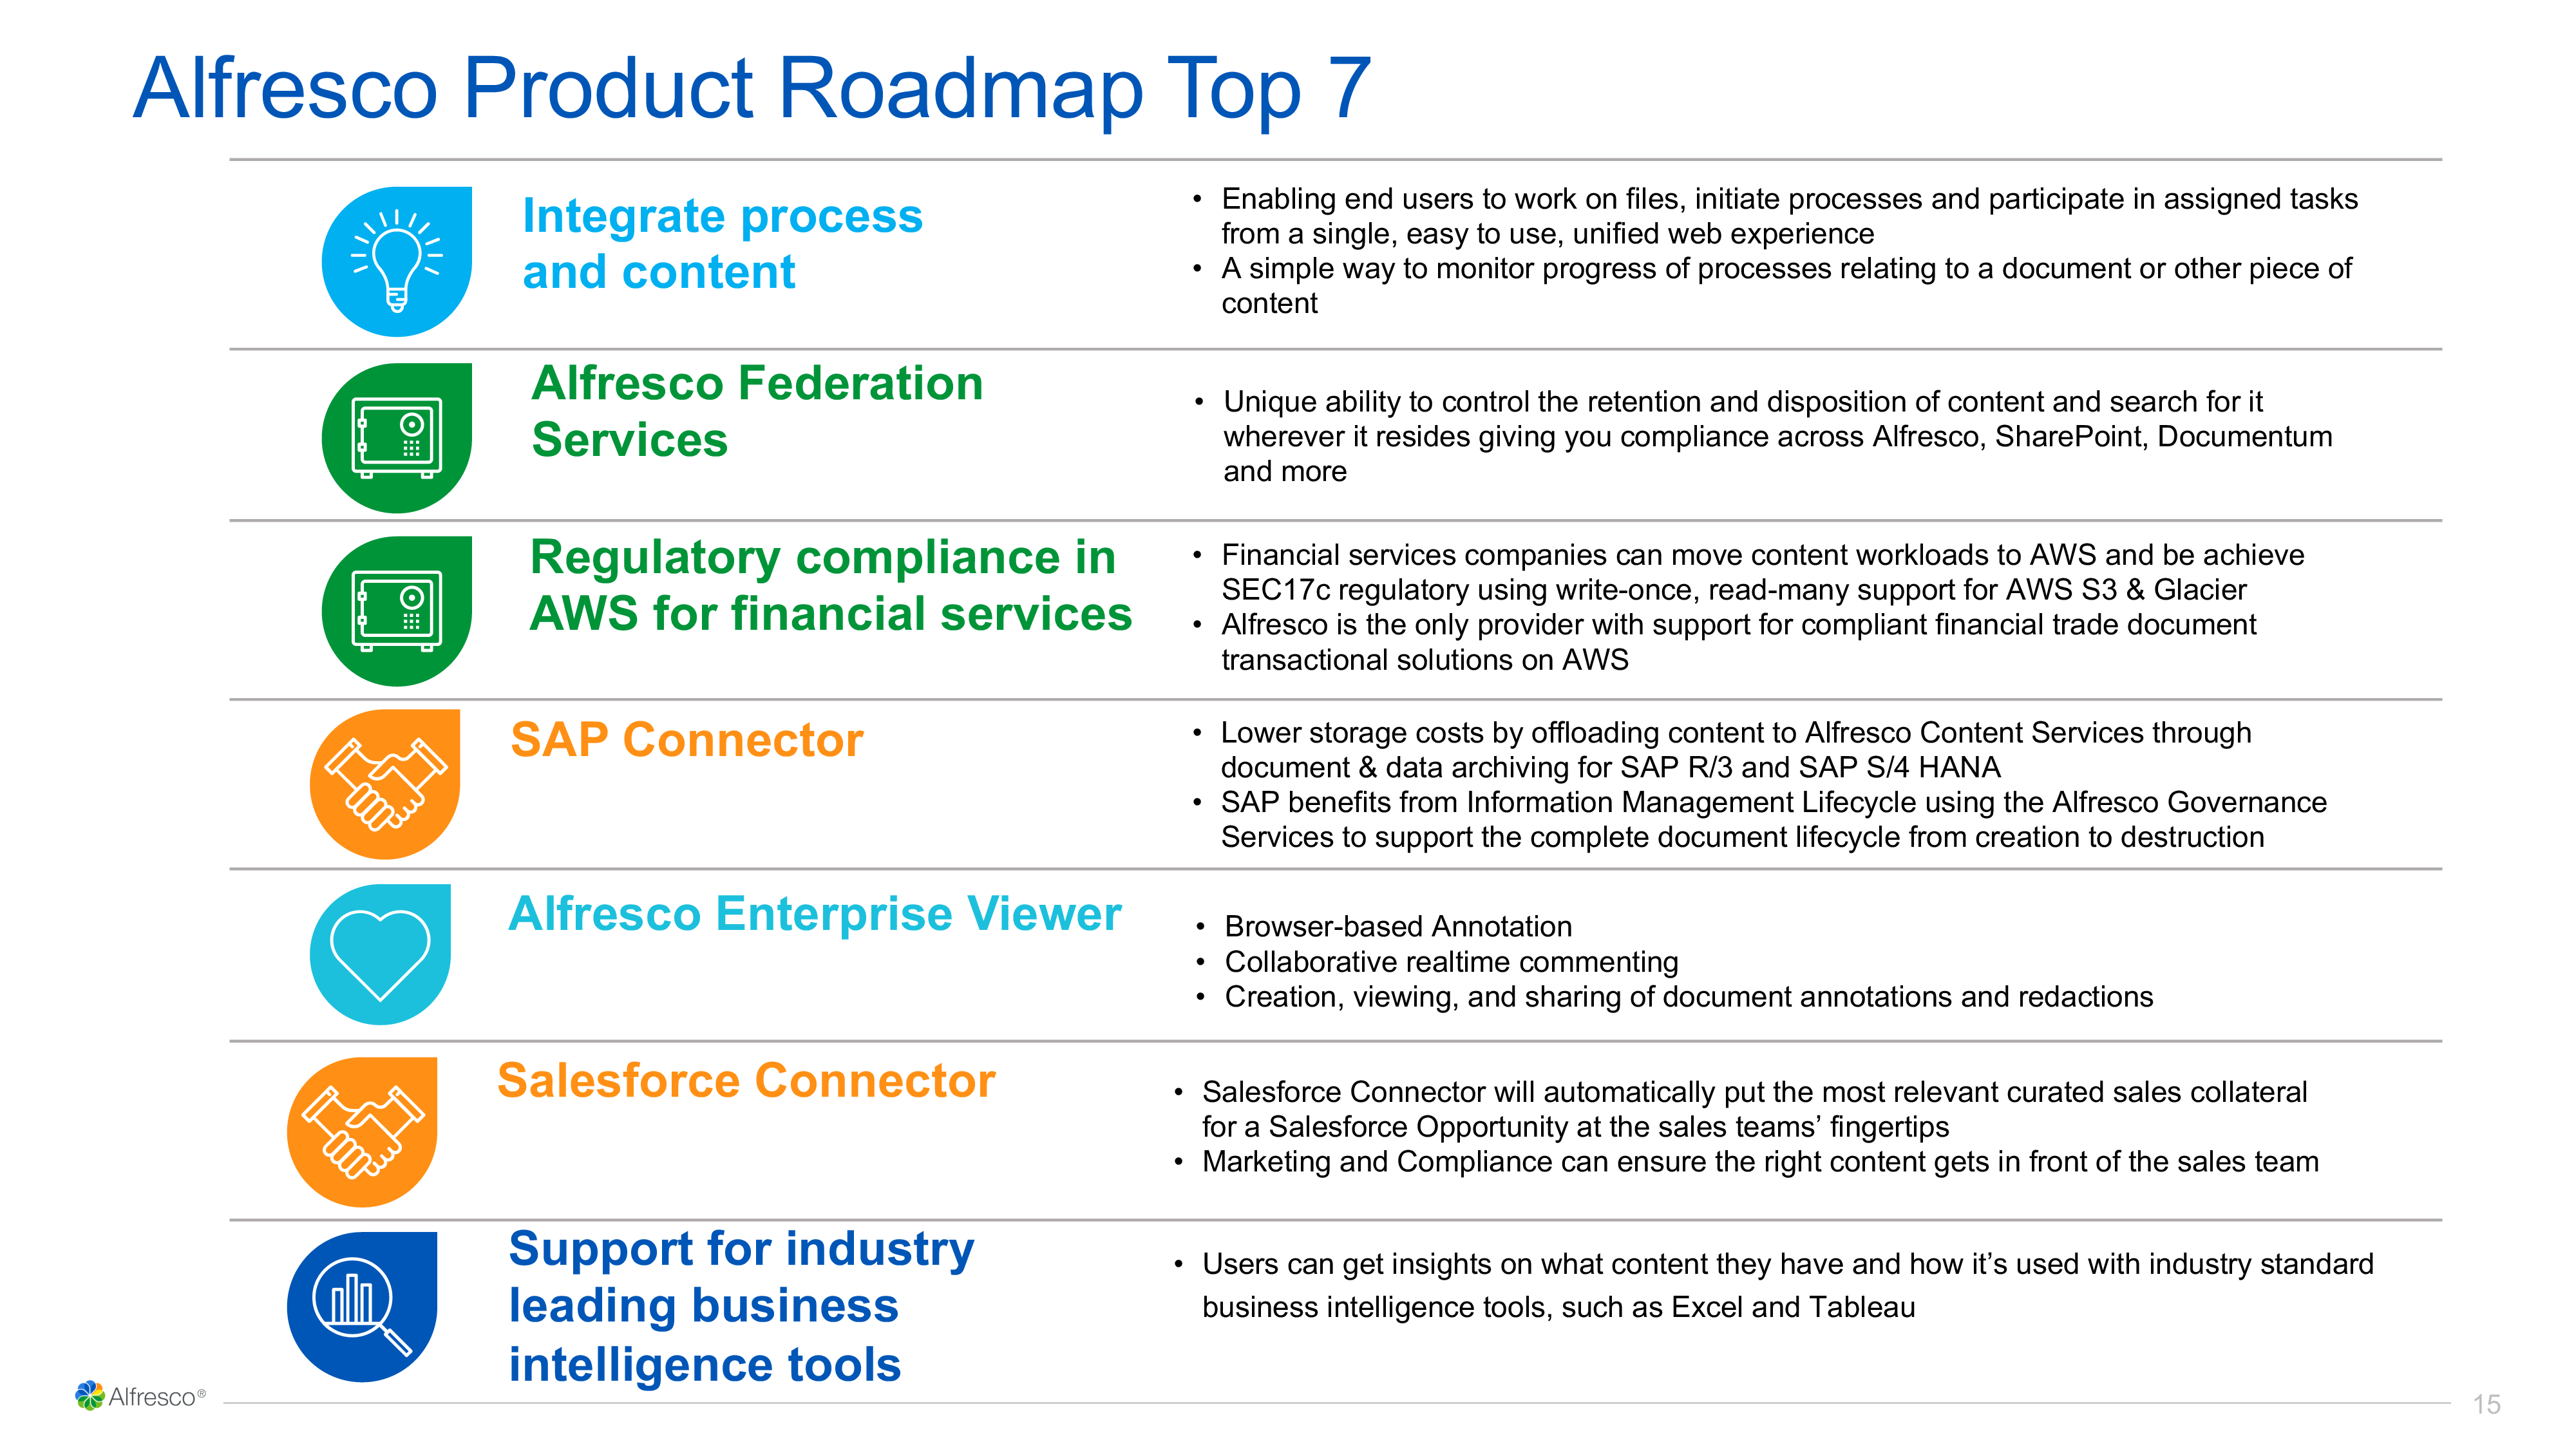
Tony Grout, Alfresco Chief Product Officer, provided a product roadmap for their digital business platform. I found the slide on content and process interesting, in that it mentioned “processes relating to a document”: it seems like they have really trimmed off any of the pure process management messaging that they had previously, although Alfresco Process Server (Activiti) is still alive and well. Part of their core value proposition is the ability to start with open source and transition to the fully-supported (and more functional) enterprise version: this is true of any commercial open source vendor, but it’s front and center with Alfresco.
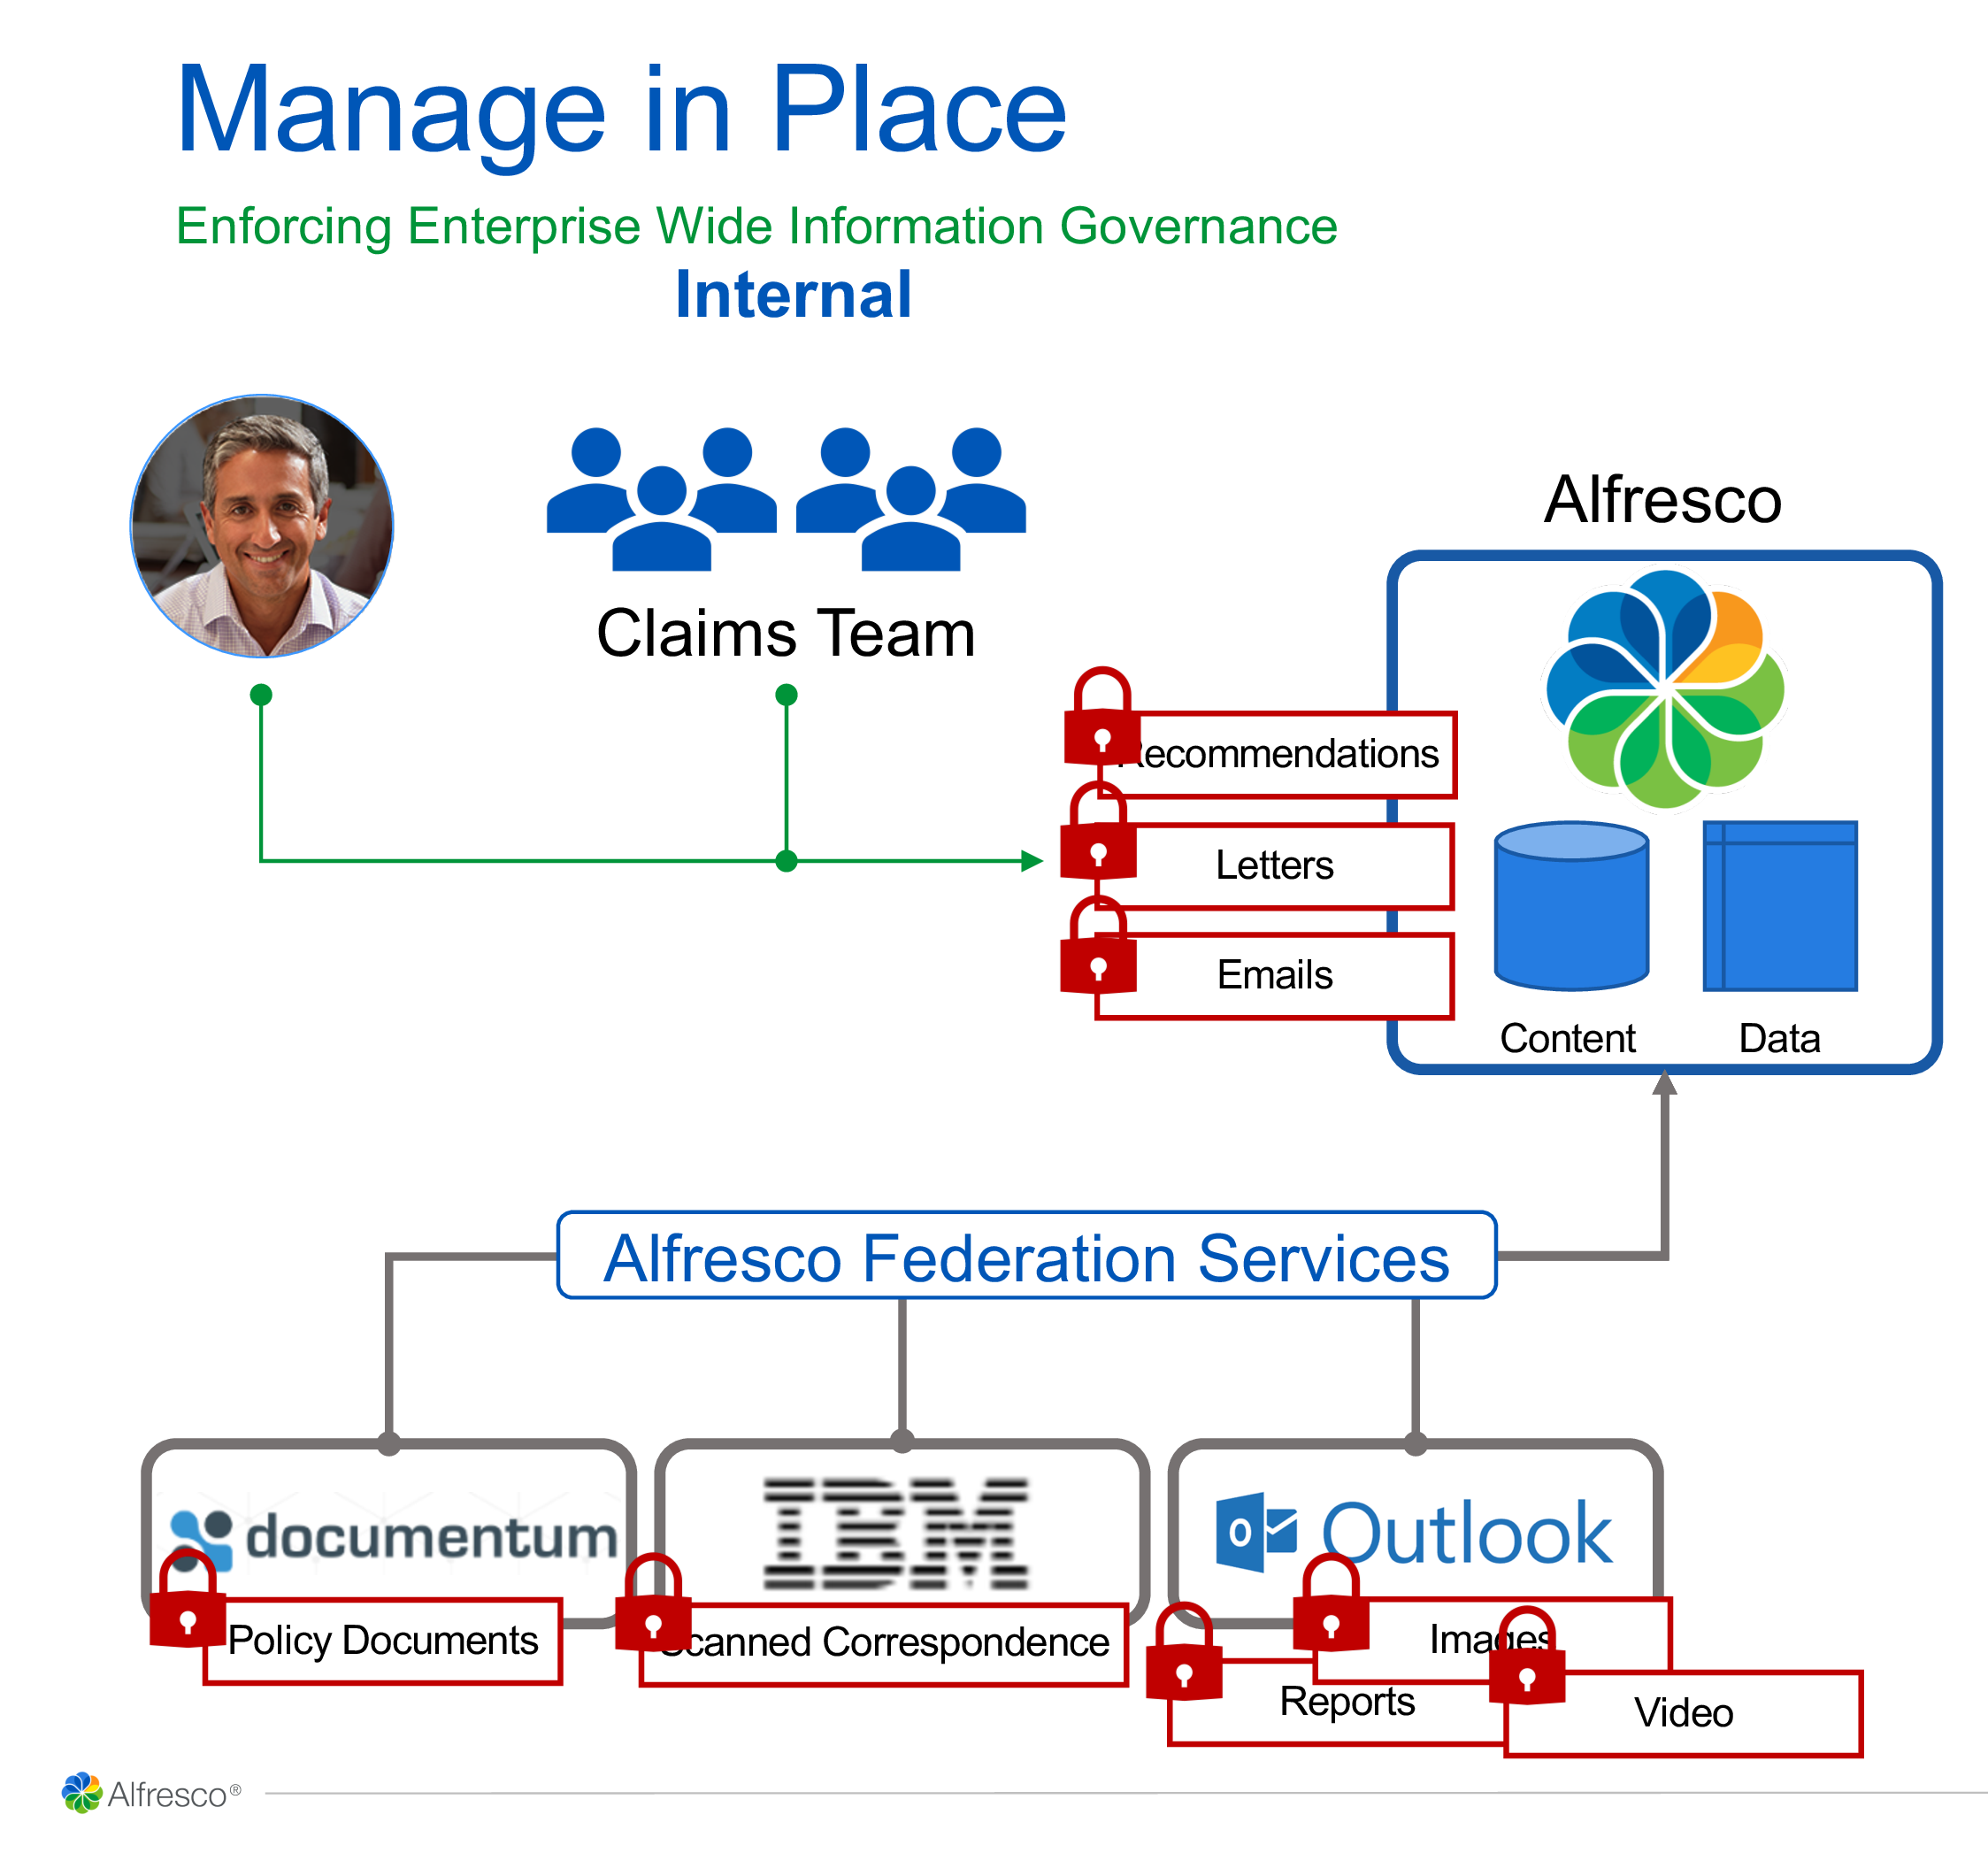
There are a number of new features on the roadmap: Federation Services (launching today) to federate different repositories, managing content in place instead of having to migrate everything to Alfresco; regulatory compliance in AWS; and the Enterprise Viewer that we saw demoed a bit later. Some of these capabilities likely came from their acquisition of Technology Services Group, a former Alfresco partner that built out a lot of value-added functionality.
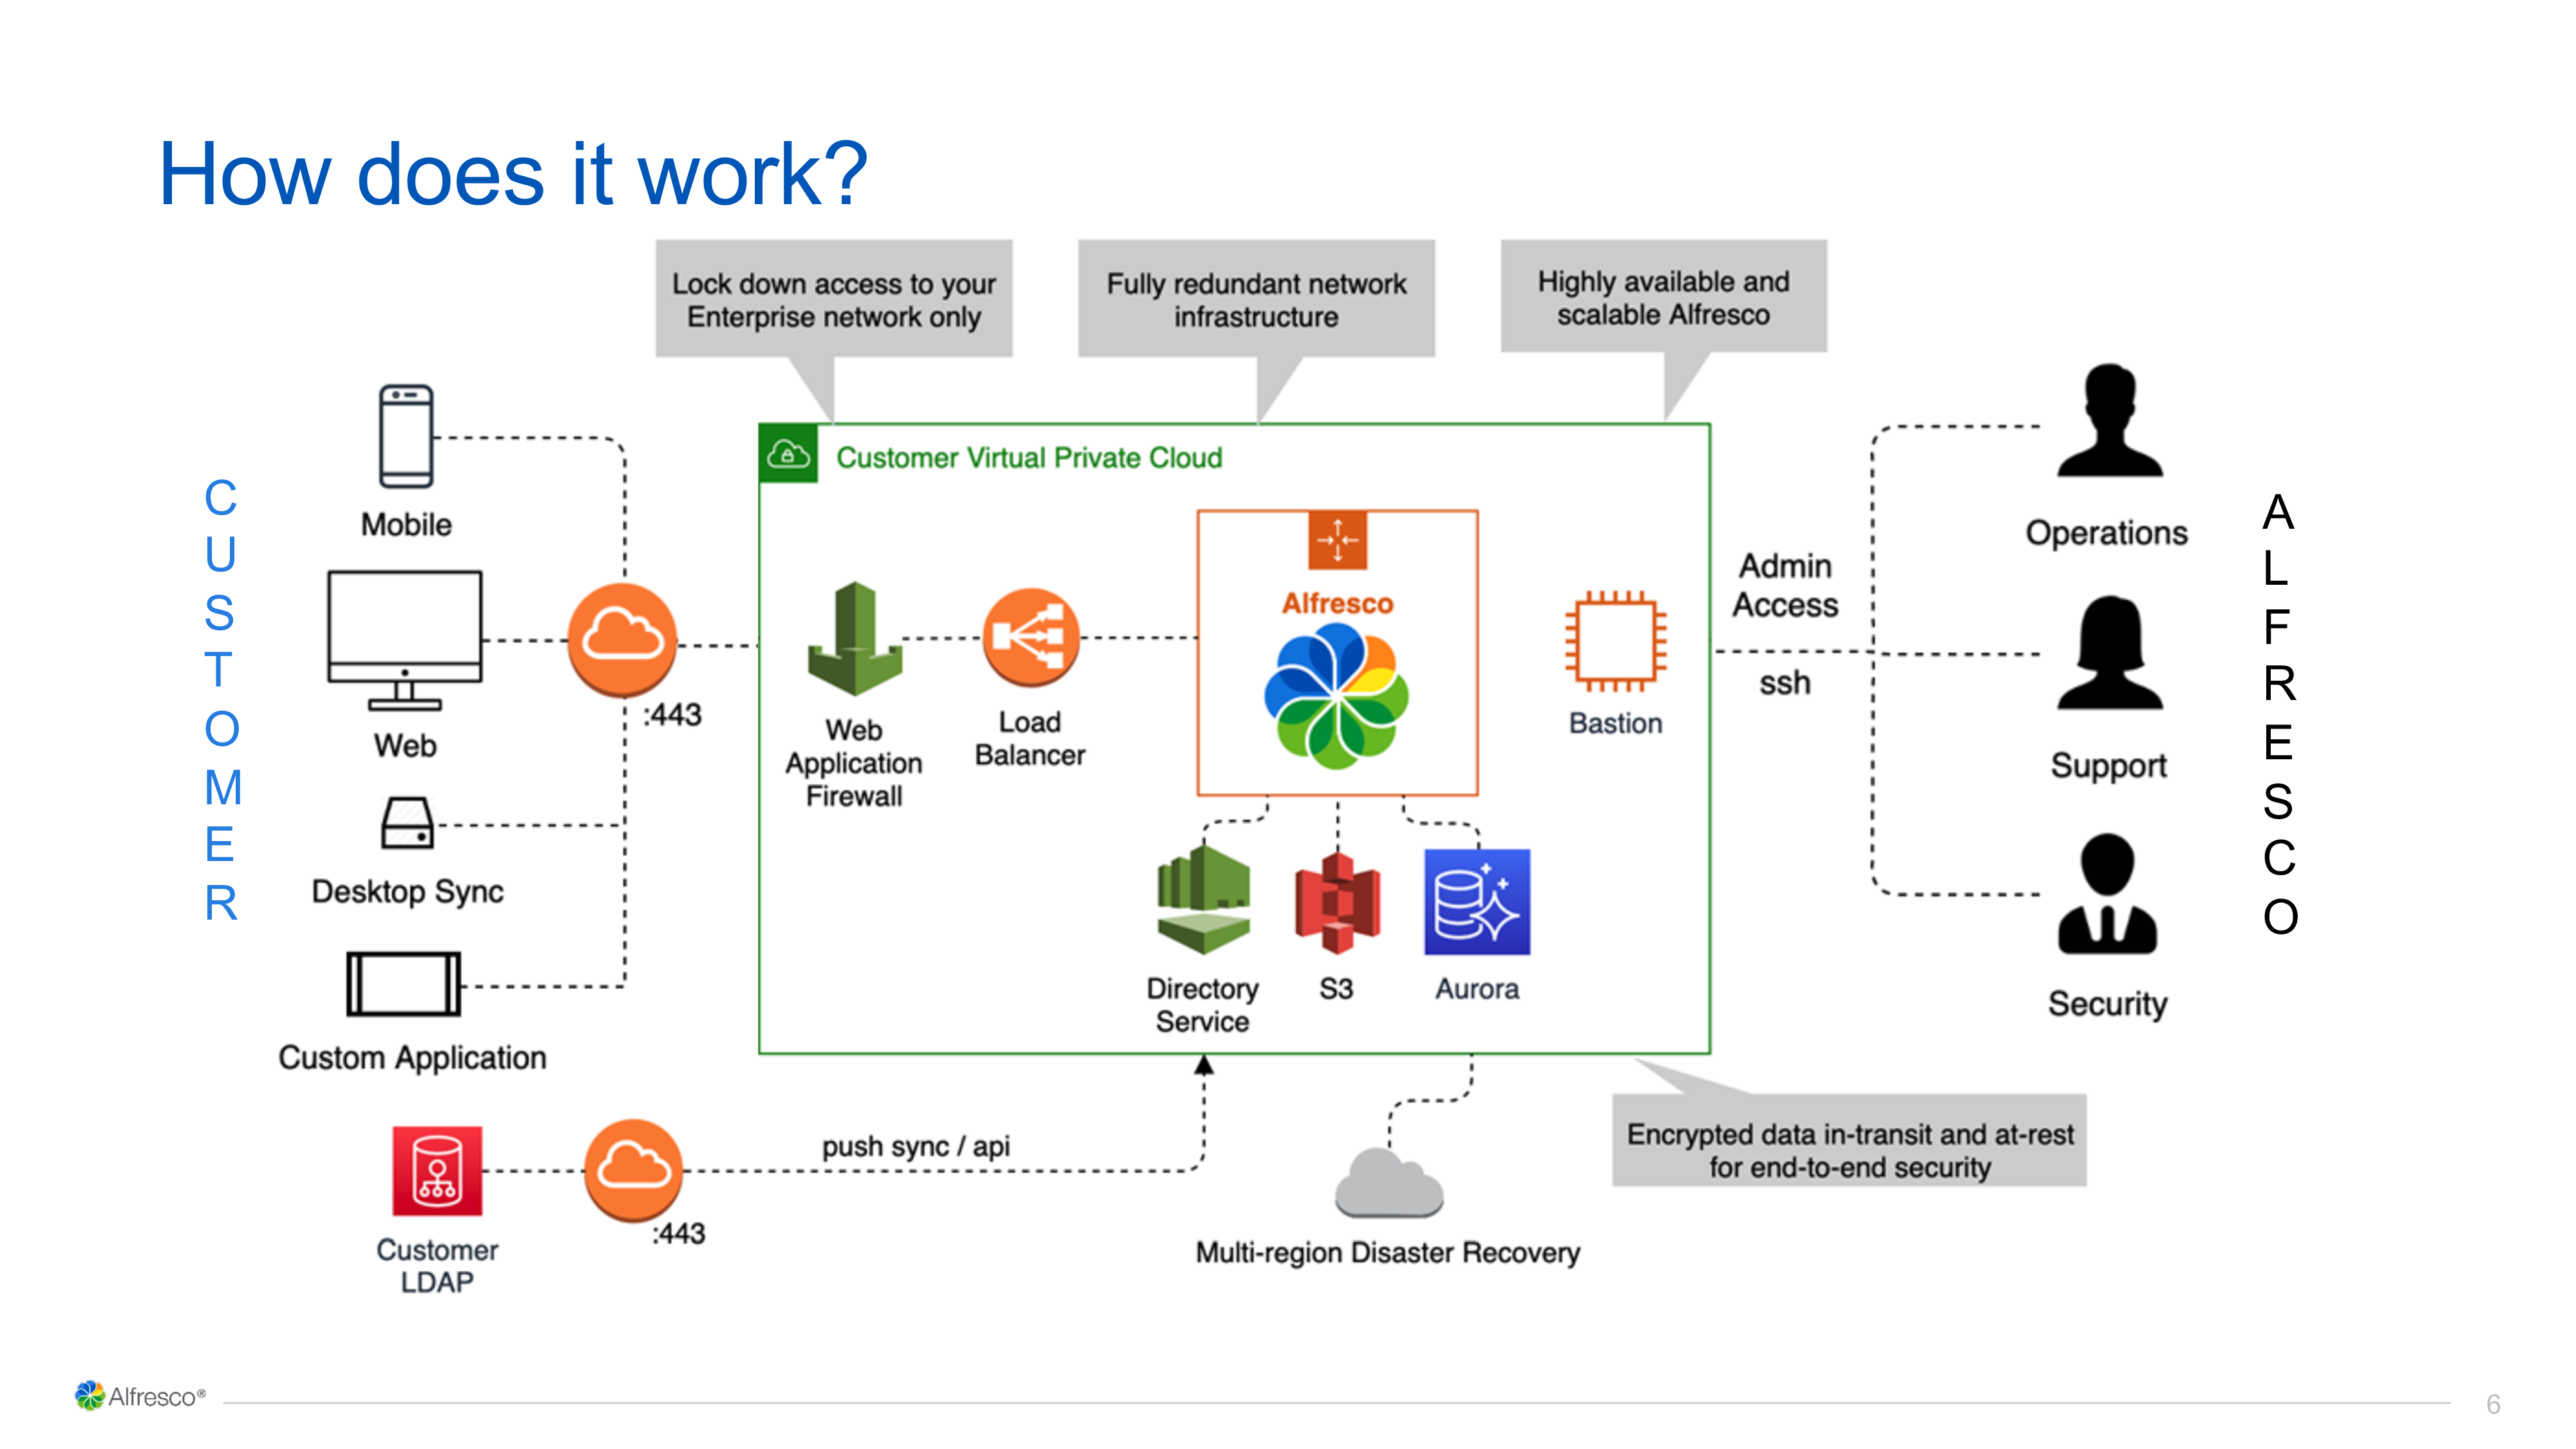
Mark Stevens, General Manager for the Alfresco Cloud, introduced how they are rolling out the Alfresco Digital Business Platform as a service, and why cloud provides such great benefits for content management: resiliency, availability, and lower costs. Their platform is cloud-native, not just a containerized version of an on-premised platform, which provides better scalability and extensibility. Removing most of the overhead from managing an ECM platform means that you have more time (and money) for more innovation and digital transformation. He walked us through their overall architecture, and what a typical implementation would look like, in terms of what’s managed by the customer and what’s managed by Alfresco. They’ve had some pretty high-profile wins over other ECM vendors, such as OpenText Documentum and IBM FileNet, with transitioned customers seeing a lot of hard benefits from Alfresco Cloud.
Last up in this short event were Paul Hampton, Senior Director of Product Marketing, and Ben Allen, Technical Architect, talking about the new Federation Services and Enterprise Viewer products that were announced earlier by Tony Grout. These are both pretty significant new capabilities: Federation Services allows all content repositories to be federated through Alfresco, so that users have a single user experience, and all of the sources can be managed directly by policies set in Alfresco. Content is managed in place rather than all migrated into Alfresco, although in some cases this will likely be a first step on the way to a migration.
We saw a demo of the Enterprise Viewer, which has a lot of interesting capabilities for both internal and external participants. It’s fast to browse and load large document sets, and to individual large documents since they’re caching across the network by page. Documents can be redacted for external participants, for example, removing personal information from an insurance claim when sending to an external party for a repair quote. Video can be annotated to add comments at specific points to highlight certain things in the video, with the ability to jump directly to the point of the comment. Annotations are collaborative, so that a user can reply to an existing annotation.
I didn’t stick around for the live Q&A since I wanted to get back to CelosphereLive for a session starting at the same time. Alfresco Modernize didn’t have much of a “live” feel to it: the sessions were all pre-recorded which, as I’ve mentioned in my coverage of other online conferences, just doesn’t have the same feel. Also, without a full attendee discussion capability, this was more like a broadcast of multiple webinars than an interactive event, with a short Q&A session at the end as the only point of interaction. To their credit, each speaker was in their own home, practicing social distancing; although I liked the Celonis studio environment, I did feel that it’s a bit too early to have people in the same location for an event, no matter how controlled.
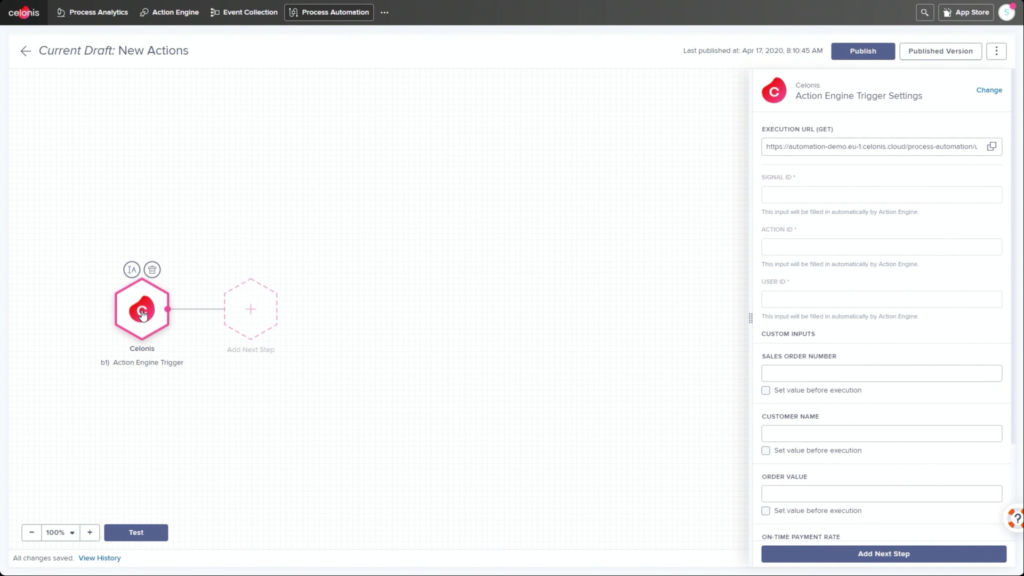
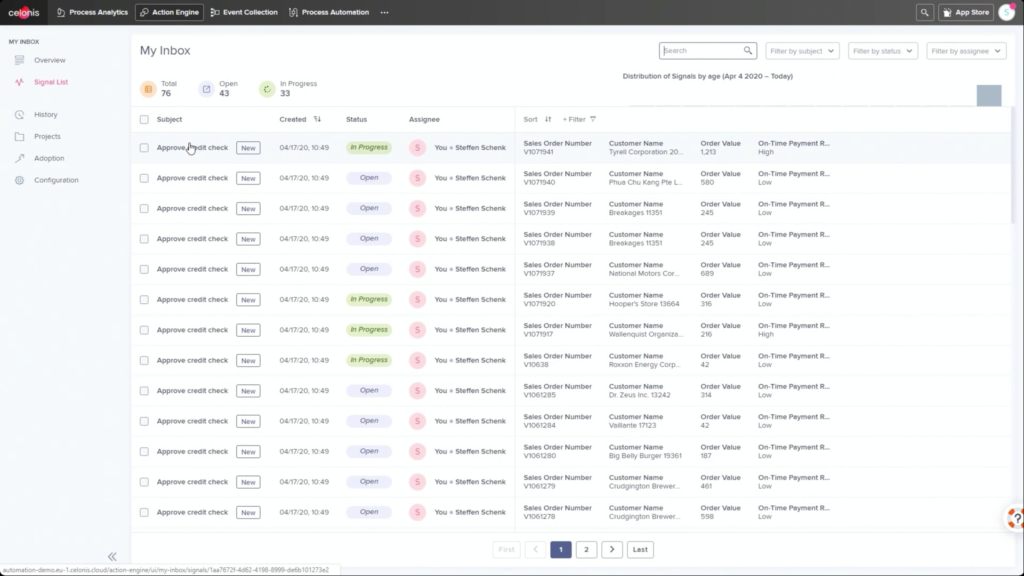
I started my day early to see Dr.Steffen Schenk, Celonis Head of Product Management, talk about the Celonis Action Engine and process automation. In short, they are seeing that because they integrate directly with core systems (especially ERP systems, that have their own processes built in), they can do things that RPA and BPM systems can’t do: namely, data-driven sense and act capabilities. However, these processes are only as timely as the data connection from the core systems into Celonis, so there can be latency.
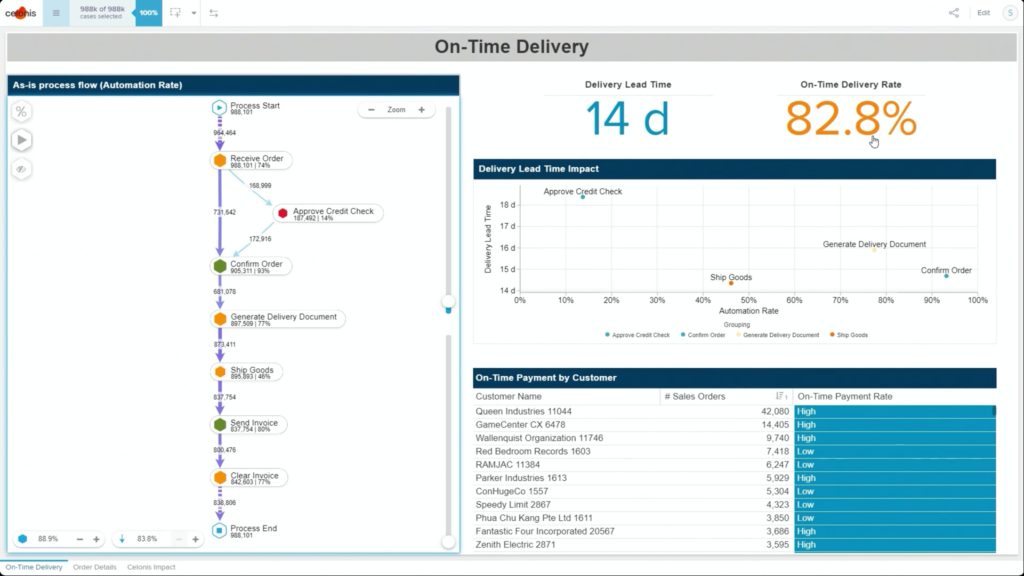
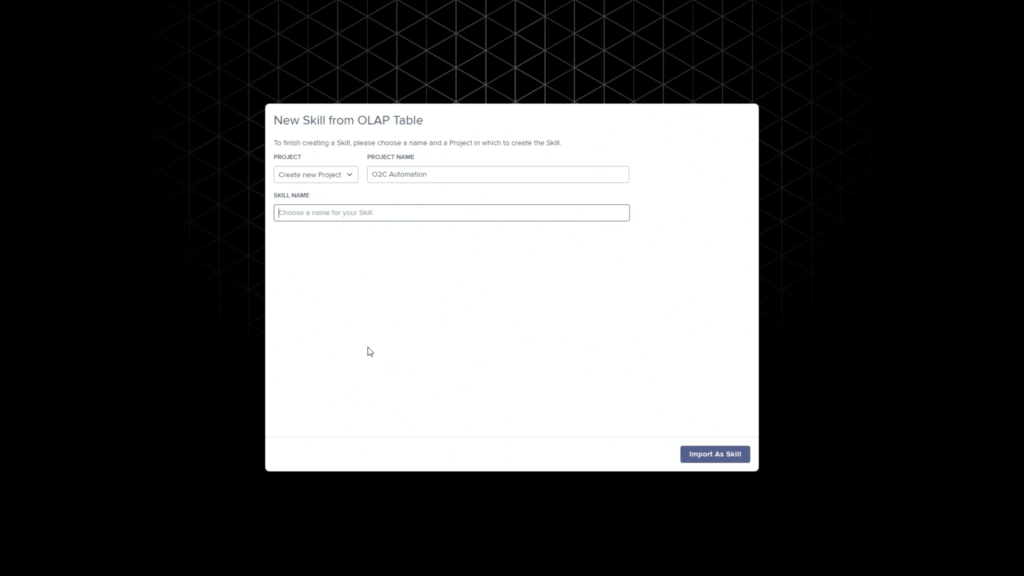
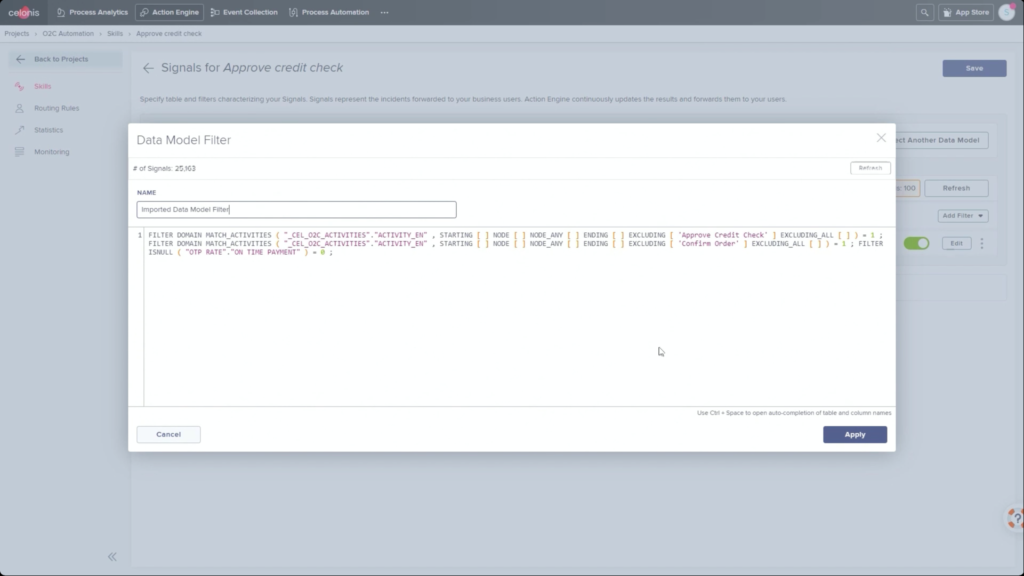
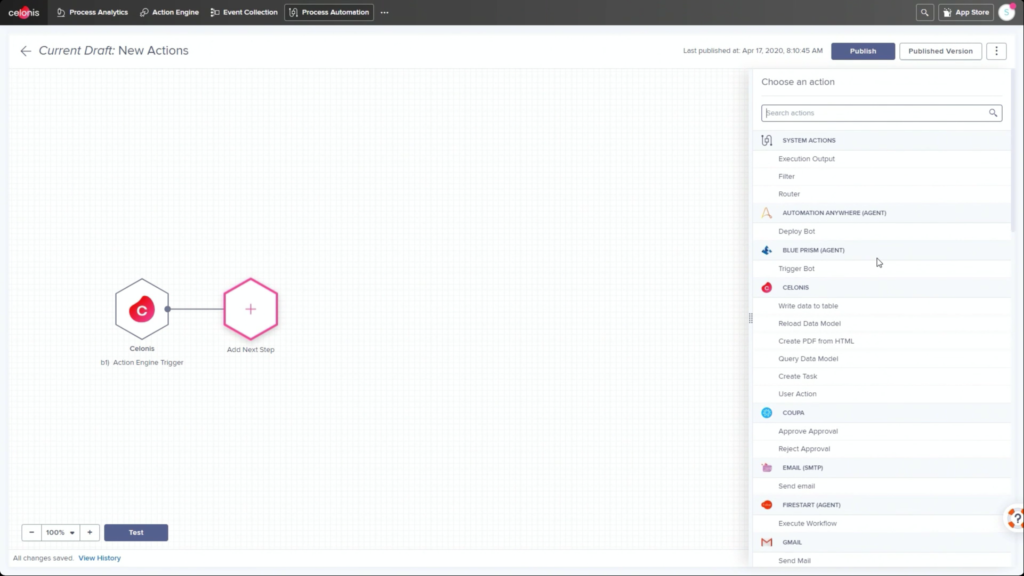
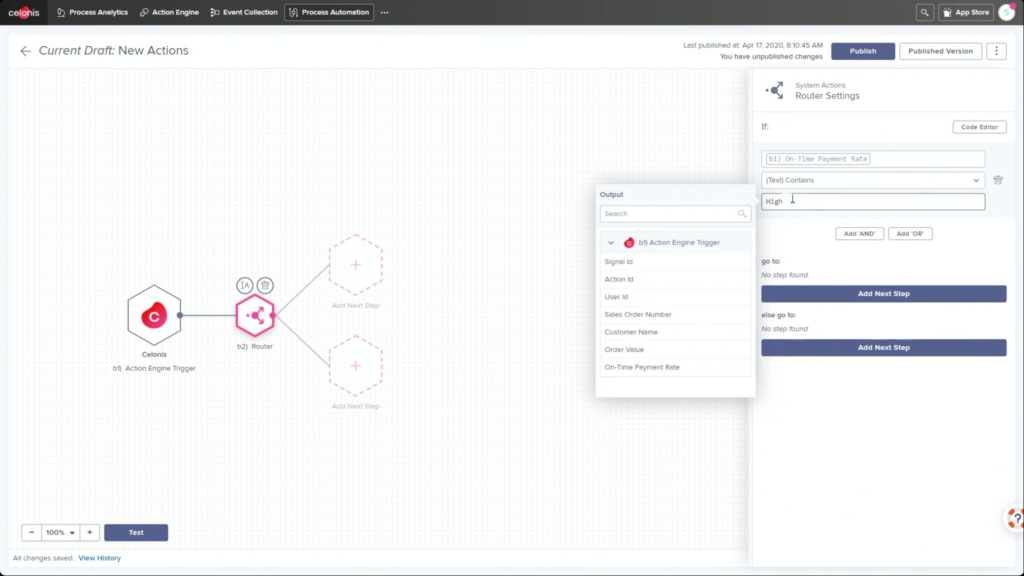
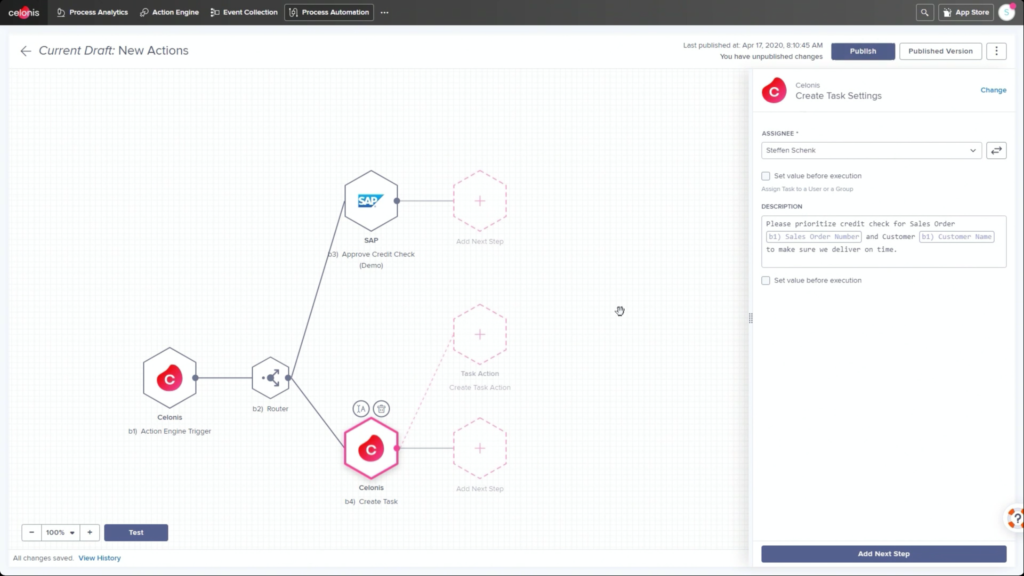
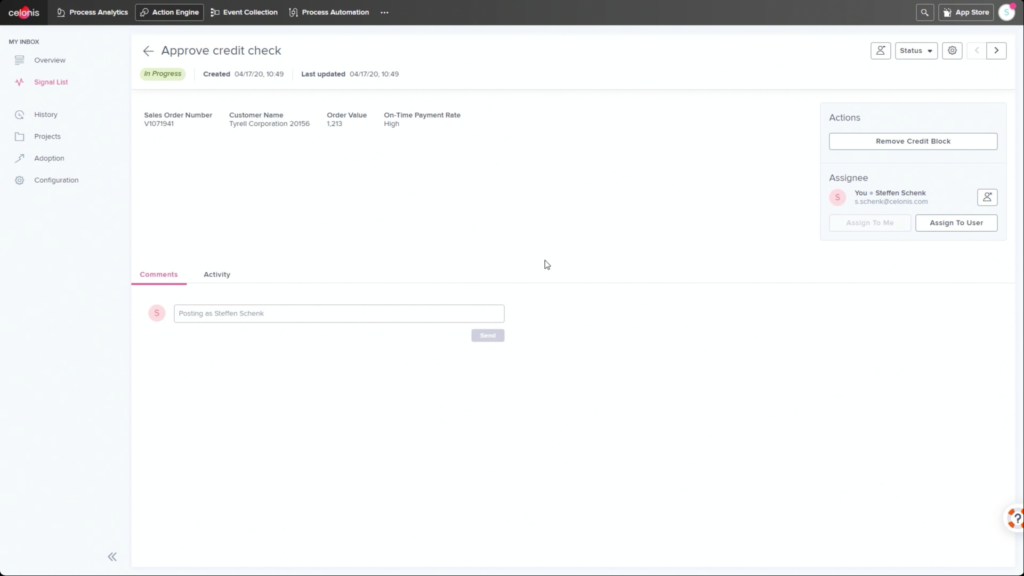
He walked through an example of an order management process where he filtered SAP order data to show those with on-time delivery problems, due to order approval or credit check required, and created a query to detect those conditions in the future. Then, he created a process automation made up of system connectors that would be triggered based on a signal from that query in the future. In addition to system connectors (including webhooks), the automation can also directly call Celonis actions that might prompts a user to take an action. The automation can do branching based on data values: in his example, a customer credit block was automatically removed if they have a history of on-time payment, and that data was pushed back to SAP. That, in turn, would cause SAP to move the invoice along: it’s effectively a collaborative process automation between SAP and Celonis. The non-automated path sends a task to an order manager to approve or deny the credit, which in turn will trigger other automated actions. This process automation is now a “Skill” in Celonis, and can be set to execute for all future SAP order data that flows through Celonis.
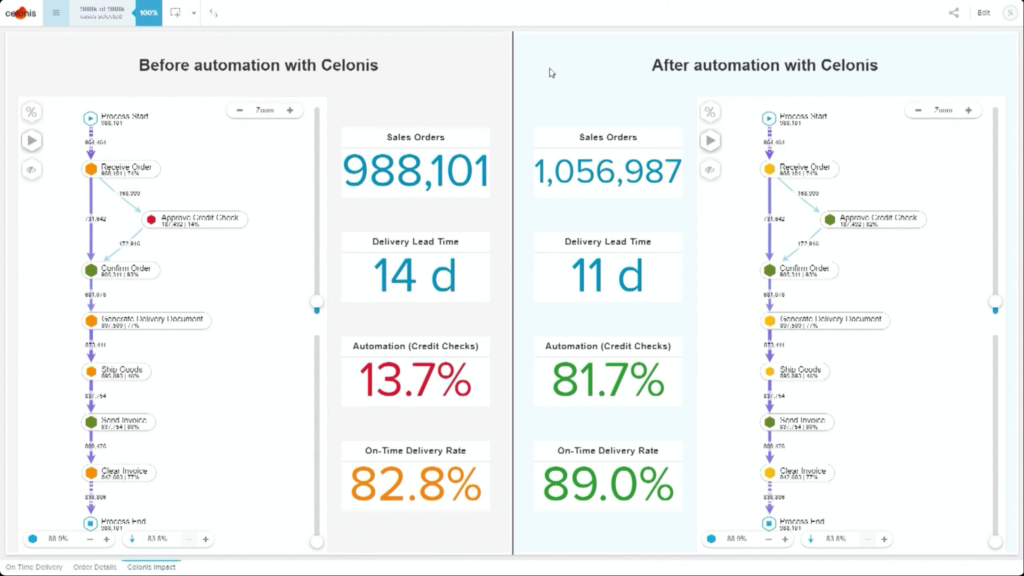
Once this automation has been set up, the before and after processes can be compared: we see a higher degree of automation that has led to improving the on-time delivery KPI without increasing risk. It’s data-driven, so that only customers that continue to have an on-time payment record will be automatically approved for credit on a specific order. This is an interesting approach to automation that provides more comprehensive task automation than RPA, and a better fit than BPM when processes primarily exist in a line-of-business or legacy system. If you have an end-to-end process to orchestrate and need a comprehensive model, then BPM may be a better choice, but there’s a lot of interesting applications for the Celonis model of automating the parts of an existing process that the core system would have “delegated” to human action. I can definitely see applications for this in insurance claims, where most of the claim process lives in a third-party claims management system, but there are many decisions and ancillary processes that need to happen around that system.
This level of automation can be set up by a trained Celonis analyst: if you’re already creating analysis and dashboards, then you have the level of skill required to create these automations. This is also available both for cloud and on-premise deployments. There was an interesting discussion in the Q&A about credentials for updating the connected systems: this could be done with the credentials of the person who approves a task to execute (attended automation) or with generic system credentials for fully-automated tasks.
This was a really fascinating talk and a vision of the future for this type of process automation, where the core process lives within an off-the-shelf or legacy system, and there’s a need to do additional automation (or recommendations) of supporting decisions and actions. Very glad that I got up early for the 7:15am start.
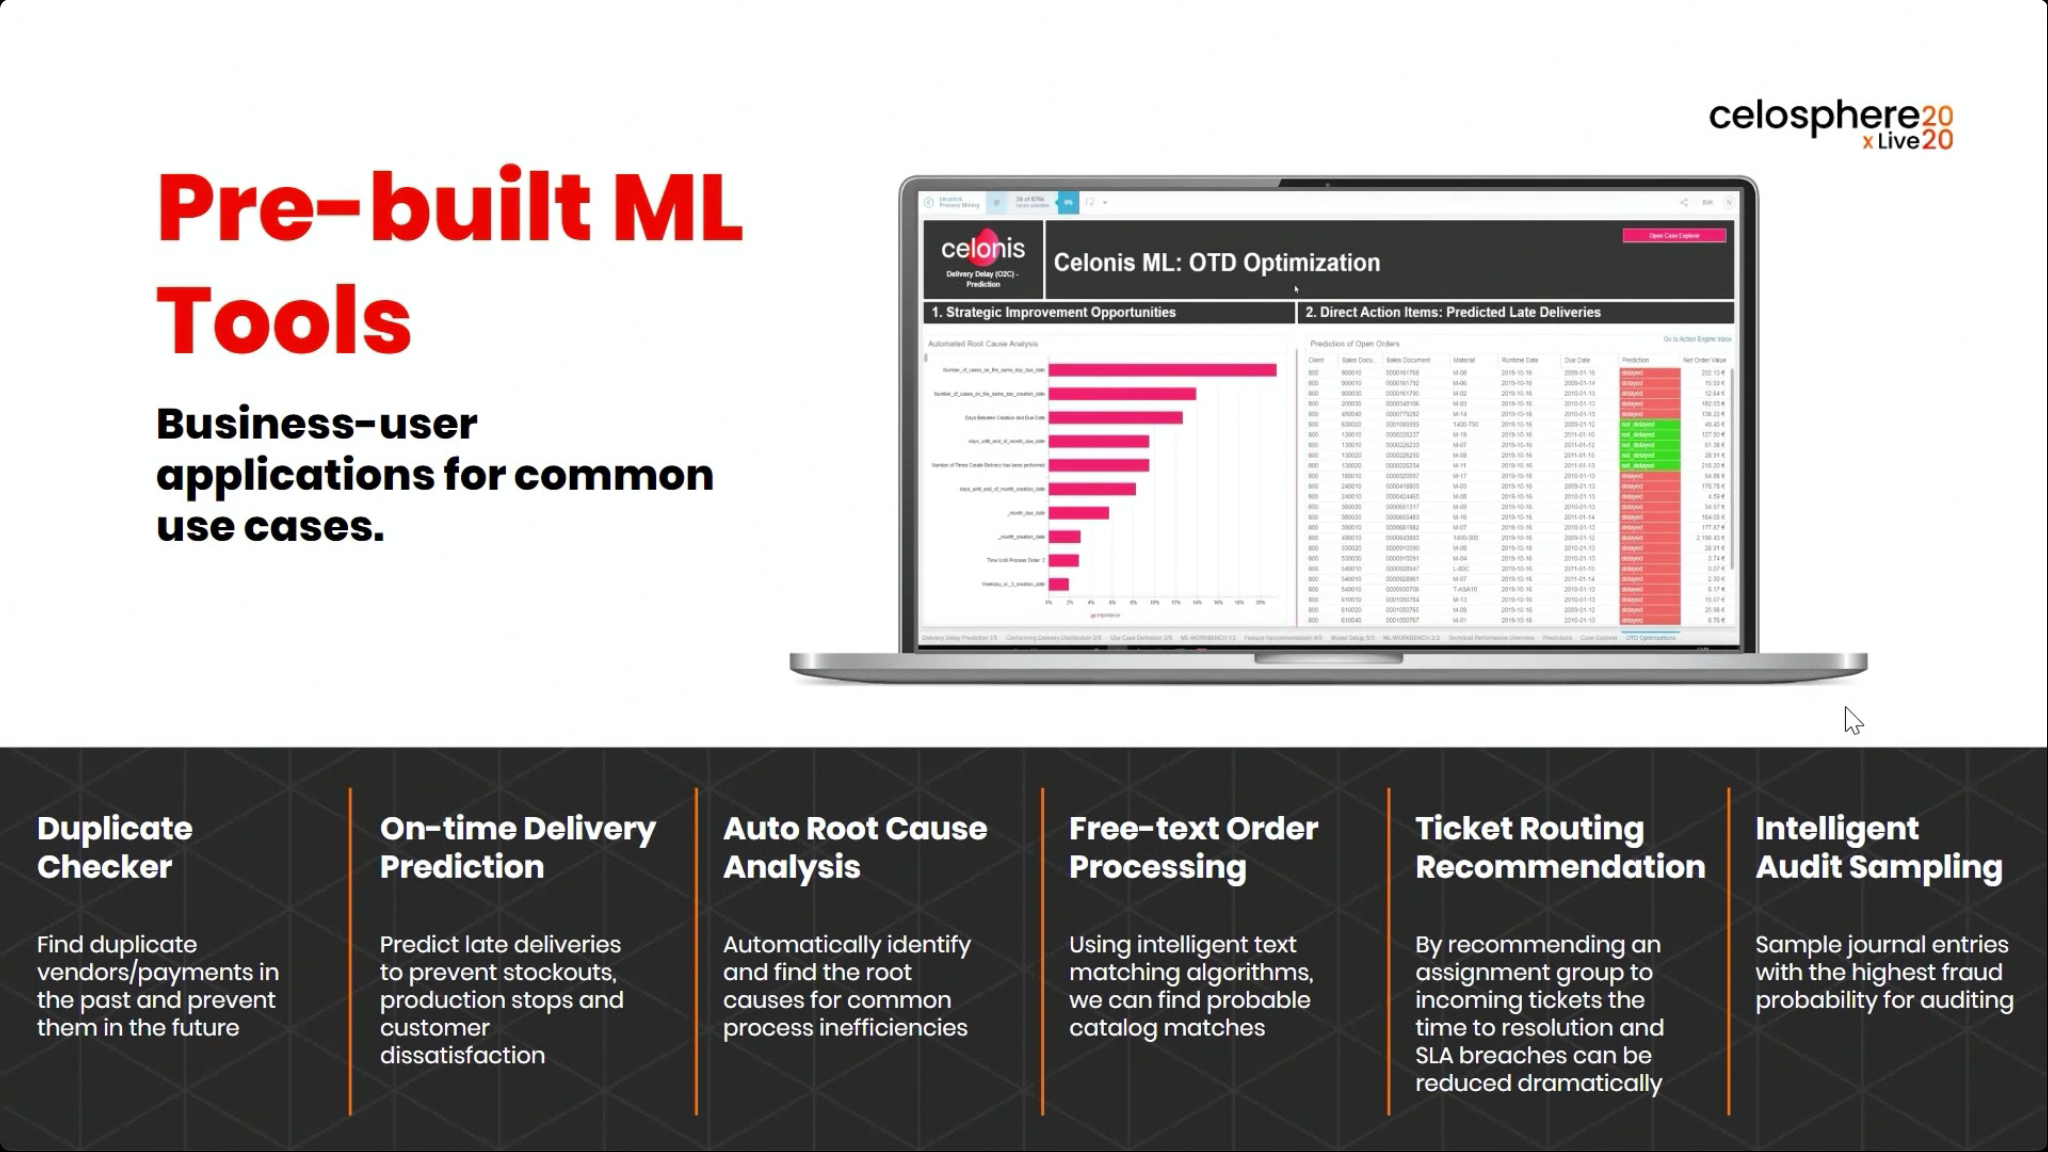
I listened in on the following talk on machine learning and intelligent automation by Nicolas Ilmberger, Celonis Senior Product Manager of Platform and Technology, where he showed some of their pre-built ML tools such as duplicate checkers (for duplicate invoices, for example), root cause analysis and intelligent audit sampling. These are used to detect specific scenarios in the data that is flowing into Celonis, then either raising an action to a user, or automating an action in the background. They have a number of pre-configured connectors and filters, for example, to find a duplicate vendor invoice in an SAP system; these will usually need some customization since many organizations have modified their SAP systems.
He showed a demonstration of using some of these tools, and also discussed a case study of a manufacturing customer that had significant cost savings due to duplicate invoice checking: their ERP system only found exact matches, but slight differences in spelling or other typographical errors could result in true duplicates that needed more intelligent comparison. A second case study was for on-time delivery by an automotive supplier, where customer orders at risk were detected and signals sent to customer service with recommendations for the agent for resolution.
It’s important to note that both for these ML tools and the process automation that we saw in the previous session, these are only as timely as the data connection from the core processing system to Celonis: if you’re only doing daily data feeds from SAP to Celonis, for example, that’s how often these decisions and automations will be triggered. For orders of physical goods that may take several days to fulfill, this is not a problem, but this is not a truly real-time process due to that latency. If an order has already moved on to the next stage in SAP before Celonis can act, for example, there will need to be checks to ensure that any updates pushed back to SAP will not negatively impact the order status.
There was a studio discussion following with Hala Zeine and Sebastian Walter. Zeine said that customers are saying “we’re done with discovery, what’s next?”, and have the desire to leverage machine learning and automation for day-to-day operations. This drove home the point that Celonis is repositioning from being an analysis tool to an operational tool, which gives them a much broader potential in terms of number of users and applications. Procure-to-pay and order-to-cash processes are a focus for them, and every mid-sized and large enterprise has problems with these processes.
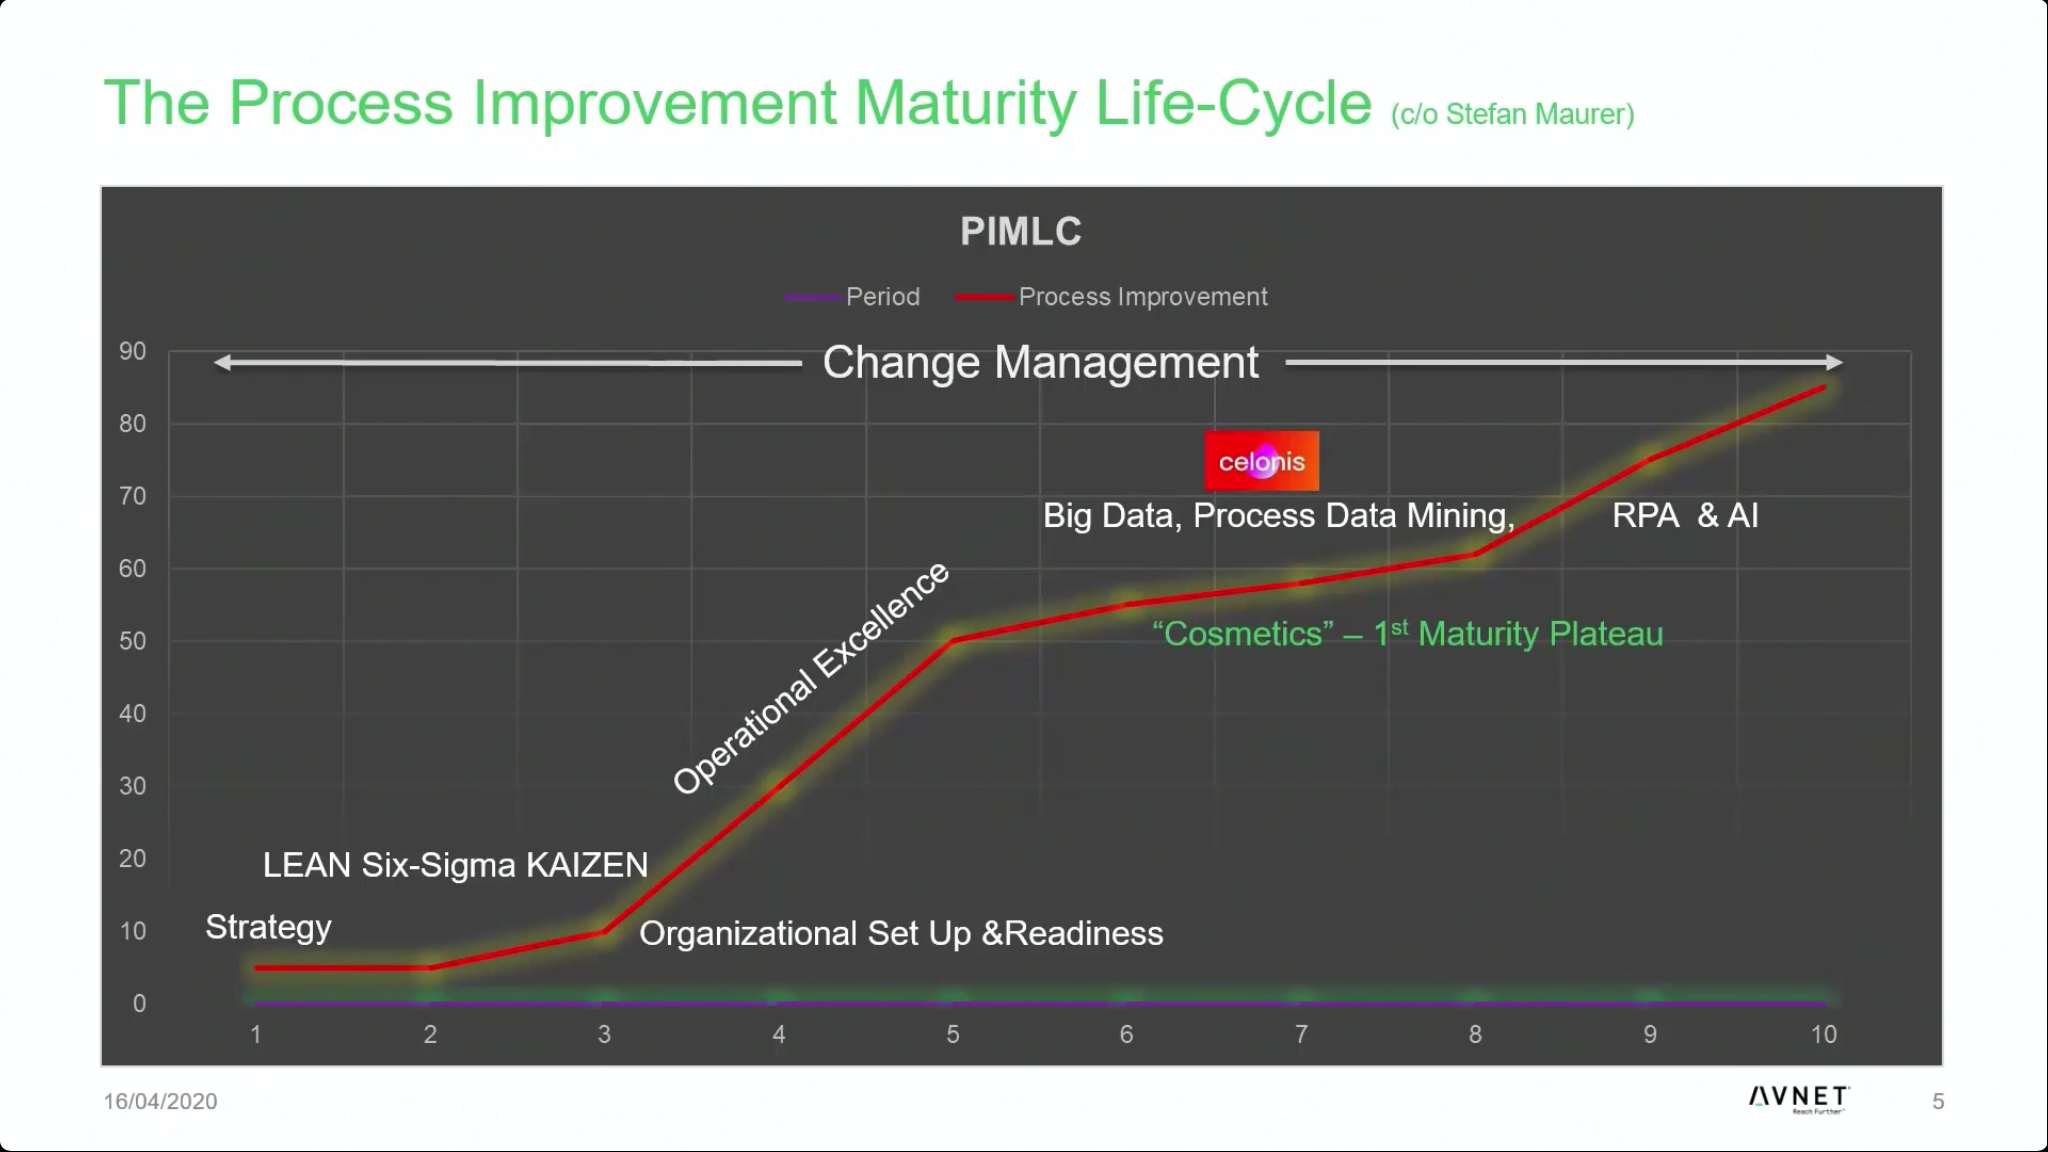
The next session was with Stefan Maurer, Vice President of Enterprise Effectiveness for AVNET, a distributor of electronic components. He spoke about how they are using Celonis in their procure-to-pay process to react to supplier delivery date changes due to the impact of COVID-19 on global supply chains. He started with a number of good points on organizational readiness and how to take on process mining and transformation projects. He walked us through their process improvement maturity lifecycle, showing what they achieved with fundamental efforts such as LEAN Six Sigma, then where they started adding Celonis to the mix to boost the maturity level. He said that they could have benefited from adding Celonis a bit earlier in their journey, but feels that people need a basic understanding of process improvement before adding new tools and methodologies. In response to an audience question later, he clarified that this could be done earlier in an organization that is ready for process improvement, but the results of process mining could be overwhelming if you’re not already in that mindset.
Their enterprise effectiveness efforts focus on the activities of a different team members in a cycle of success that get the business ideas and needs through analysis stages and into implementation within tools and procedures. At several points in that cycle, Celonis is used for process mining but not automation; they are using Kofax and UIPath for RPA as their general task automation strategy.
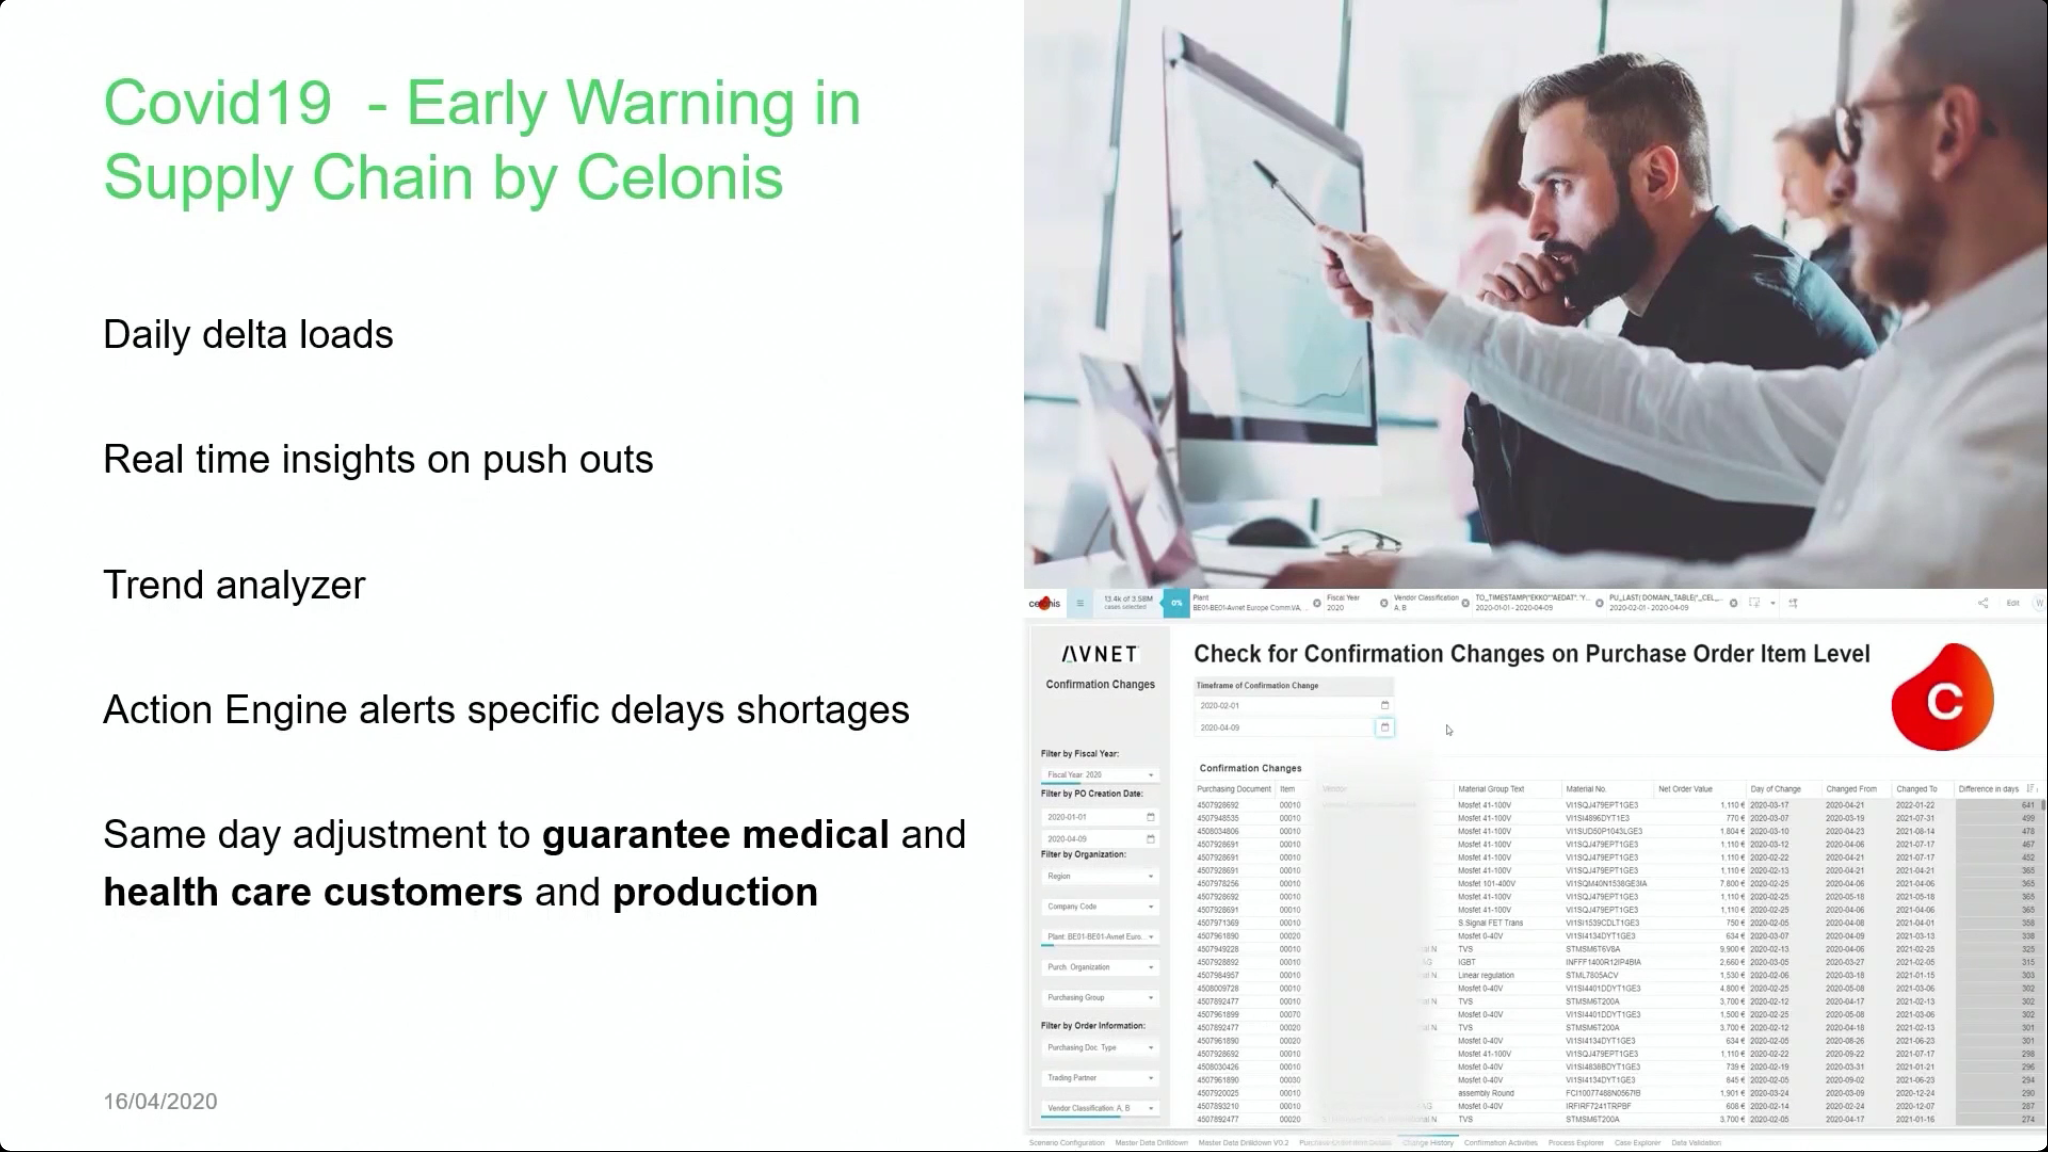
Maurer showed a case study for early supplier deliveries: although early deliveries might seem like a good thing, if you don’t have an immediate use for the goods and the supplier invoices on delivery, this can have a working capital impact. They used Celonis to investigate details of the deliveries to determine the impact, and identify the target suppliers to work with on resolving the discrepancies. They also use Celonis to monitor procure-to-pay process effectiveness, using a throughput time KPI based over time windows a year apart: in this case, they are using the analytical capabilities to show the impact of their overall process improvement efforts. By studying the process variants, they can see what factors are impacting their effectiveness. They are starting to use the Celonis Action Engine for some delivery alerts, and hope to use more Celonis alerts and recommendations in the future.
Almost accidentally, Celonis also provided an early warning to the changes in the supply chain due to COVID-19. Using the same type of data set as they used for their early delivery analysis, they were able to find which suppliers and materials had a significant delay to their expected deliveries. They could then prioritize the needs of their medical and healthcare customers, manually interfering in their system logic to shift their supply chain to guarantee those customers while delaying others. He thinks that additional insights into materials acquisition supply chains will help them through the crisis.
I’m taking a break from Celosphere to attend the online Alfresco Modernize event, but I plan to return for a couple of the afternoon sessions.
I’m back for the Celonis online conference, CelosphereLive, for a second day. They started much earlier since they using a European time zone, but I started in time to catch the Q&A portion of Ritu Nibber’s presentation (VP of Global Process and Controls at Reckitt Benckiser) and may go back to watch the rest of it since there were a lot of interesting questions that came up.
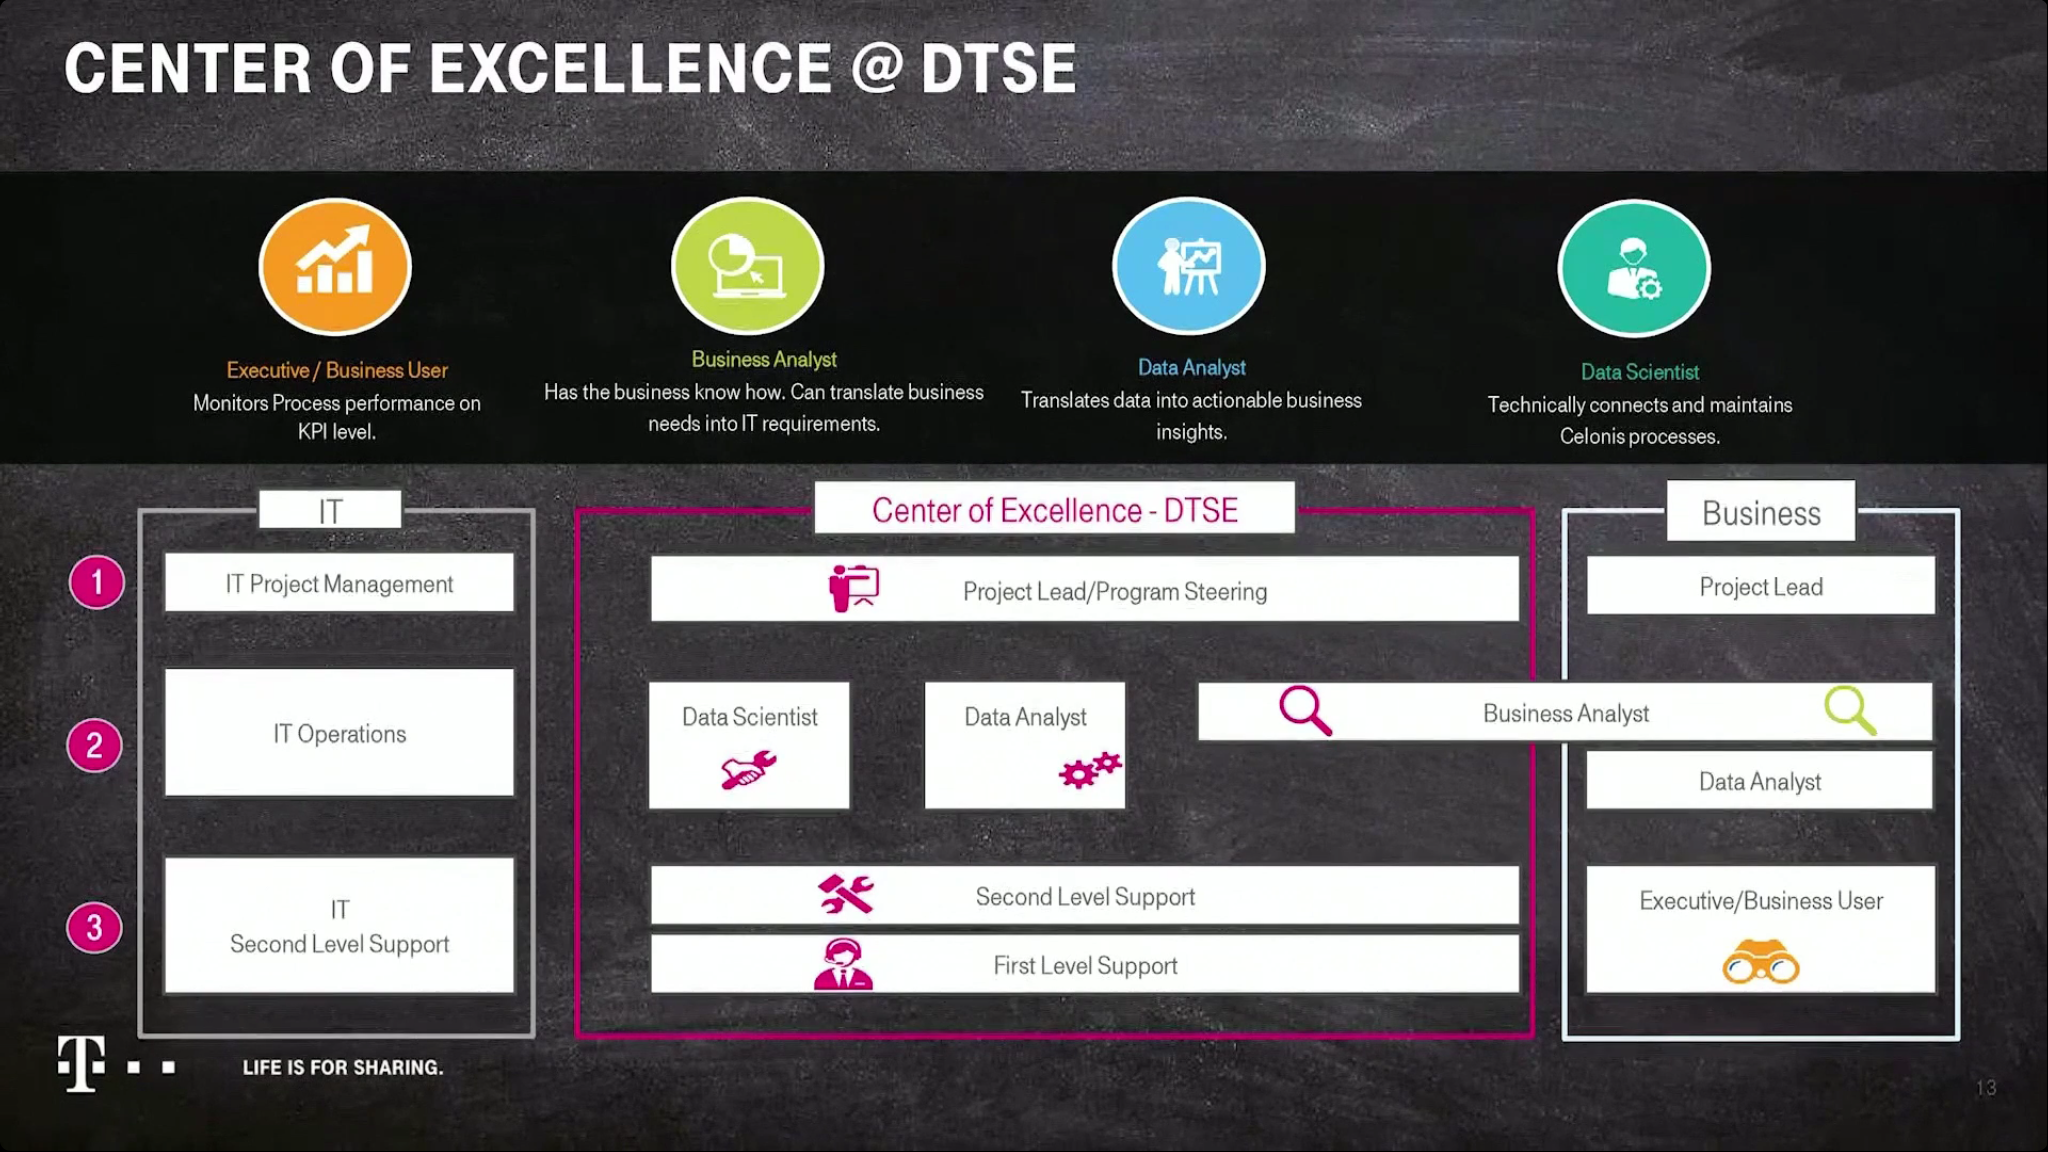
There was a 15-minute session back in their studio with Celonis co-CEO Bastian Nominacher and VP of Professional Services Sebastian Walter, then on to a presentation by Peter Tasev, SVP of Procure to Pay at Deutsche Telekom Services Europe. DTSE is a shared services organization providing process and service automation across many of their regional organizations, and they are now using Celonis to provide three key capabilities to their “process bionics”:
Monitor the end-to-end operation and efficiency of their large, heterogeneous processes such as procure-to-pay. They went through the process of identifying the end-to-end KPIs to include into an operational monitoring view, then use the dashboard and reports to support data-driven decisions.
Use of process mining to “x-ray” their actual processes, allowing for process discovery, conformance checking and process enhancement.
Track real-time breaches of rules in the process, and alert the appropriate people or trigger automated activities.
Interesting to see their architecture and roadmap, but also how they have structured their center of excellence with business analysts being the key “translator” between business needs and the data analysts/scientists, crossing the boundary between the business areas and the CoE.
He went through their financial savings, which were significant, and also mentioned the ability of process mining to identify activities that were not necessary or could be automated, thereby freeing up the workforce to do more value-added activities such as negotiating prices. Definitely worth watch the replay of this presentation to understand the journey from process mining to real-time operational monitoring and alerting.
It’s clear that Celonis is repositioning from just process mining — a tool for a small number of business analysts in an organization — into operational process intelligence that would be a daily dashboard tool for a much large portion of the workforce. Many other process mining products are attempting an equivalent pivot, although Celonis seems to be a bit farther along than most.
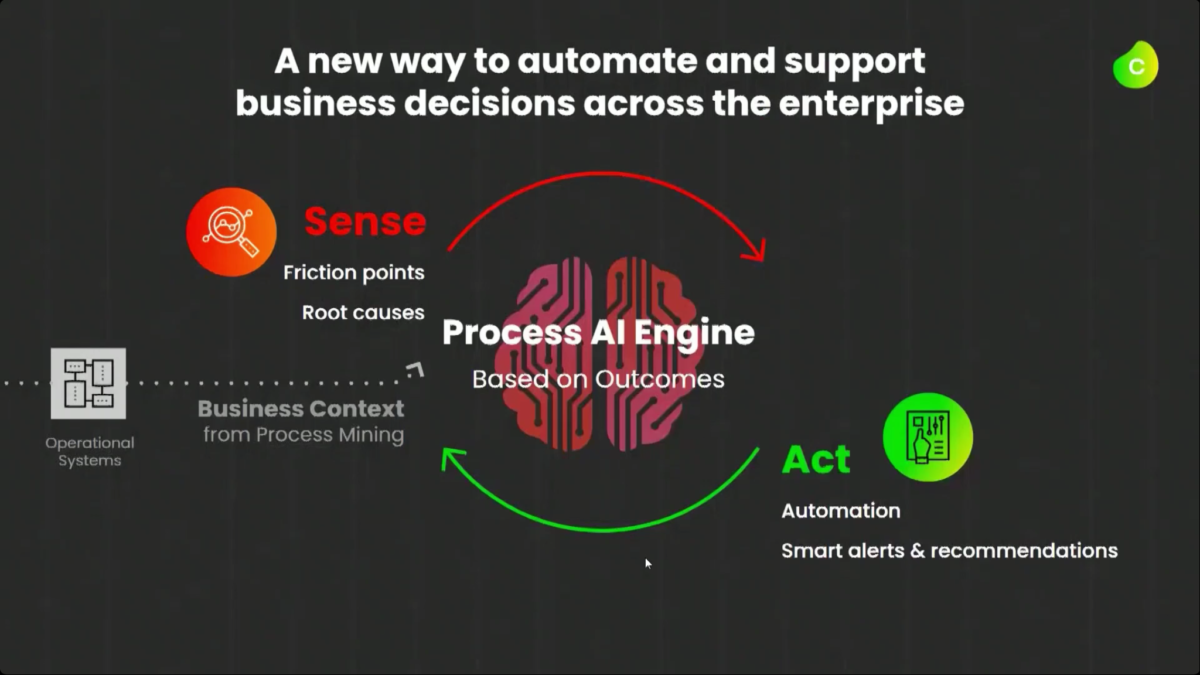
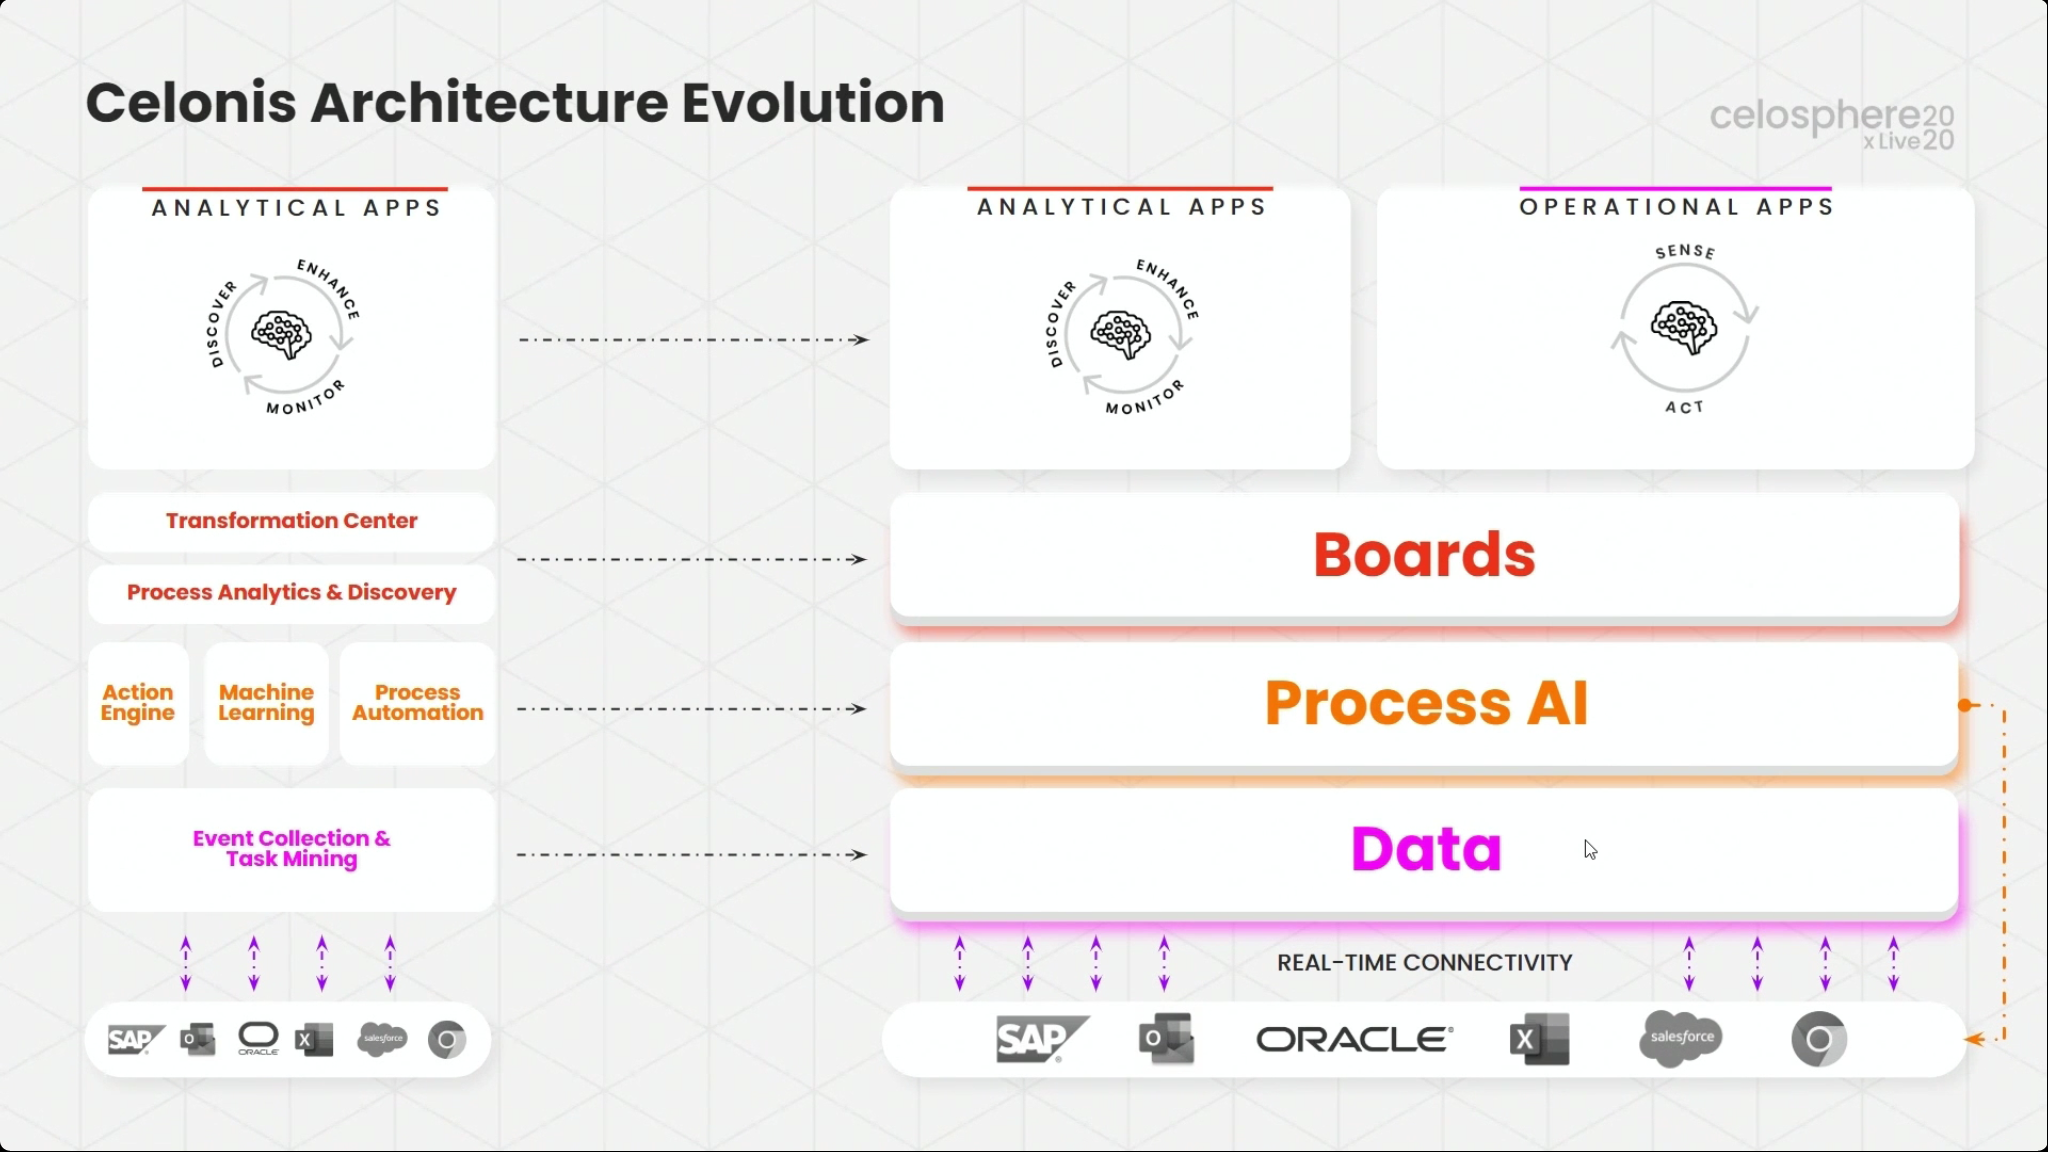
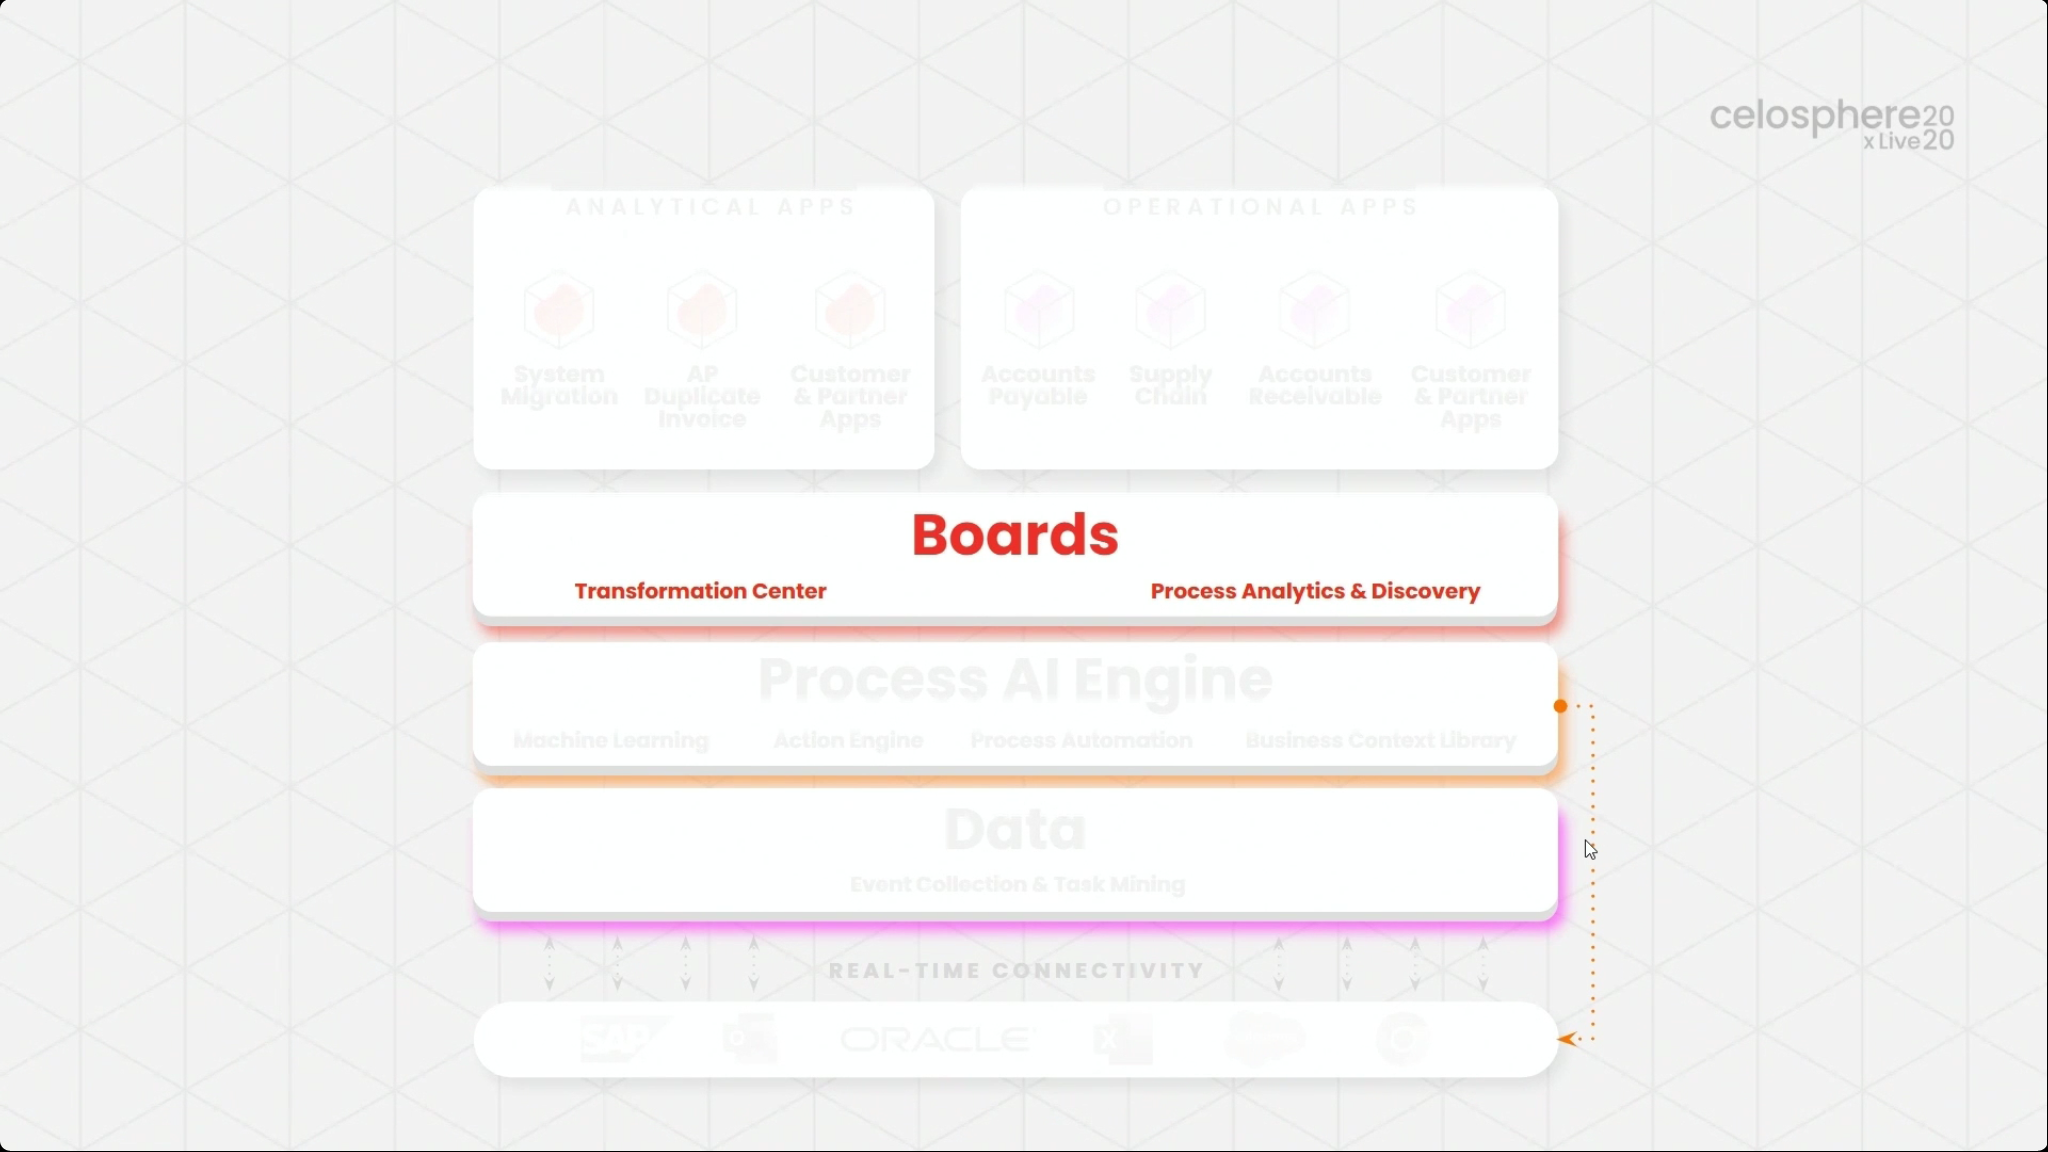
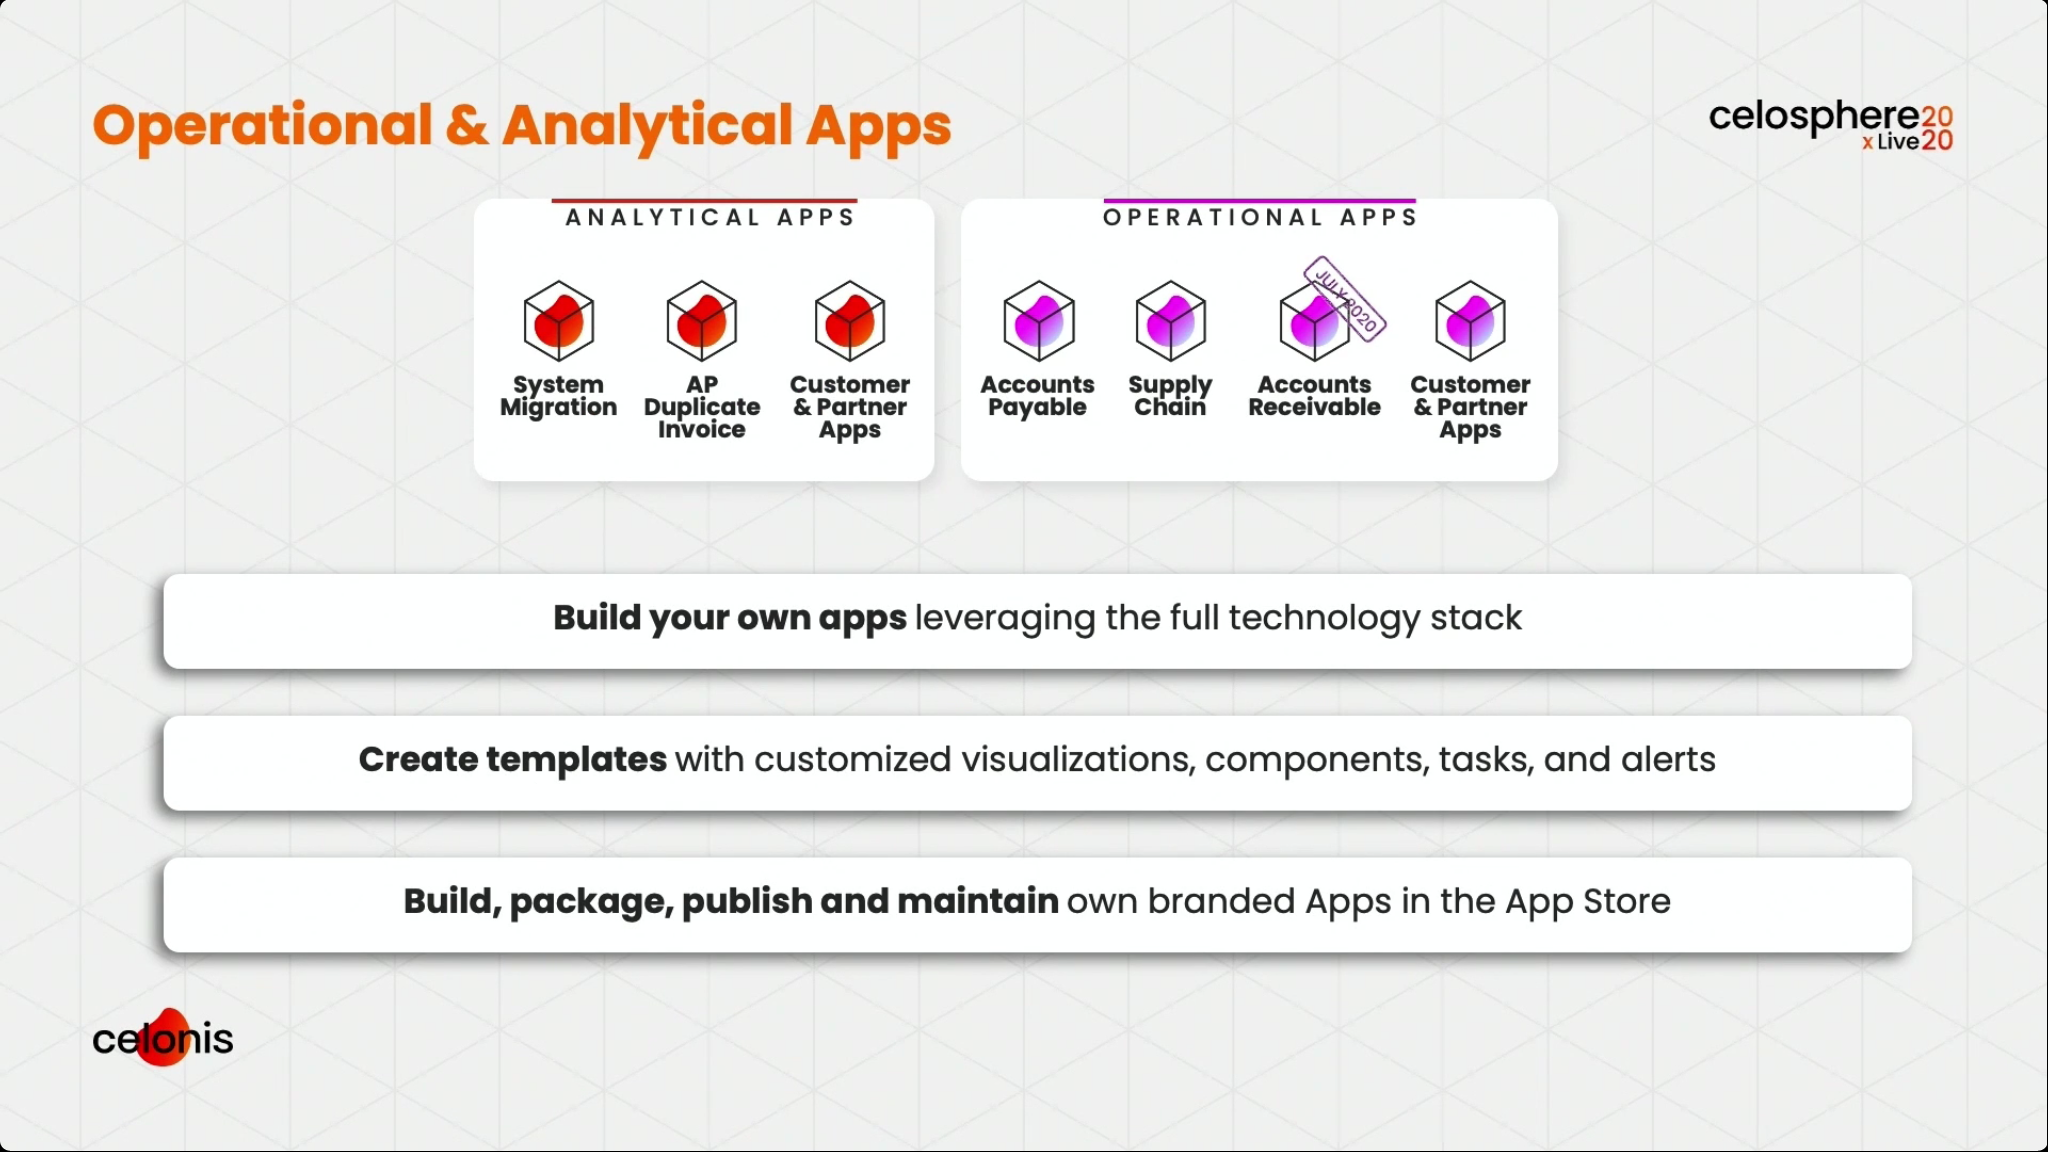
Martin Klenk, Celonis CTO, gave an update on their technology strategy, with an initial focus on how the Celonis architecture enables the creation of these real-time operational apps: real-time connectors feed into a data layer, which is analyzed by the Process AI Engine, and then exposed through Boards that integrate data and other capabilities for visualization. Operational and analytical apps are then created based on Boards. Although Celonis has just released two initial Accounts Payable and Supply Chain operational apps, this is something that customers and partners can build in order to address their particular needs.
He showed how a custom operational app can be created for a CFO to show how this works, using a real-time connectors to Salesforce for order data and Jira for support tickets. He showed their multi-event log analytical capability, which makes it much easier to bring together data sources from different systems and automatically correlate them without a lot of manual data cleansing — the links between processes in different systems are identified without human intervention. This allows detection of anomalies that occur on boundaries between systems, rather than just within systems.
Signals can be created based on pre-defined patterns or from scratch, allowing a real-time data-driven alert to be issued when required, or an automation push to another system be triggered. This automation capability is a critical differentiator, allowing for a simple workflow based on connector steps, and can replace the need for some amount of other process automation technologies such as RPA in cases where those are not a good fit.
He was joined by Martin Rowlson, Global Head of Process Excellence at Uber; they are consolidating data from all of their operational arms (drive, eats, etc.) to analyze their end-to-end processes, and using process mining and task mining to identify areas for process improvement. They are analyzing some critical processes, such as driver onboarding and customer support, to reduce friction and improve the process for both Uber and the driver or customer.
Klenk’s next guest as Philipp Grindemann, head of Business Development at Lufthansa CityLine, discussing how they are using Celonis to optimize their core operations. They track maintenance events on their aircraft, plus all ground operations activities. Ground operations are particularly complex due to the high degree of parallelism: an aircraft may be refueled at the same time that cargo is being loaded. I have to guess that their operations are changing radically right now and they are having to re-structure their processes, although that wasn’t discussed.
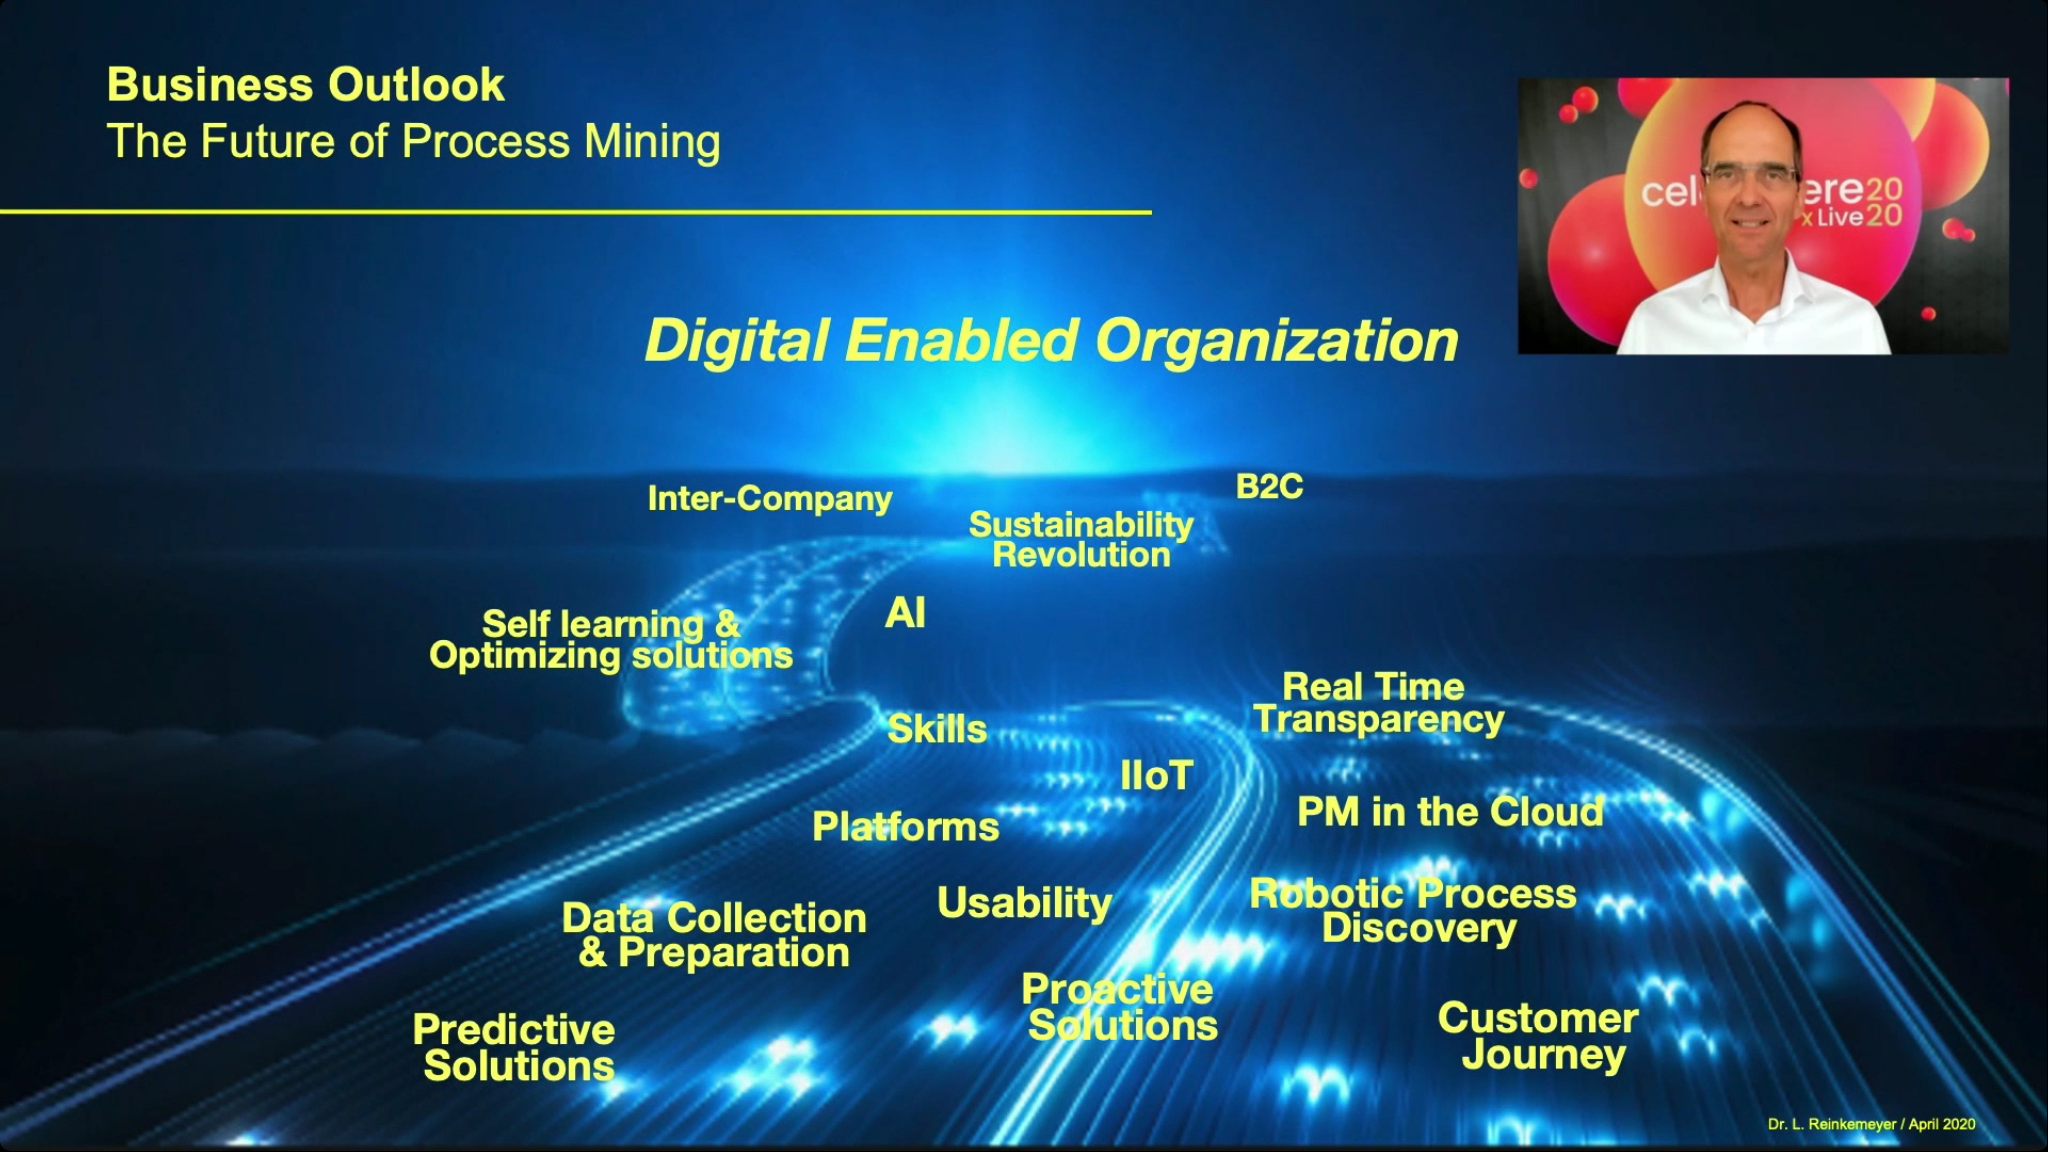
His last guest was Dr. Lars Reinkemeyer, author of Process Mining in Action — his book has collected and documented many real-world use cases for process mining — to discuss some of the expected directions of process mining beyond just analytics.
They then returned to a studio session for a bit more interactive Q&A; the previous technology roadmap keynote was pre-recorded and didn’t allow for any audience questions, although I think that the customers that he interviewed will have full presentations later in the conference.
#CelosphereLive lunch break
As we saw in at CamundaCon Live last week, there is no break time in the schedule: if you want to catch all of the presentations and discussions in real time, be prepared to carry your laptop with you everywhere during the day. The “Live from the Studio” sessions in between presentations are actually really interesting, and I don’t want to miss those. Today, I’m using their mobile app on my tablet just for the streaming video, which lets me take screenshots as well as carry it around with me, then using my computer for blogging, Twitter, screen snap editing and general research. This means that I can’t use their chat or Q&A functions since the app does not let you stream the video and use the chat at the same time, and the chat wasn’t very interesting yesterday anyway.
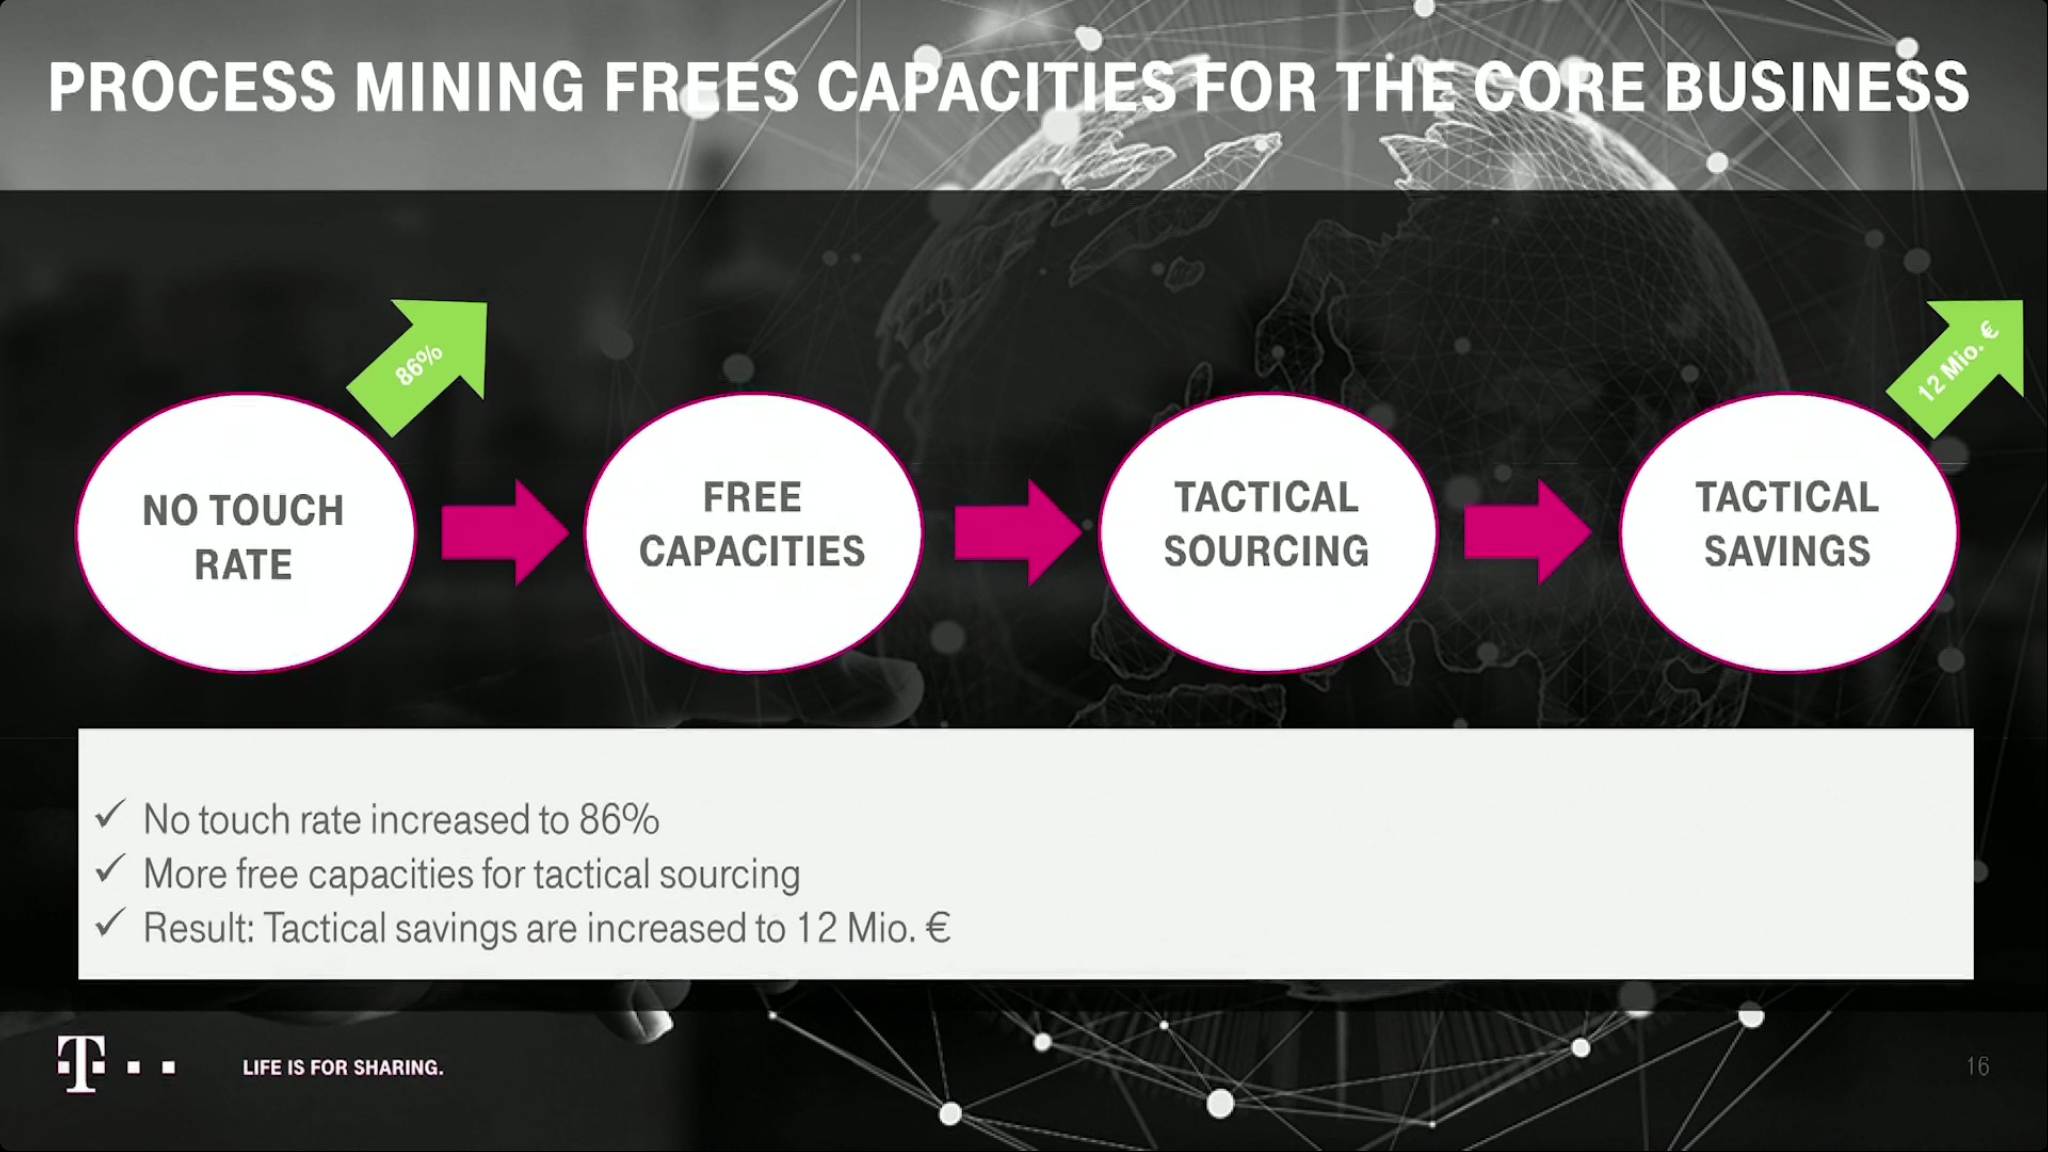
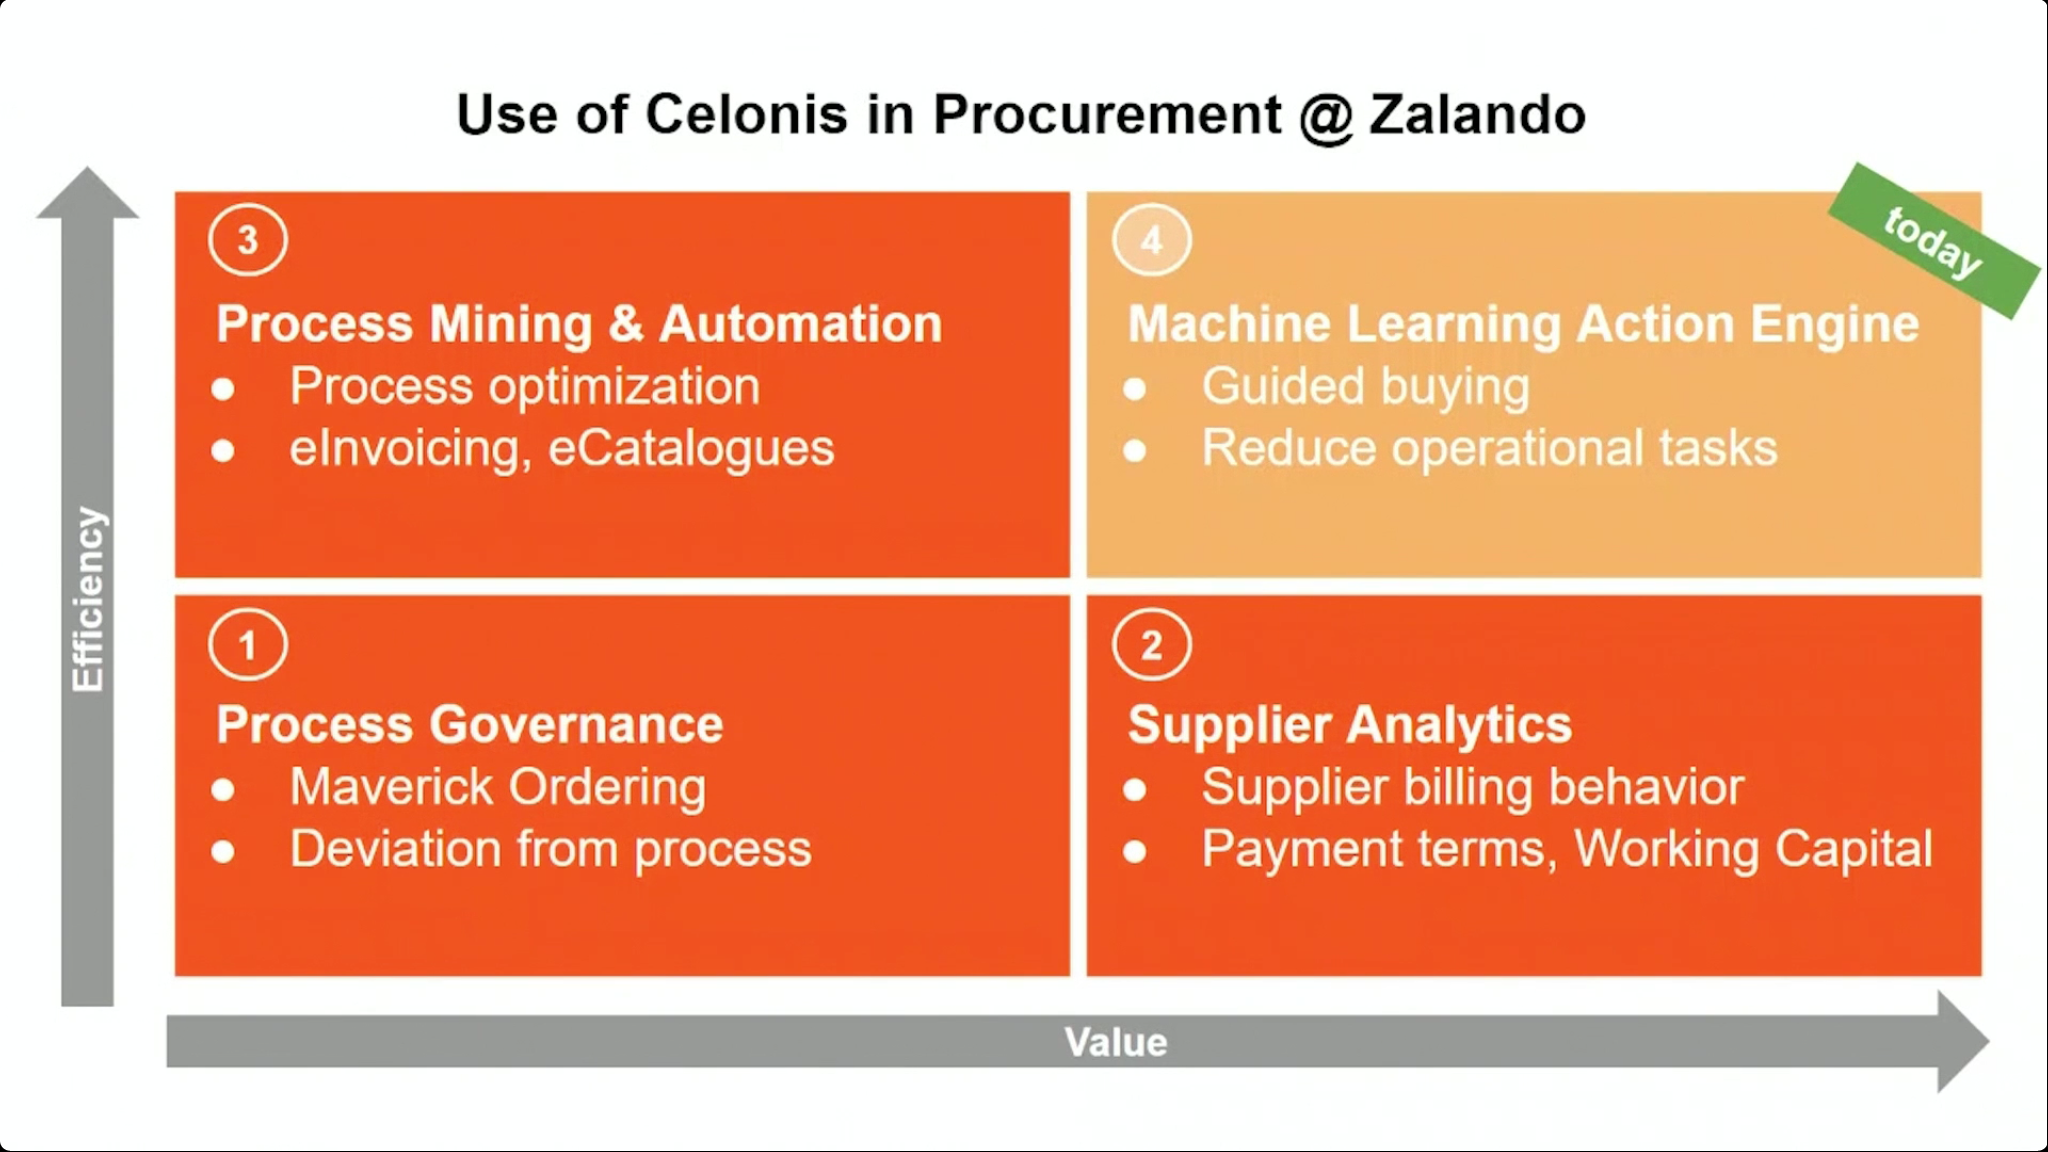
The next presentation was by Zalando, a European online fashion retailer, with Laura Henkel, their Process Mining Lead, and Alejandro Basterrechea, Head of Procurement Operations. They have moved beyond just process mining, and are using Celonis to create machine learning recommendations to optimize procurement workflows: the example that we saw provided Amazon-like recommendations for internal buyers. They also use the process automation capabilities to write information back to the source systems, showing how Celonis can be used for automating multi-system integration where you don’t already have process automation technology in place to handle this. Their key benefits in adding Celonis to their procurement processes have been efficiency, quality and value creation. Good interactive audience Q&A at the end where they discuss their journey and what they have planned next with the ML/AI capabilities. It worked well with two co-presenters, since one could be identifying a question for their area while the other was responding to a different question, leaving few gaps in the conversation.
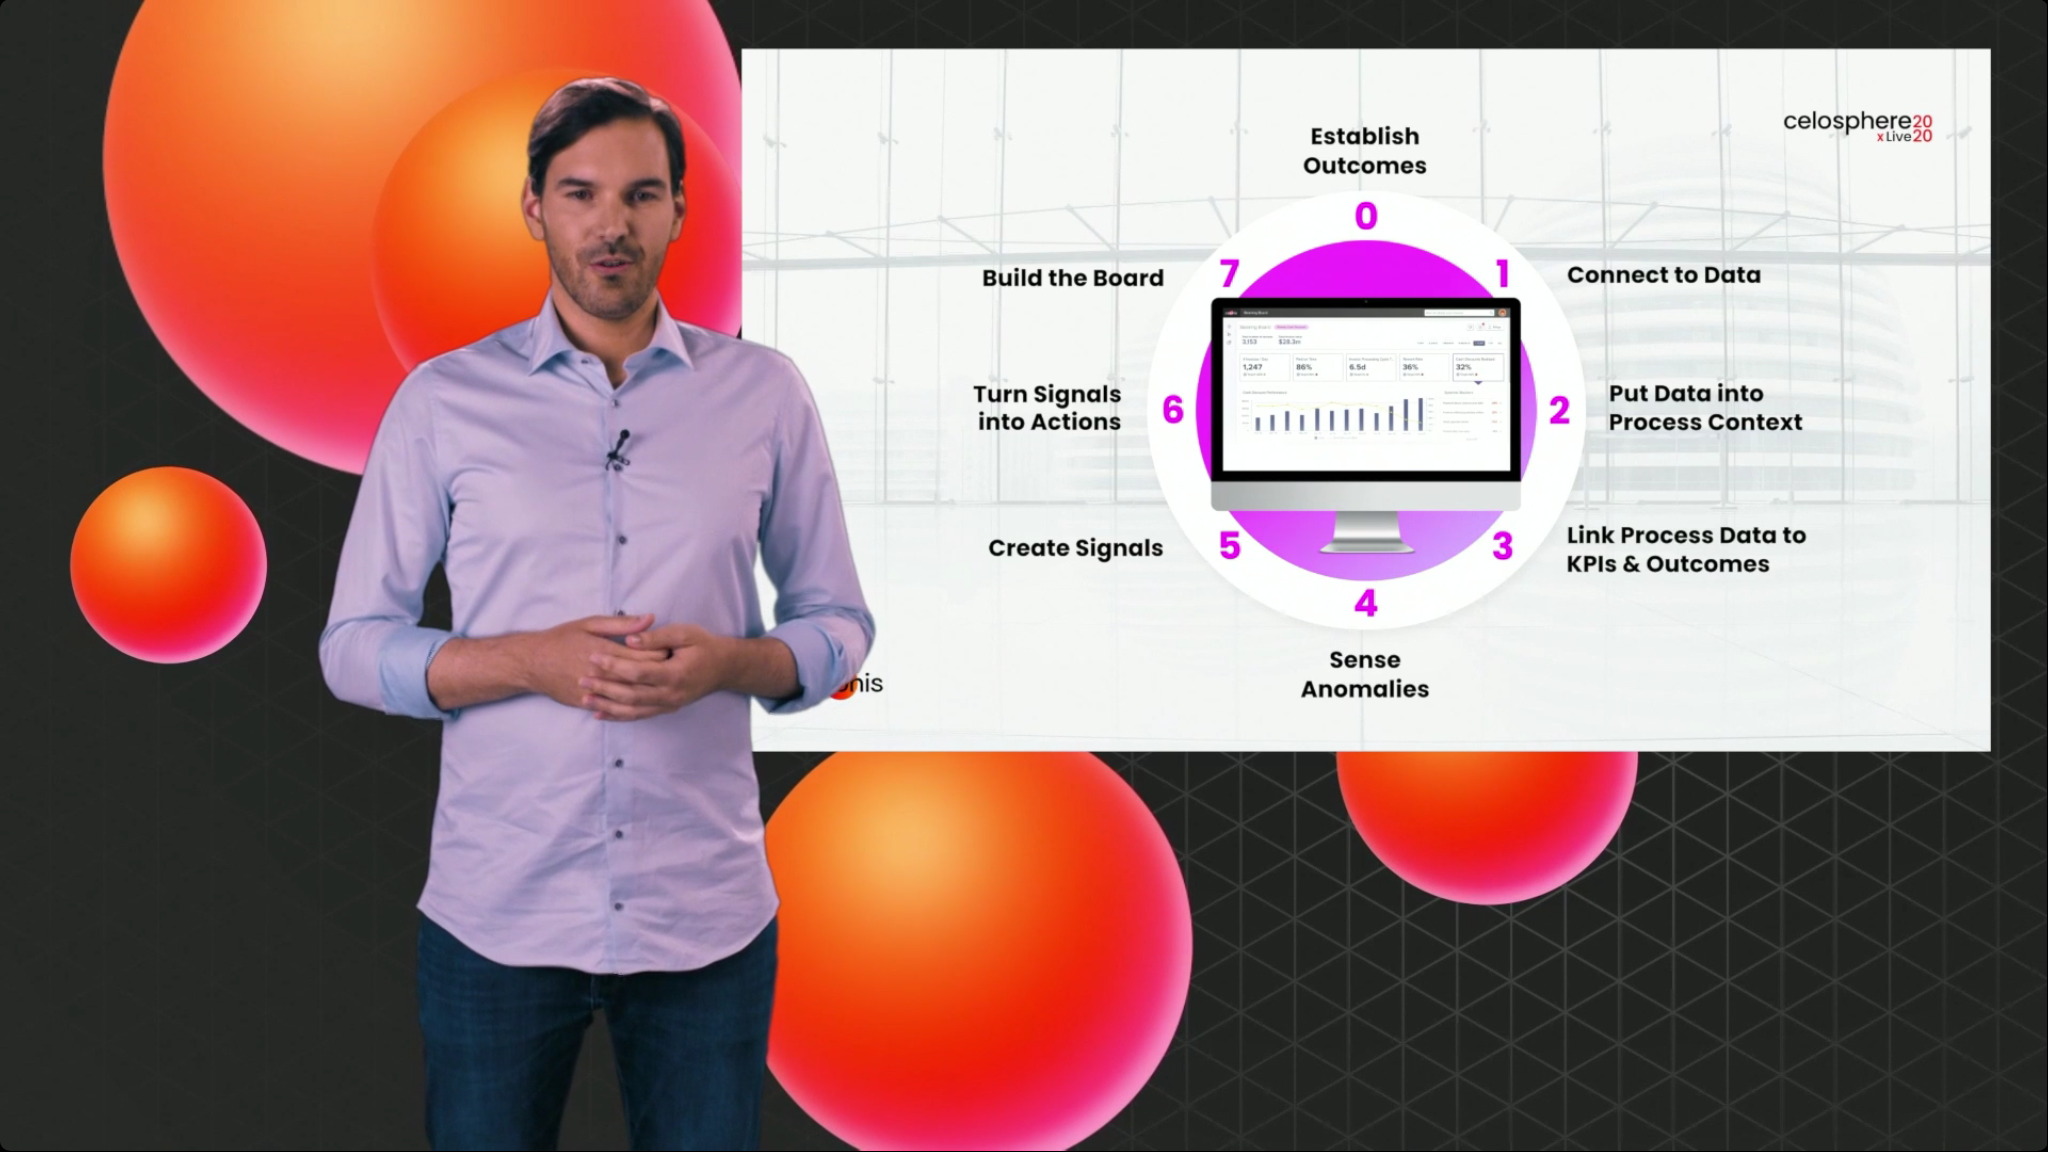
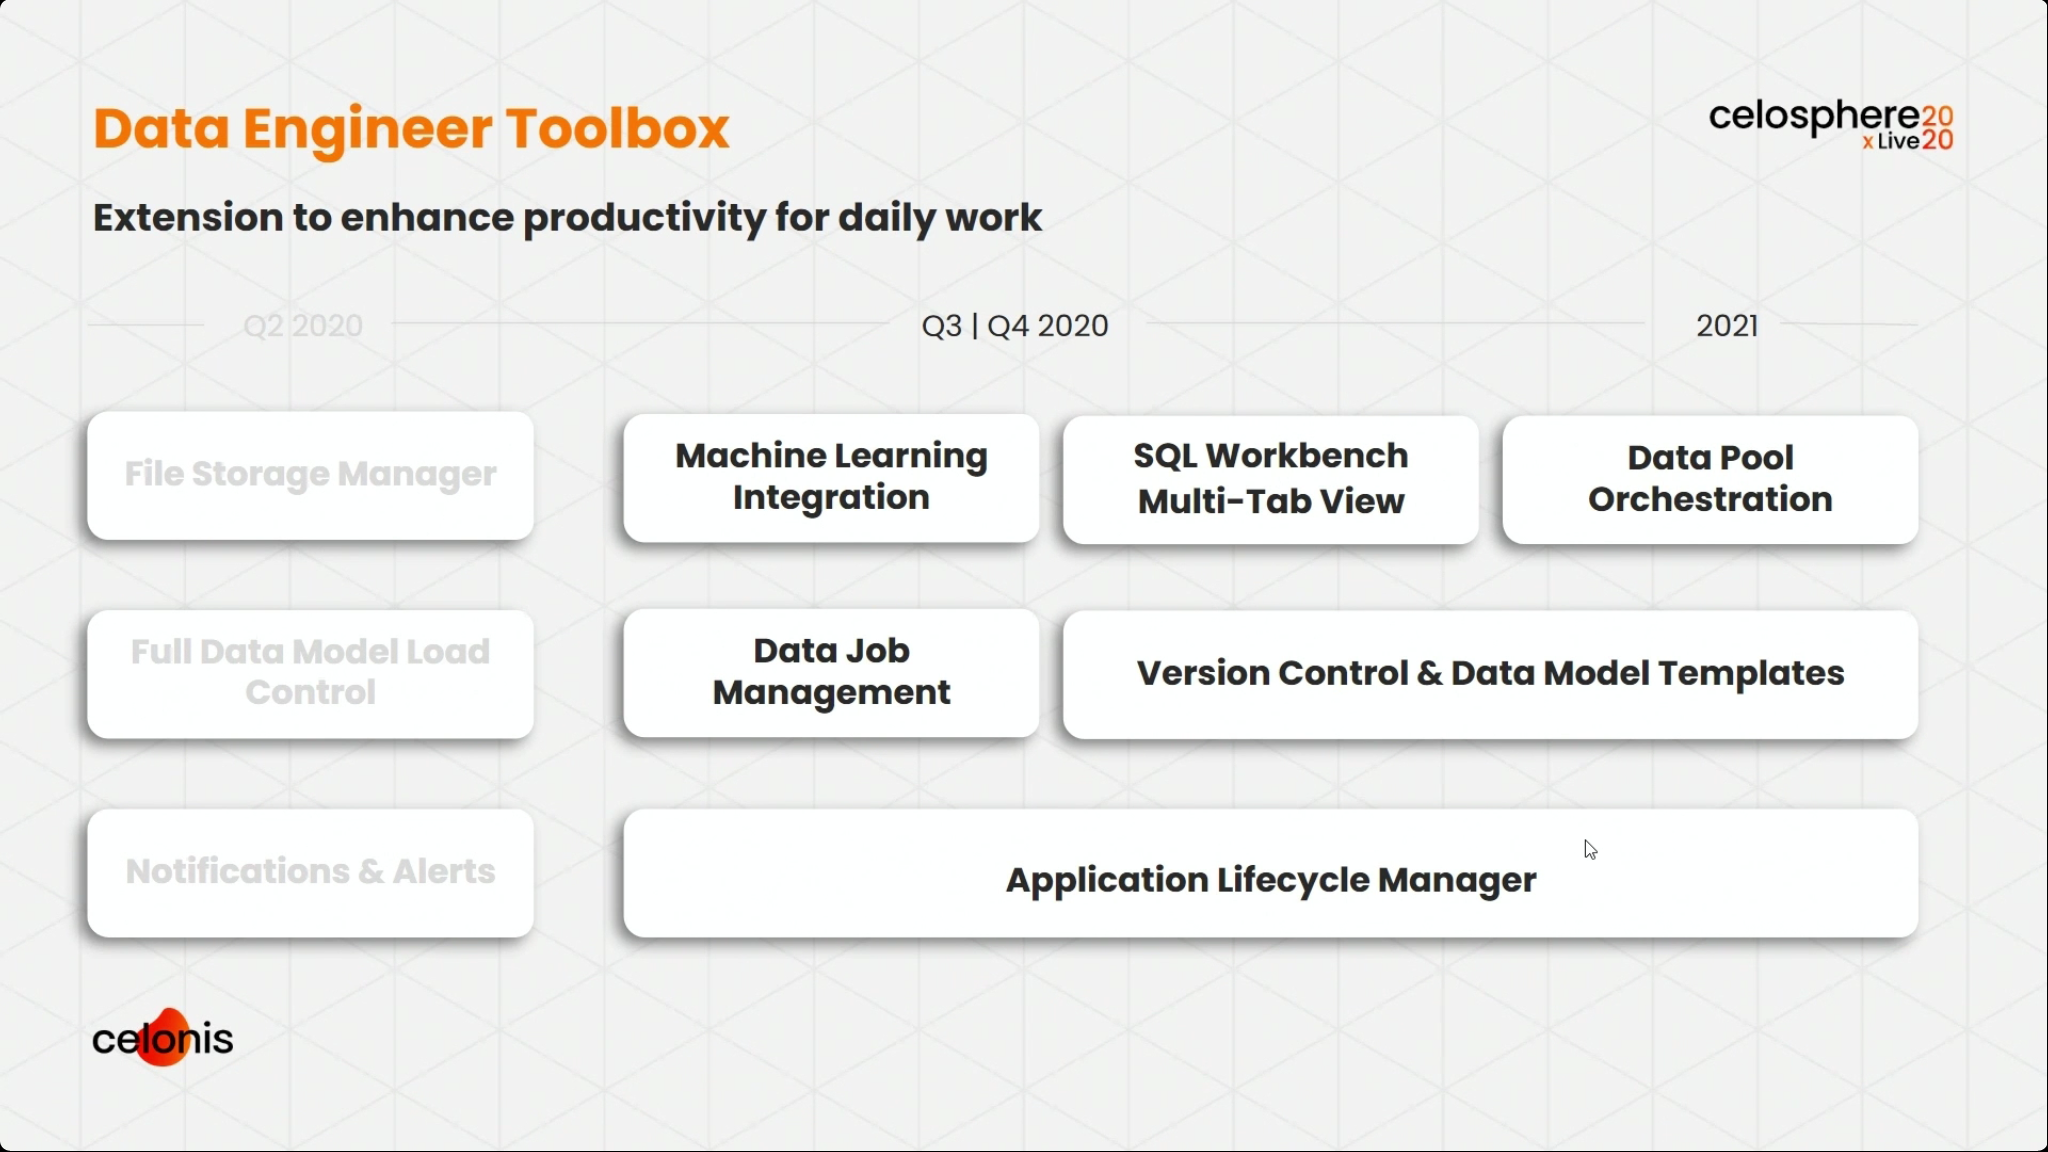
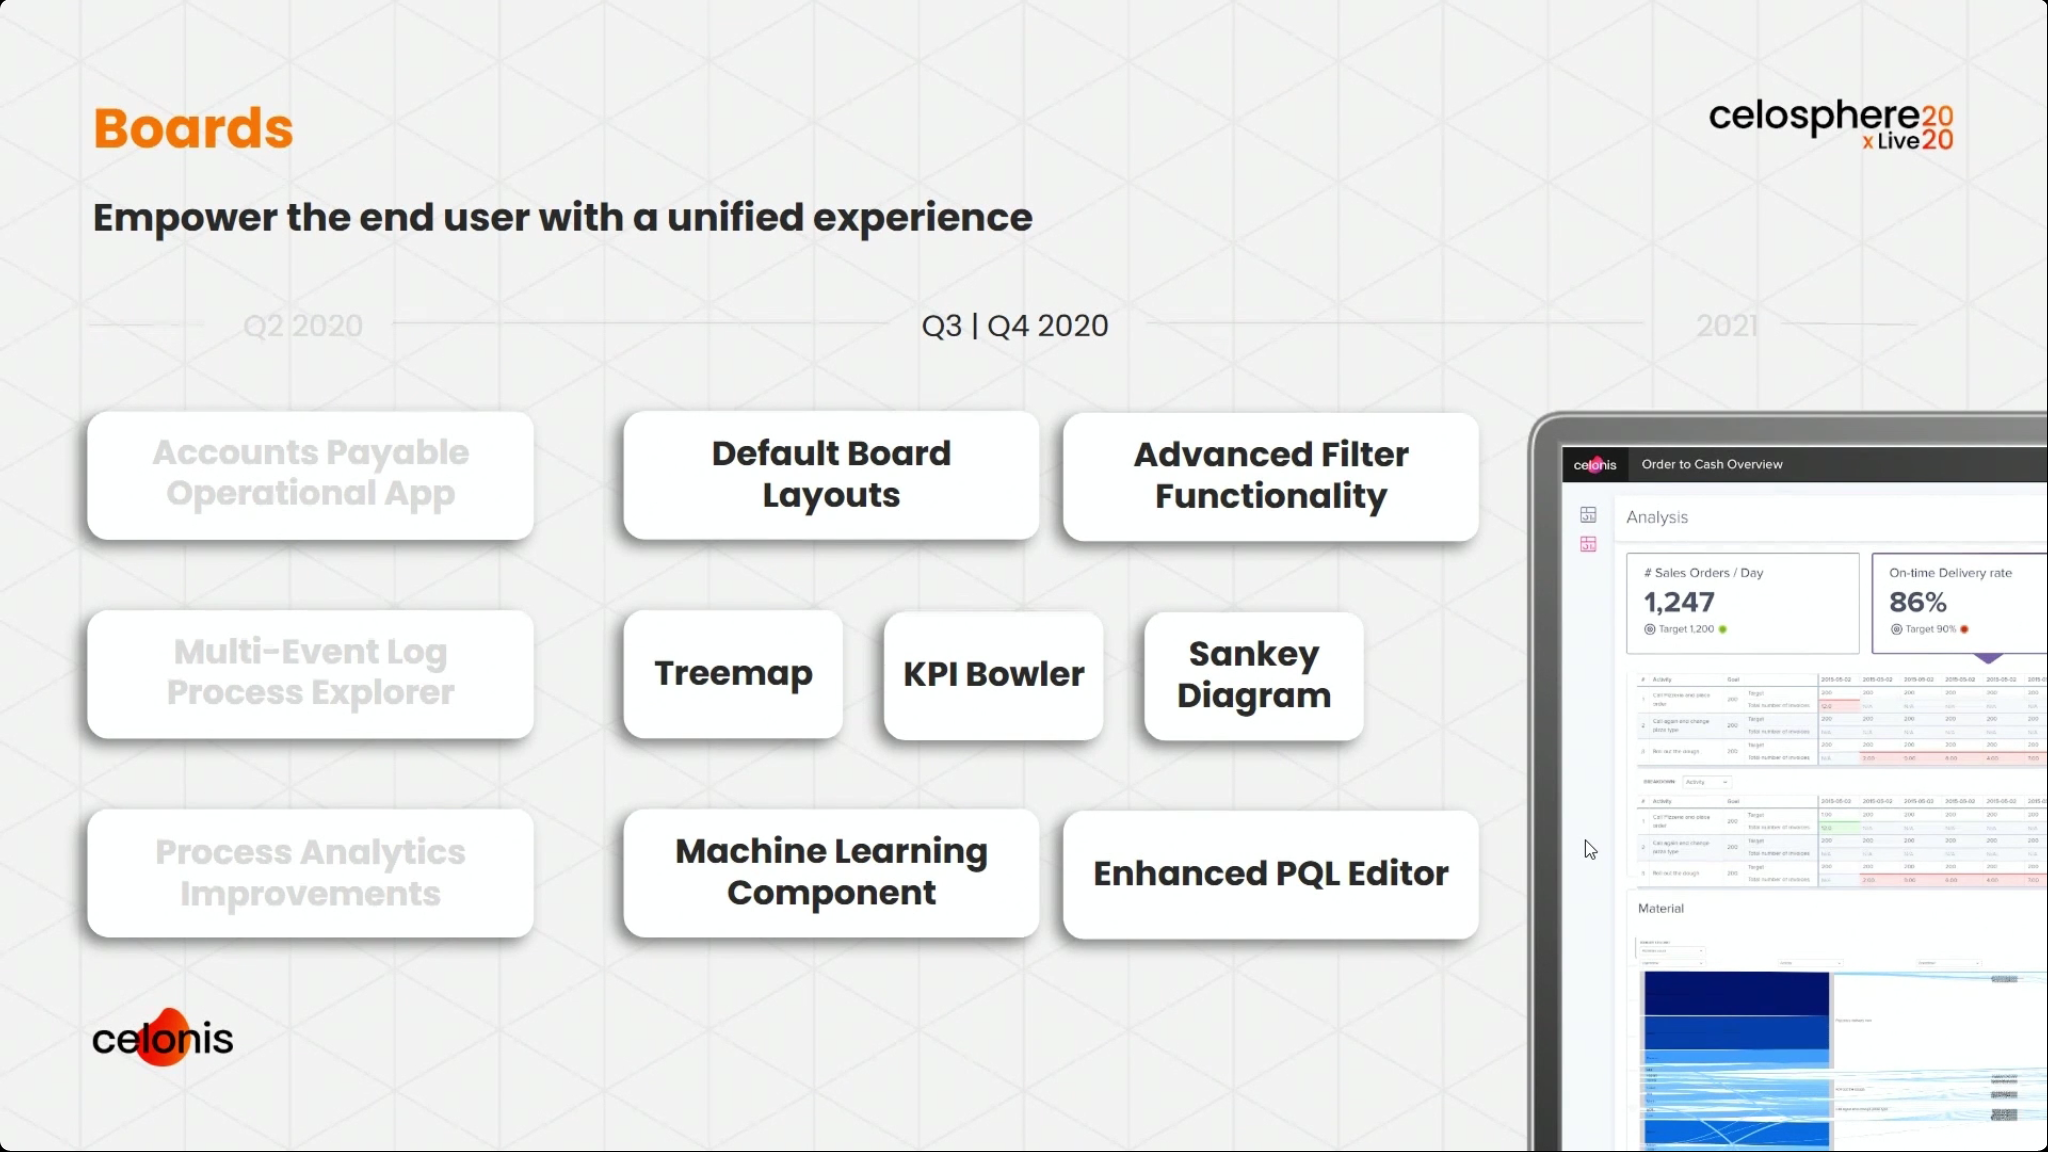
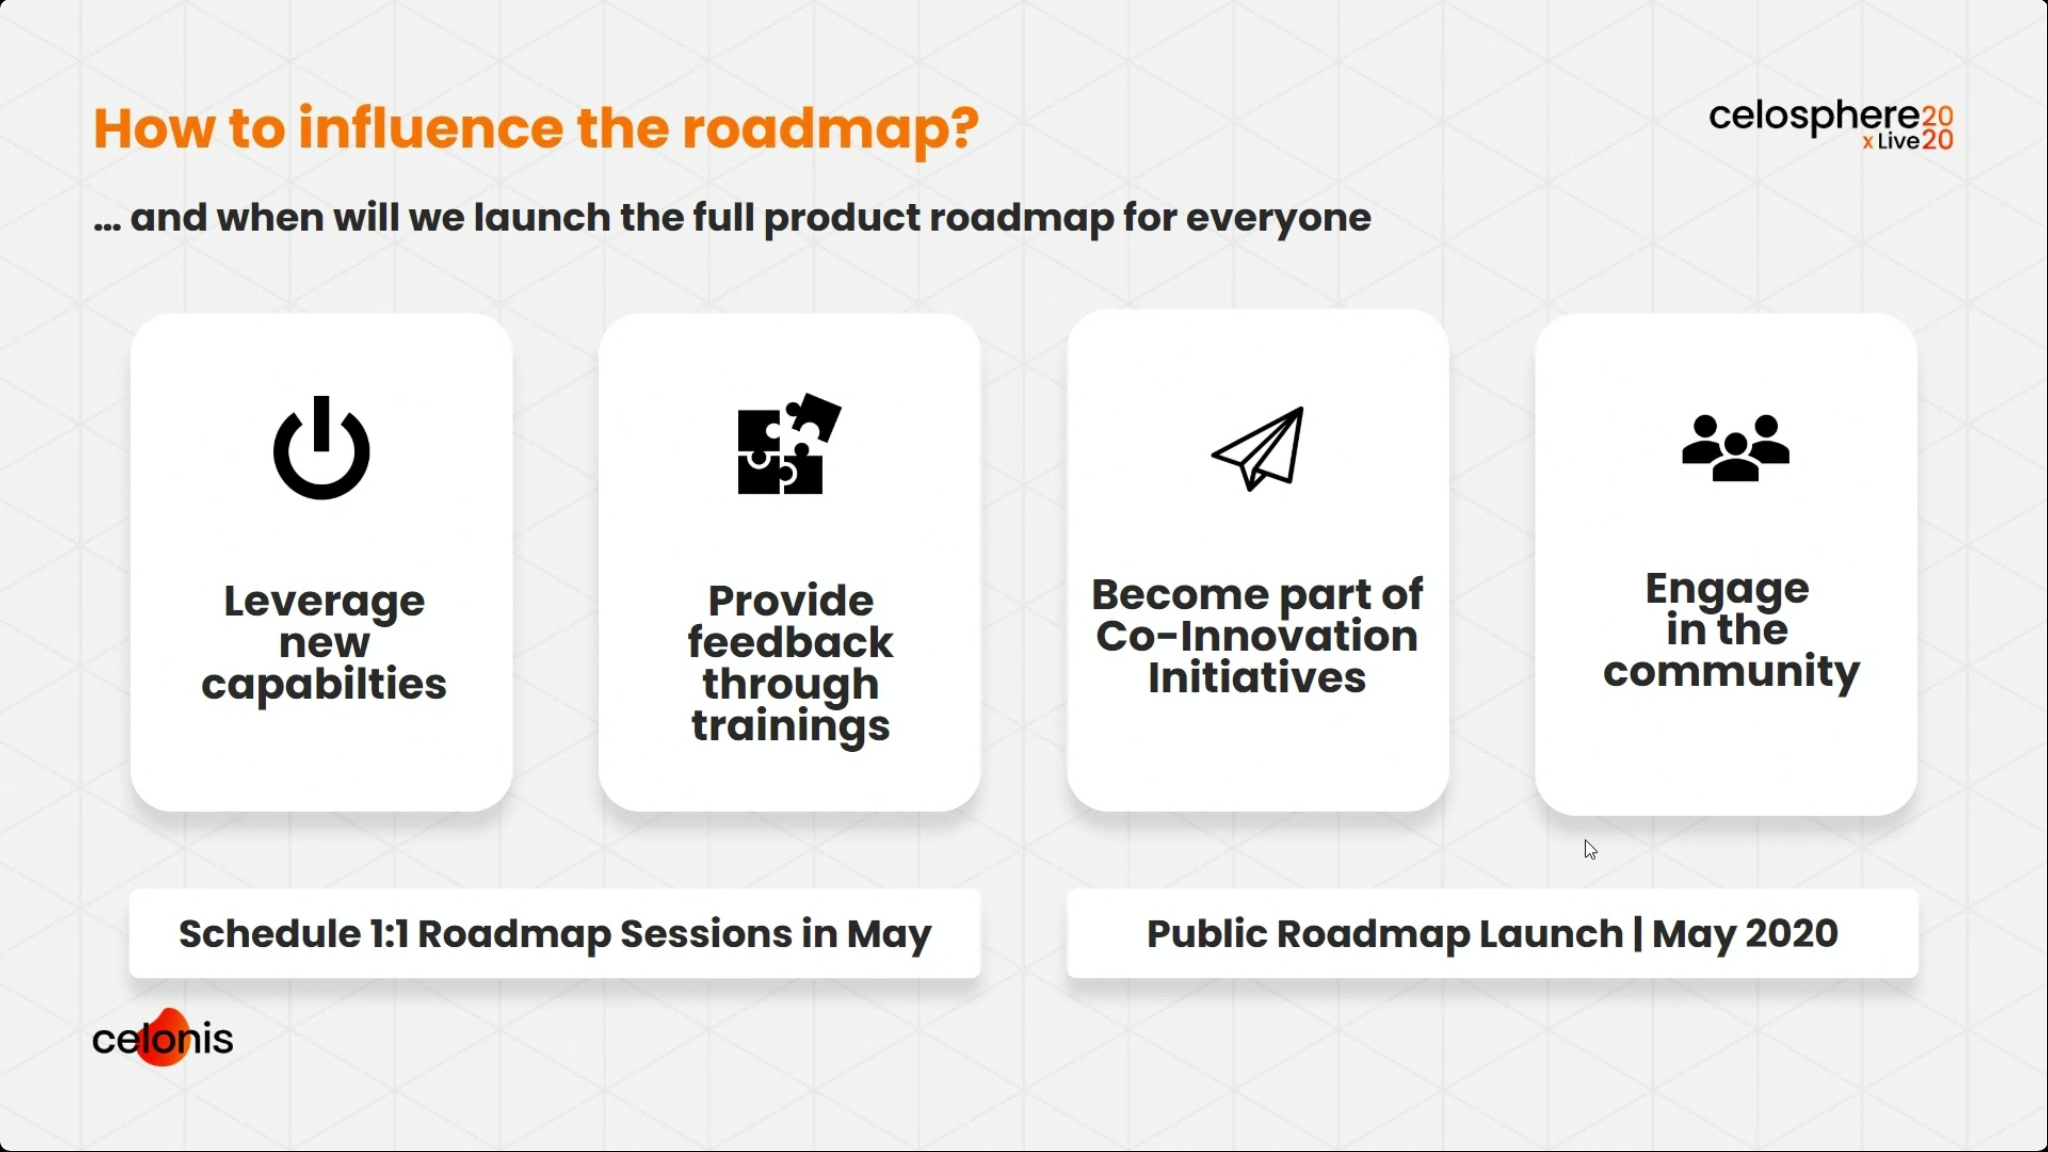
We broke into two tracks, and I attended the session with Michael Götz, Engineering Operations Officer at Celonis, providing a product roadmap. He highlighted their new operational apps, and how they collaborated with customers to create them from real use cases. There is a strong theme of moving from just analytical apps to operational apps that sense and act. He walked through a broad set of the new and upcoming features, starting with data and connectivity, through the process AI engine, and on to boards and the operational apps. I’ve shown some of his slides that I captured below, but if you’re a Celonis customer, you’ll want to watch this presentation and hear what he has to say about specific features. Pretty exciting stuff.
I skipped the full-length Uber customer presentation to see the strategies for how to leverage Celonis when migrating legacy systems such as CRM or ERP, presented by Celonis Data Scientist Christoph Hakes. As he pointed out, moving between systems isn’t just about migrating the data, but it also requires changing (and improving) processes . One of the biggest areas of risk in these large-scale migrations is around understanding and documenting the existing and future-state processes: if you’re not sure what you’re doing now, then likely anything that you design for the new system is going to be wrong. 60% of migrations fail to meet the needs of the business, in part due to that lack of understanding, and 70% fail to achieve their goals due to resistance from employees and management. Using process mining to explore the actual current process and — more importantly — understand the variants means that at least you’re starting from an accurate view of the current state. They’ve created a Process Repository for storing process models, including additional data and attachments
Hakes moved on to talk about their redesign tools, such as process conformance checking to align the existing processes to the designed future state. After rollout, their real-time dashboards can monitor adoption to locate the trouble spots, and send out alerts to attempt remediation. All in all, they’ve put together a good set of tools and best practices: their customer Schlumberger saved $40M in migration costs by controlling the migration costs, driving user adoption and performing ongoing optimization using Celonis. Large-scale ERP system migration is a great use case for process mining in the pre-migration and redesign areas, and Celonis’ monitoring capabilities also make it valuable for post-migration conformance monitoring.
The last session of the day was also a dual track, and I selected the best practices presentation on how to get your organization ready for process mining, featuring Celonis Director of Customer Success Ankur Patel. The concurrent session was Erin Ndrio on getting started with Celonis Snap, and I covered that based on a webinar last month. Patel’s session was mostly for existing customers, although he had some good general points on creating a center of excellence, and how to foster adoption and governance for process mining practices throughout the organization. Some of this was about how a customer can work with Celonis, including professional services, training courses, the partner network and their app store, to move their initiatives along. He finished with a message about internal promotion: you need to make people want to use Celonis because they see benefits to their own part of the business. This is no different than the internal evangelism that needs to be done for any new product and methodology, but Patel actually laid out methods for how some of their customers are doing this, such as road shows, hackathons and discussion groups, and how the Celonis customer marketing team can help.
He wrapped up with thoughts on a Celonis CoE. I’m not a big fan of product-specific CoEs, instead believing that there should be a more general “business automation” or “process optimization” CoE that covers a range of process improvement and automation tools. Otherwise, you tend to end up with pockets of overlapping technologies cropping up all over a large organization, and no guidance on how best to combine them. I wrote about this in a guest post on the Trisotech blog last month. I do think that Patel had some good thoughts on a centralized CoE in general to support governance and adoption for a range of personas.
I will check back in for a few sessions tomorrow, but have a previous commitment to attend Alfresco Modernize for a couple of hours. Next week is IBM Think Digital, the following week is Appian World, then Signavio Live near the end of May, so it’s going to be a busy few weeks. This would normally be the time when I am flying all over to attend these events in person, and it’s nice to be able to do it from home although some of the events are more engaging than others. I’m gathering a list of best practices for online conferences, including the things that work and those that don’t, and I’ll publish that after this round of virtual events. So far, I think that Camunda and Celonis have both done a great job, but for very different reasons: Camunda had much better audience engagement and more of a “live” feel, while Celonis showed how to incorporate higher production quality and studio interviews to good effect, even though I think it’s a bit early to be having in-person interviews.
I expect to be participating in a lot of virtual vendor conferences over the next months, and today I tuned in to the Celonis CelosphereLive. They are running on European time, with today’s half day starting at a reasonable 9am Eastern North American time, but the next two days will be starting at 4am my time– I may be catching some of the sessions on demand.
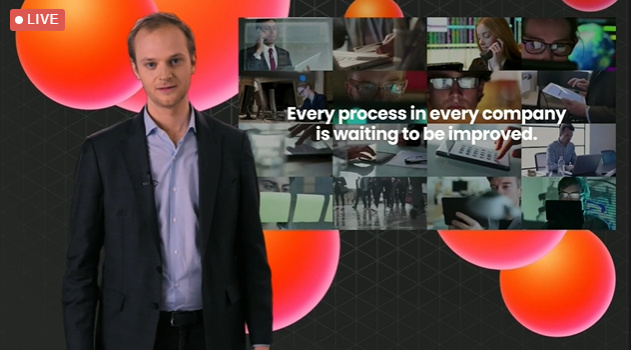
We had a keynote from co-CEO Alexander Rinke that included a short discussion with the godfather of process mining, Wil van der Aalst. I liked Rinke’s characterization that every process in every company is waiting to be improved: this is what process mining (aka process intelligence, depending on which vendor is talking) is all about in terms of discovering processes. Miguel Milano, Celonis Chief Revenue Officer, joined him to talk about their new Celonis Value Architects certification program. The fact that this announcement takes such a prominent place in the keynote highlights that there’s still a certain amount of expertise required to do process mining effectively, even though the tools have become much easier to use.
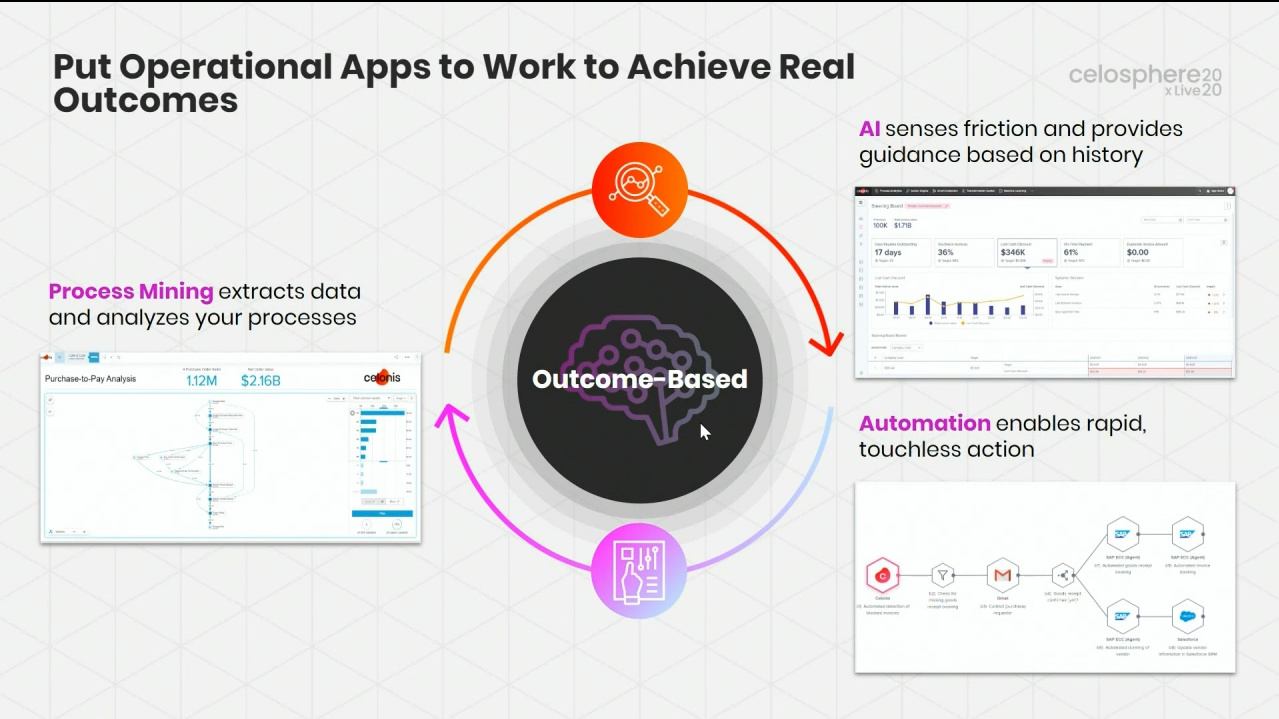
There were also some new product announcements, first around the availablity of their real-time data connectors. This is a direction that many of the process mining vendors are taking, moving from just an analytical process discovery role to more of an operational monitoring process intelligence role. Chief Product Officer Hala Zeine joined Rinke to talk about their connectivity — out of the box, the product connects to 80 different data sources — and their process AI engine that fits the data to a set of desired outcomes and makes recommendations. Their visualization boards then let you view the analysis and explore root causes of problem areas.
Their process AI engine does some amount of automation, and they have just released operational apps that help to automate some activities of of the workflow. These operational apps are an overlay on business processes that monitor work in progress, and display analysis of the state of (long-running) processes that it is monitoring. The example shown is an Accounts Payable operational app that looks at invoices that are scheduled for payment, and allows a financial person to change parameters (such as date of payment) in bulk, which would then push that update back to the underlying A/P system. Think of these operational apps as smart dashboards, where you can do some complex analysis for monitoring work in progress, and also push some updates and actions back to the underlying operational system. These first two apps are already available to Celonis customers in their app store, and tomorrow there will be a session with the CTO showing how to build your own operational app.
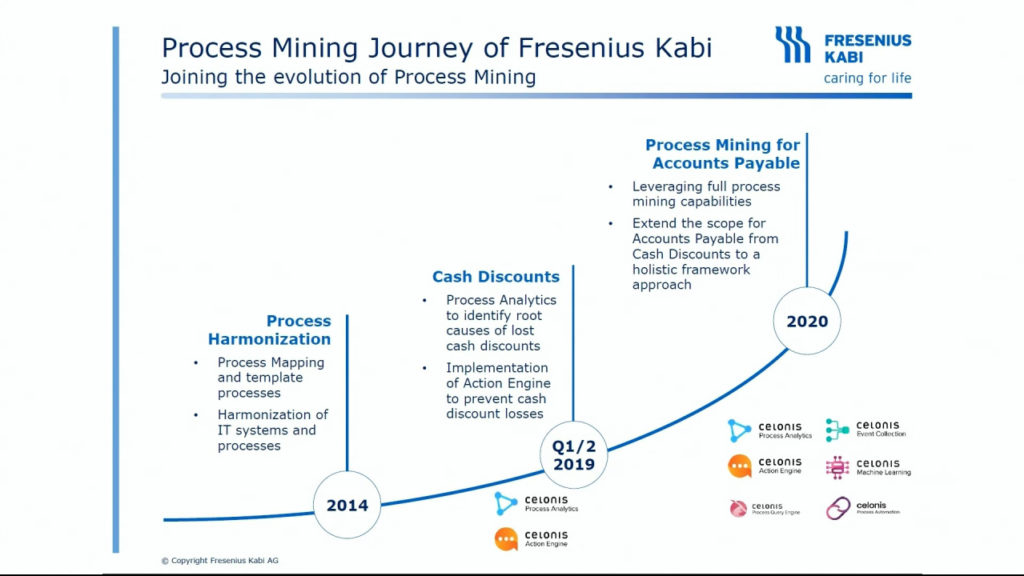
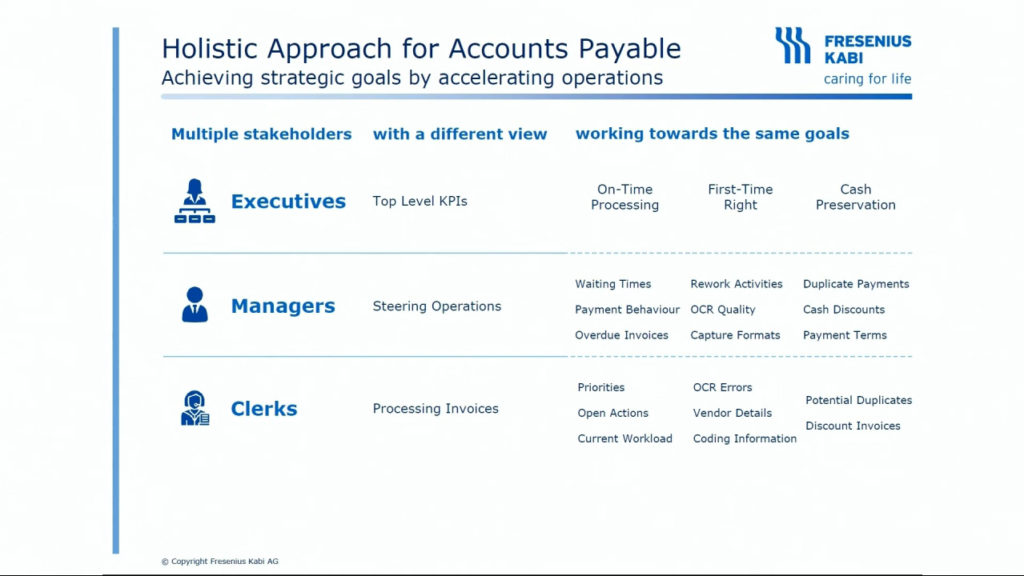
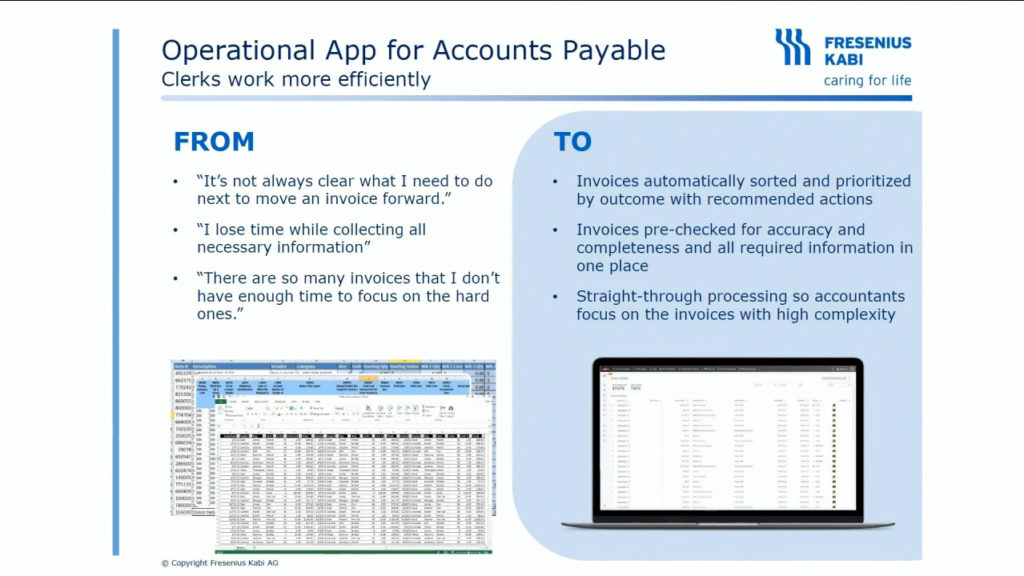
To finish off the day we had two product demos/discussions. First was JP Thomsen, Celonis’ VP Business Models, giving a more in-depth demo of their Accounts Payable operational applications. He was joined by Jan Fuhr, Process Mining Lead at global healthcare company Fresenius Kabi, which collaborated on the creation of the A/P operational application; Fuhr discussed their process mining journey and how they are now able to better support their A/P function and manage cash flow. The sweet spot for these operational apps appears to be when you don’t have end-to-end management on your process with another system such as a BPMS: the operational app monitors what’s happening in any core systems (such as SAP) and replaces ad hoc “management by spreadsheet” with AI and rules that highlight problem areas and make suggestions for remediation. They’ve had some great cost savings, through taking advantage of paying within a specified time frame to receive a discount, and optimizing their payment terms.
Last up was Trevor Miles, Celonis’ head of Supply Chain and Manufacturing Solutions, talking about the supply chain operational application: obviously these operational apps are a big deal for Celonis and their customers, since they’ve been the focus of most of these first half-day. Process mining can provide significant value in supply chain management since it typically involves a number of different systems without an explicit end-to-end process orchestration, and can have a lot of exceptions or variants. Understanding those variants and being able to analyze and reroute things on the fly is critical to maintaining a resilient suppy chain. This has been highlighted during the COVID-19 pandemic, where supply chains have been disrupted, overloaded or underused, depending on the commodity and the route.
Process mining is used to generate a digital twin for the supply chain, which can then be used to analyze past performance and use as a point of comparison with current activities. The Celonis operational app for supply chain is about closing the gap between sensing and actions, so that process mining and simulation isn’t just an analytical tool, but a tool for guiding actions to improve processes. It’s also a tool for bridging across multiple systems of the same time: many large organizations have, for example, multiple instances of SAP for different parts of their processes, and need to knit together all of that information to make better decisions.
Not quite social distancing…
They finished up with a discussion in the studio between Hala Zeine, co-CEO Bastian Nominacher and CTO Martin Klenk, covering some of the new announcements and what’s coming up in the next two days. I’ll be back for some of the sessions tomorrow, although likely not before 8am Eastern.
A few notes on the virtual conference format. Last week’s CamundaCon Live had sessions broadcast directly from each speaker’s home plus a multi-channel Slack workspace for discussion: casual and engaging. Celonis has made it more like an in-person conference by live-broadcasting the “main stage” from a studio with multiple camera angles; this actually worked quite well, and the moderator was able to inject live audience questions. Some of the sessions appeared to be pre-recorded, and there’s definitely not the same level of audience engagement without a proper discussion channel like Slack — at an in-person event, we would have informal discussions in the hallways between sessions that just can’t happen in this environment. Unfortunately, the only live chat is via their own conference app, which is mobile-only and has a single chat channel, plus a separate Q&A channel (via in-app Slido) for speakers that is separated by session and is really more of a webinar-style Q&A than a discussion. I abandoned the mobile app early and took to Twitter. I think the Celosphere model is probably what we’re going to see from larger companies in their online conferences, where they want to (attempt to) tightly control the discussion and demonstrate the sort of high-end production quality that you’d have at a large in-person conference. However, I think there’s an opportunity to combine that level of production quality with an open discussion platform like Slack to really improve the audience experience.
It was a tough choice with the first post-break session at CamundaCon Live: I wanted to listen in on Rick Weinberg, Camunda VP of Products, as he talked about their product direction roadmap, but I decided on the presentation by Muthukumar Vaidhianathan and Tandeep Sidhu from Capital One instead, focused on their process automation modernization with Camunda. I’ll catch the recorded version of Weinberg’s session later, along with a few others that I want to see.
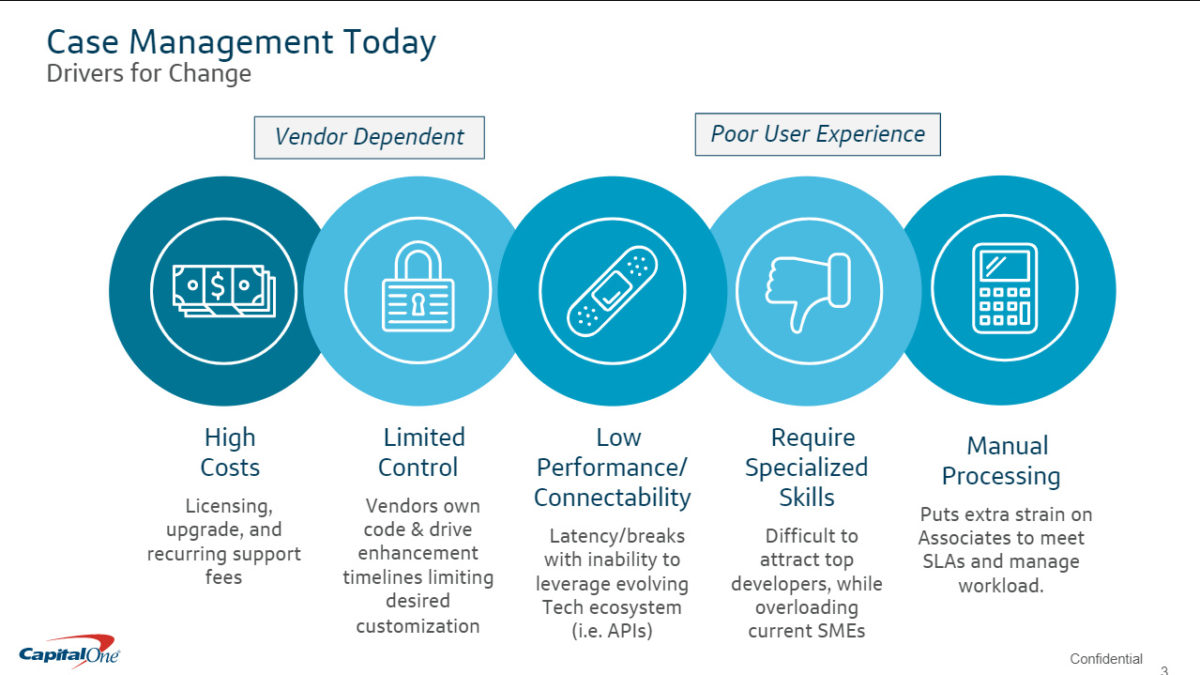
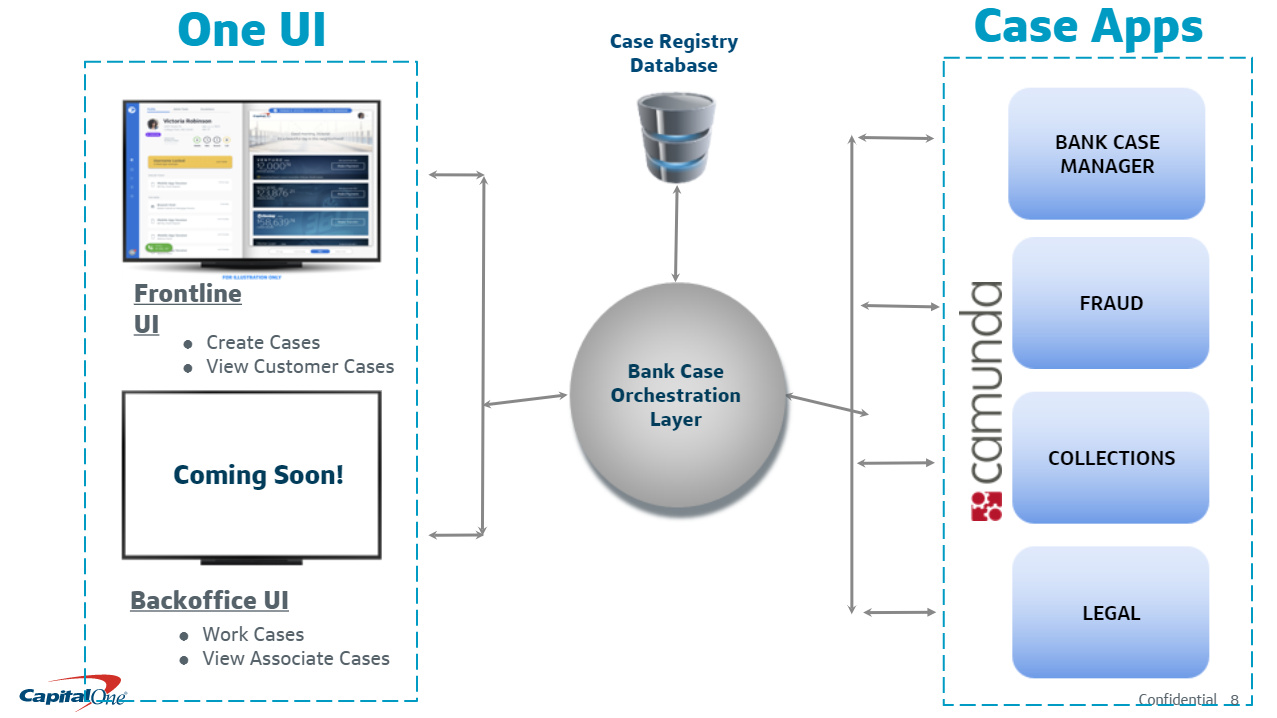
Vaidhianathan and Sidhu talked about some of the problems that they were having with case management using their legacy infrastructure, and how they selected and deployed Camunda. Sidhu talked quite a bit about getting the technical teams up and running with Camunda, and some of the team and DevOps scalability issues. They use a single consolidated UI (actually, one each for front office and back office workers), then a case orchestration layer that connects to the multiple Camunda-based applications: Bank Case Manager, Fraud, Collections, and Legal.
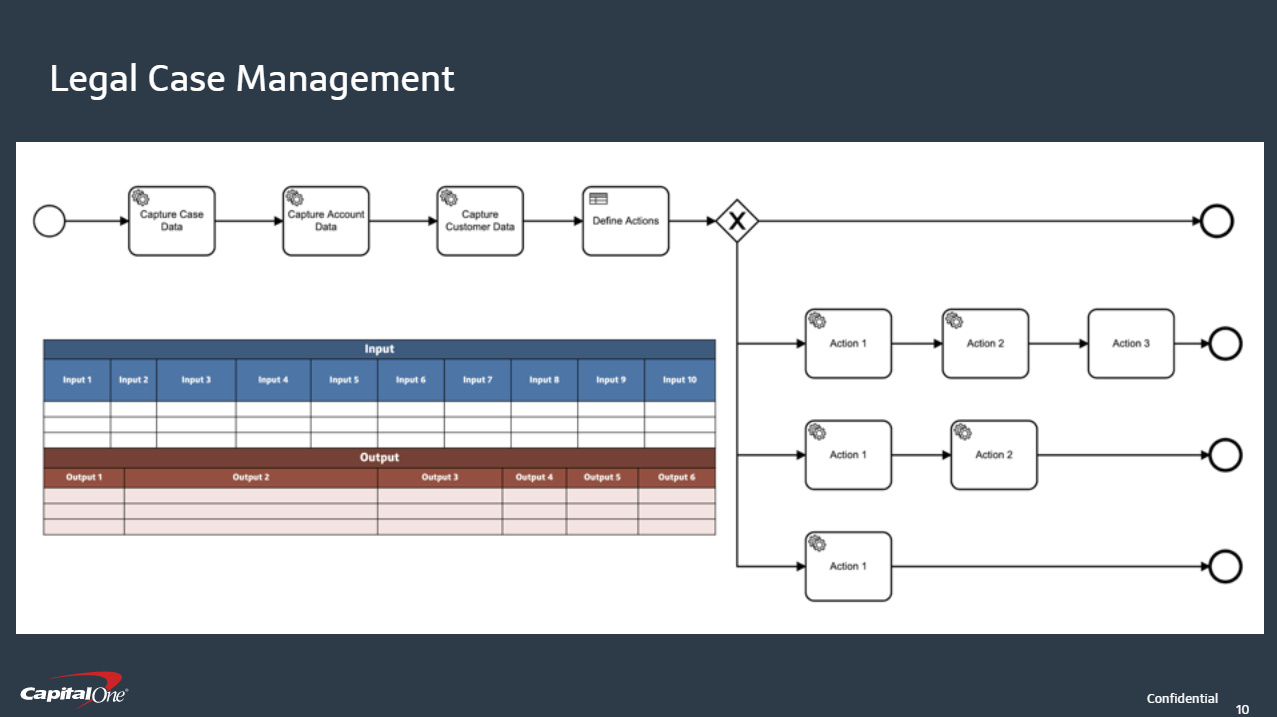
Vaidhianathan then took us through their Legal Case Management application, and how they use BPMN and DMN for automating with complex business rules. Decision tables are used to decide, for example, on the course of action for a particular case based on the data about the case. They feel that it’s important for product owners to own their BPMN and DMN models, while building the strong relationships between developers and the product owners on the business side. Some good lessons learned from their journey at the end.
Captial One also presented at the Camunda Day in NYC last summer, but talked about how they organized a Camunda hackathon rather than the business applications — I think they were much earlier in their journey then, and weren’t ready to talk about business applications yet.
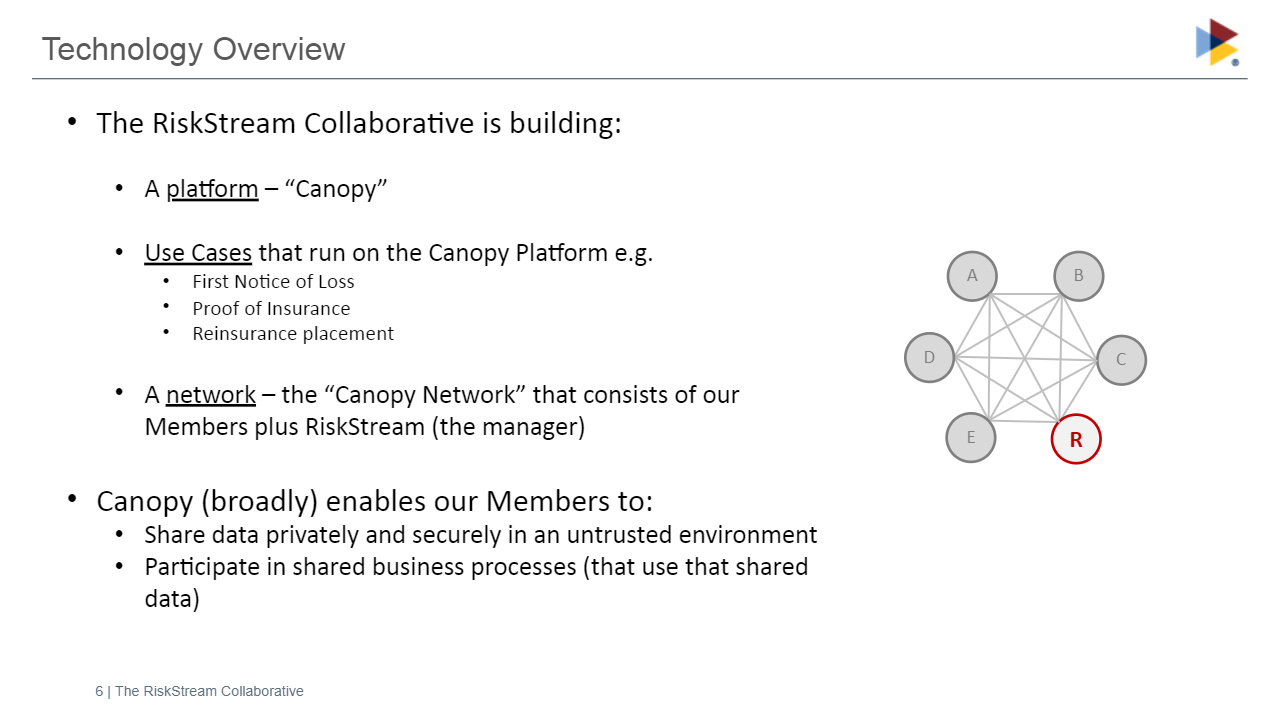
I’ve been interested in blockchain and BPM for a while now, and listened in on Patrick Millar of the non-profit consortium RiskStream Collaborative as he presented on ledger automation using Camunda. Their parent organization is The Institutes, which provides risk management and insurance education, and is guided by senior executives from the property and casualty industry. RiskStream is creating a distributed network platform, called Canopy, that allows their insurance company members to share data privately and securely, and participate in shared business processes. Whenever you have multiple insurance companies in an insurance process, like a claim for a multi-vehicle accident, having shared business processes — such as first notice of loss and proof of insurance — between the multiple insurers means that claims can be settled quicker and at a much lower cost.
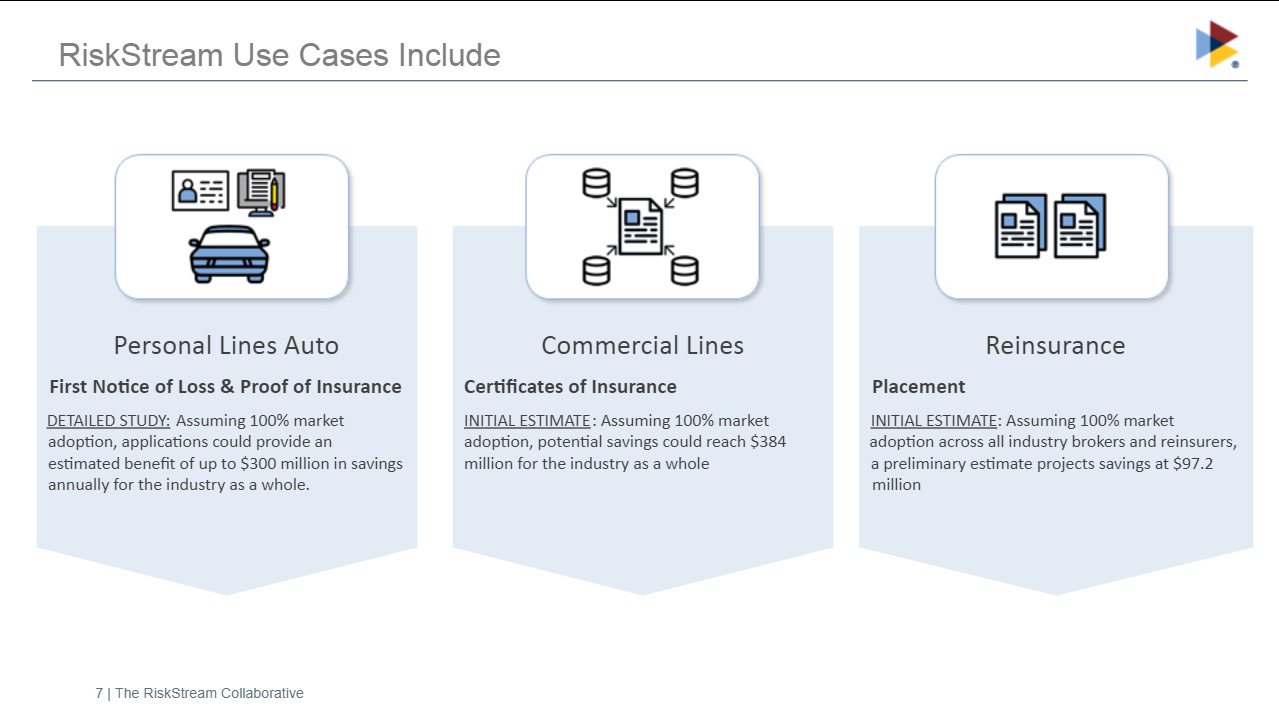
In addition to private lines of insurance, they are also looking at applications in commercial lines and reinsurance. There are pretty significant savings if they get 100% market adoption (not an unrealistic goal since the market is made up of their members): $300M in personal lines auto for FNOL and proof of insurance, $384 in commercial lines for certificates of insurance, and $97M in reinsurance for placement.
Unfortunately, we lost the audio/video connection to the presenter in the middle of the session (yes, this really is happening live, and shit happens) and they had to close the session, just as I was really getting into the topic. Also, he never got to the part about how they’re using Camunda. We’ve already heard from Camunda that they will have him record his presentation and have it added to the on-demand videos.
The next session brought both tracks back together for a panel on digital transformation, featuring Mike Ryan, VP Software Engineering at JP Morgan Chase; Christine Yen, CEO of Honeycomb; and Camunda’s Bernd Rücker. Mary Thengvall, Camunda’s Director of Developer Relations, moderated the panel. Here’s some of the points that came up:
We’ve built up these massive monolithic systems over the last few decades, but now need to break up these legacy pieces while still supporting them, all while adding new functionality in a more agile manner. This is making it difficult for many of the established companies to compete with the new competitors, such as older financial services companies competing with fintechs. (By the way, I talked about this on a recent webinar, and see it with my own enterprise customers)
There’s a need to protect — and improve — the customer experience while the monolith is being replaced piece by piece. In my opinion, “big bang” as a deployment model is dead: gradual migrations without disrupting the user experience should be the general method.
There has been a lot of change in roles and communication within organizations. DevOps is part of that, which changes what people are responsible for, and also the concept of process owners being responsible for the end-to-end metrics. Microservices (and service-oriented architecture in general) means that systems can be more targeted since they’re assembled from shared services for a unique purpose.
There are a lot of great tools and methodologies now, but many companies are not yet ready to implement them. Microservices, serverless architectures, etc. are changing how we design systems for future state.
The current pandemic crisis is driving some amount of digital transformation, and companies are having to decide what is critical for survival now versus what can wait. Ryan said that JP Morgan sent 300,000 employees home to work, and they are rethinking how productive that people can be in distributed environments, and how teams can still work collaboratively. As a financial company, they need to keep serving customers who need access to financial transactions, and are probably having to scale up their online customer experiences to accommodate. Yen believes there is as much of a focus on how people work together remotely to build applications, as there is on the technology itself.
The panel felt a bit unfocused, and wasn’t as engaging as yesterday’s panel. Possibly I’m not quite as fresh after live-blogging 6,000 words over two days.
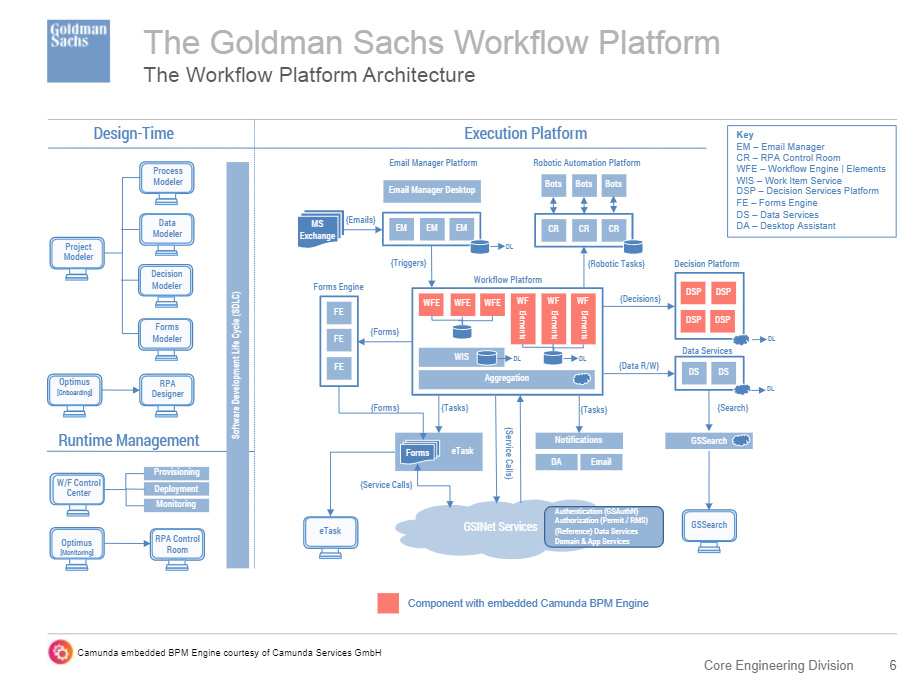
The last presentation of the day, and of CamundaCon Live 2020, was Richard Tarling, co-head of Workflow Engineering at Goldman Sachs, on the process automation platform that they built with Camunda at its core. He is focused on workflow at enterprise scale: they have 60,000 users (the entire firm) with 8,000 daily users, participating in 10M new activities and 250M decisions per day spread over 650 compute servers. This includes 3,000 process models, 1,000 decision models, 6,000 forms models and 125 RPA bot automations, all created and supported by 1,500 platform developers. Yowsa.
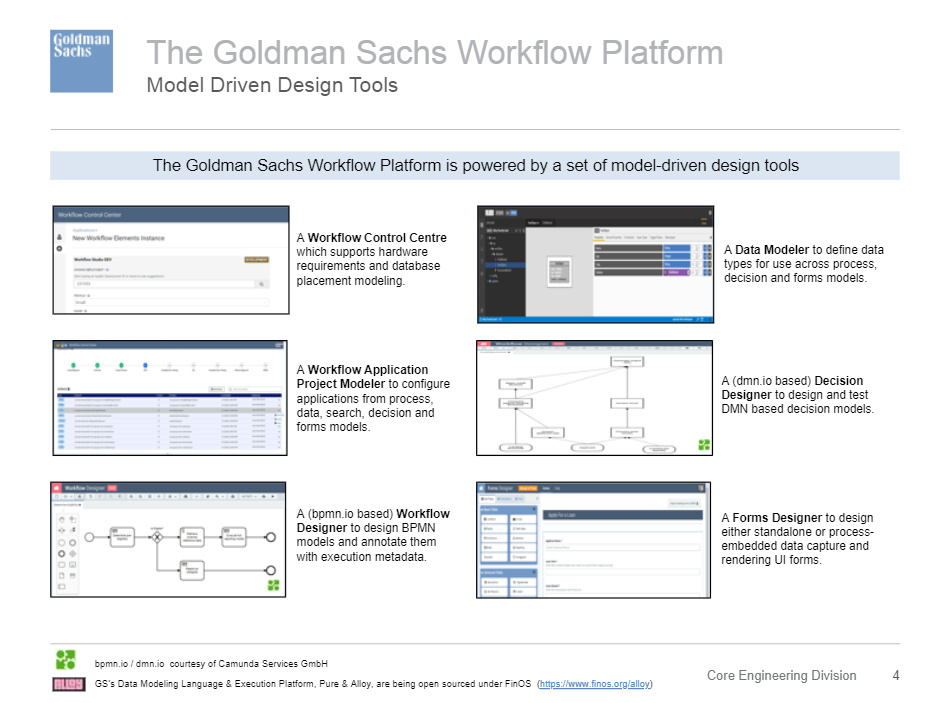
Their goal with creating their digital automation platform was to accelerate developers, but also support non-technical/citizen developers. This means that they embraced model-driven development by creating six key design tools:
Workflow Control Centre
Workflow Application Project Modeler
Workflow Designer, based on bpmn.io
Data Modeler
Decision Designer, based on dmn.io
Forms Designer
They built some engine extensions for their implementation, specifically around the using a stripped-down embedded BPM engine to implement decision flows with high-performance, plus the creation of an open-source jDMN execution engine.
He walked through their overall design-time and execution platform architecture, and some of the things that they did to maximize performance while maximizing (developer) usability. Decision services is a big part of their platform, and he discussed their enterprise-wide decision services execution platform. Their architecture wasn’t born in the cloud, but he feels that their use of microservices design principles means that they could move into the cloud in a straightforward manner.
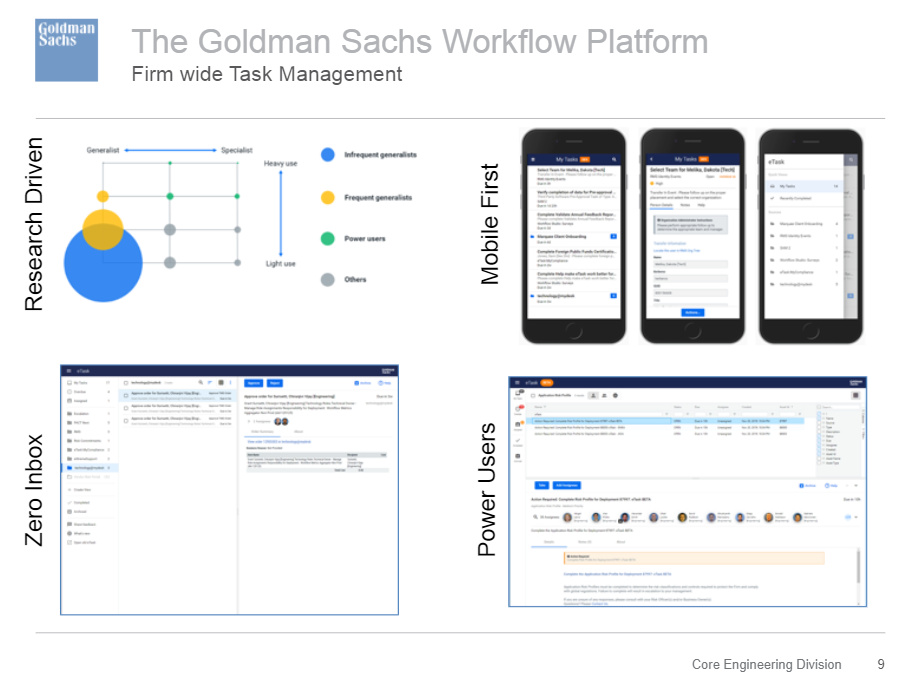
They have a number of different UI personas that they’ve developed for, resulting in a “zero inbox” persona versus a “power user”. They’ve recently redesigned these UIs with a mobile-first focus. They’re also supporting citizen developers for creating their own case management applications through a combination of model-driven design and pre-built components, plus a governed software development lifecycle built on GitLab. They’ve also built their own provisioning, runtime management and monitoring tools — they even use a BPMN-based process for provisioning.
If you’re building your own large-scale digital process/decision automation platform, definitely go and watch the replay of this presentation — Tarling has been in the trenches and has a ton of great advice. Lots of great Q&A at the end, too.
@phoebe_cat
Jakob Freund came back briefly to chat with Mary Thengvall and wrap the conference: thanks for giving a shout out to this blog (and my cat, who made a brief appearance on the Slack channel). And congrats to all for a great virtual conference that was much, much more than a long series of webinars.
I mentioned on Twitter today that CamundaCon is now the gold standard for online conferences: all you other vendors who have conferences coming up, take note. I believe that the key contributers to this success are live (not pre-recorded) presentations, use of a discussion platform like Slack or Discord alongside the broadcast platform, full engagement of a large number of company participants in the discussion platform before/during/after presentations, and fast upload of the videos for on-demand watching. Keep in mind that a successful conference, whether in-person or online, allows people to have unscripted interactions: it’s not a one-way broadcast, it’s a big messy collaborative conversation.
Day 2 of CamundaCon Live kicked off with Camunda co-founder Bernd Rücker talking about microservices orchestration and integation using workflow automation. This is a common theme for him, and I’ve seen earlier versions of this presentation, but he always brings something fresh to the discussion. He discussed reactive applications that are responsive, resilient, elastic and message-driven, then covered different styles of event-driven architecture.
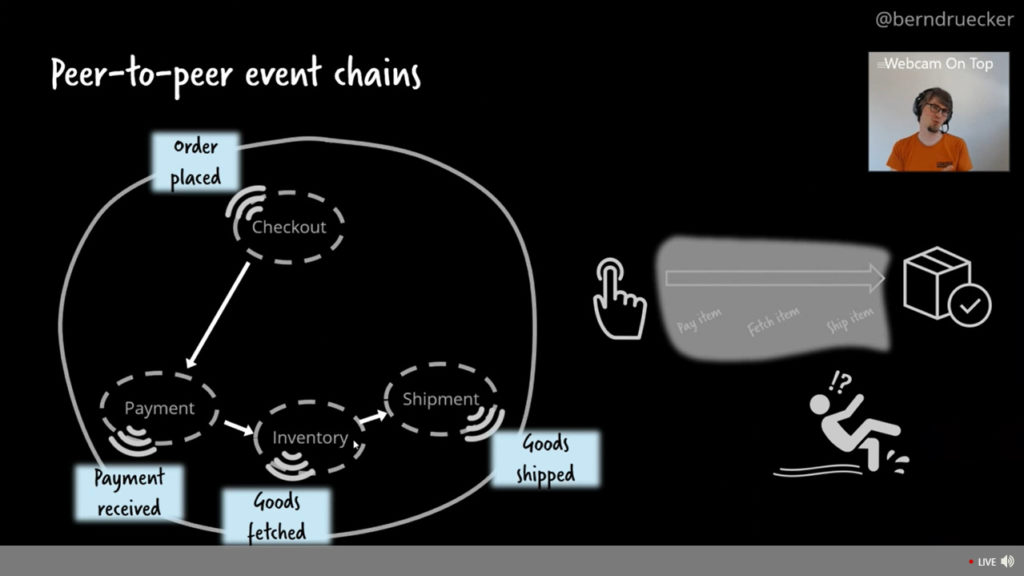
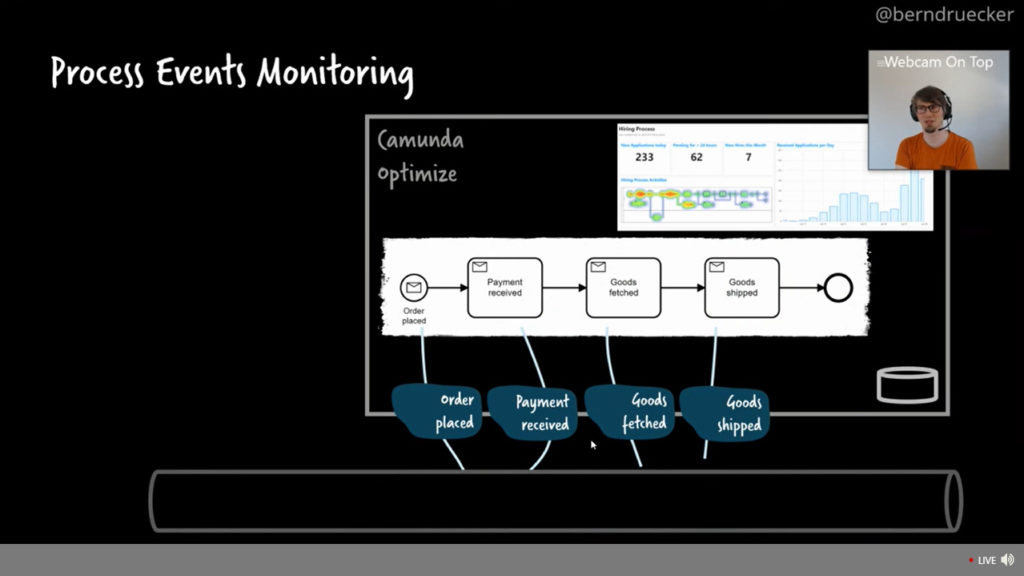
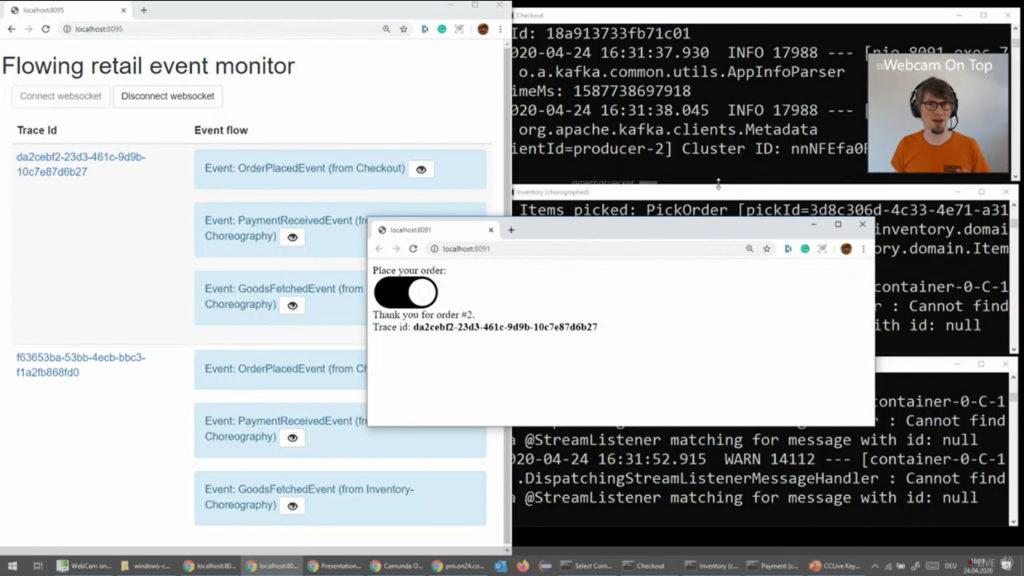
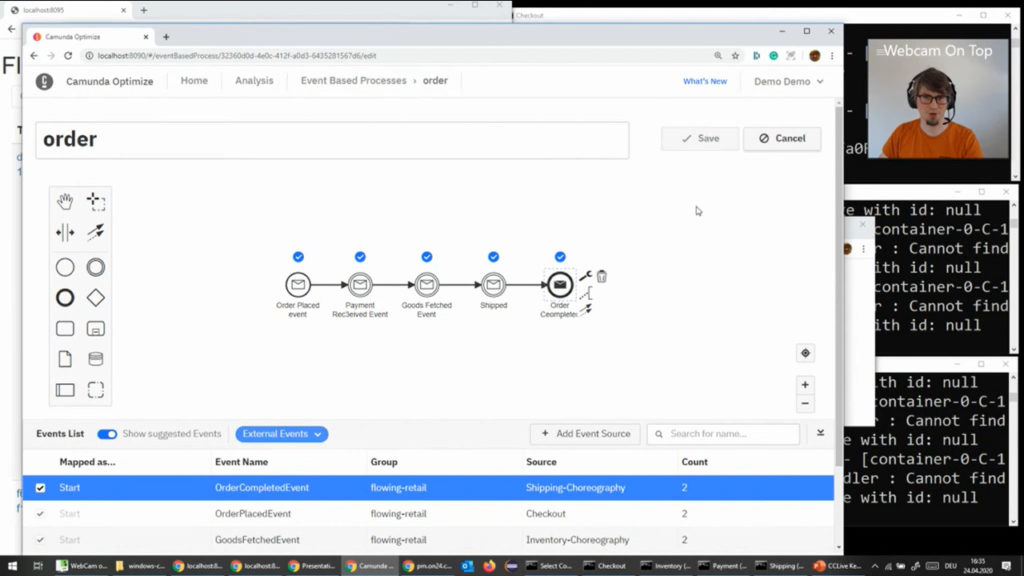
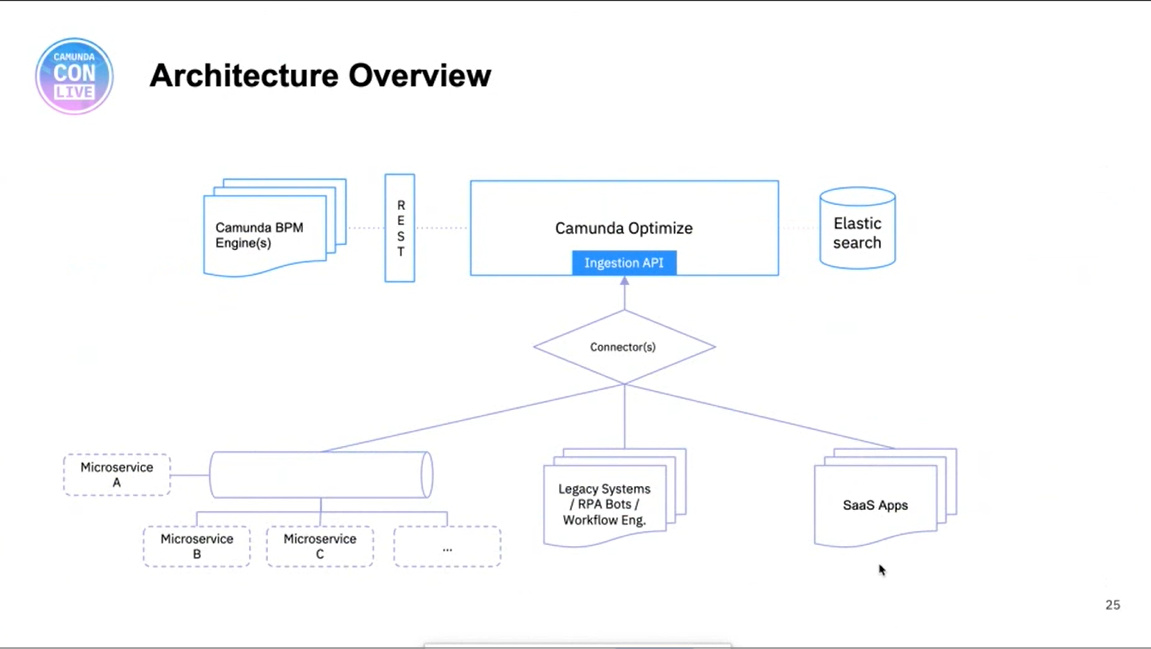
He gave a (live) demo of autonomous services communicating using Kafka, and showed the issue with peer-to-peer choreography: there is no sense of the end-to-end orchestration to ensure that all services that should have run did actually run. He created an event-based process in Camunda Optimize that modeled the expected end-to-end process, and now by connecting that to the Kafka messages, he had a visualization of the workflow that he defined that showed what happens when one service isn’t running: effectively, the virtual workflow is stuck at the previous service since it does not receive a message that the (stopped) service has picked up the messages.
One solution is to extract the end-to-end responsibility into its own service: really, this implies some level of orchestration via commands rather than purely reacting to events, even if it’s not a completely tightly-coupled workflow. If you use an engine like Camunda to do that top-level orchestration, then you can move the monitoring of the process within that engine (Cockpit rather than Optimize) although it’s likely that anyone using an event-based architecture is going to be looking at an event monitoring system like Optimize as well. You can see his slides below, and the video will be available on the CamundaCon Live hub probably by the time that I publish this post.
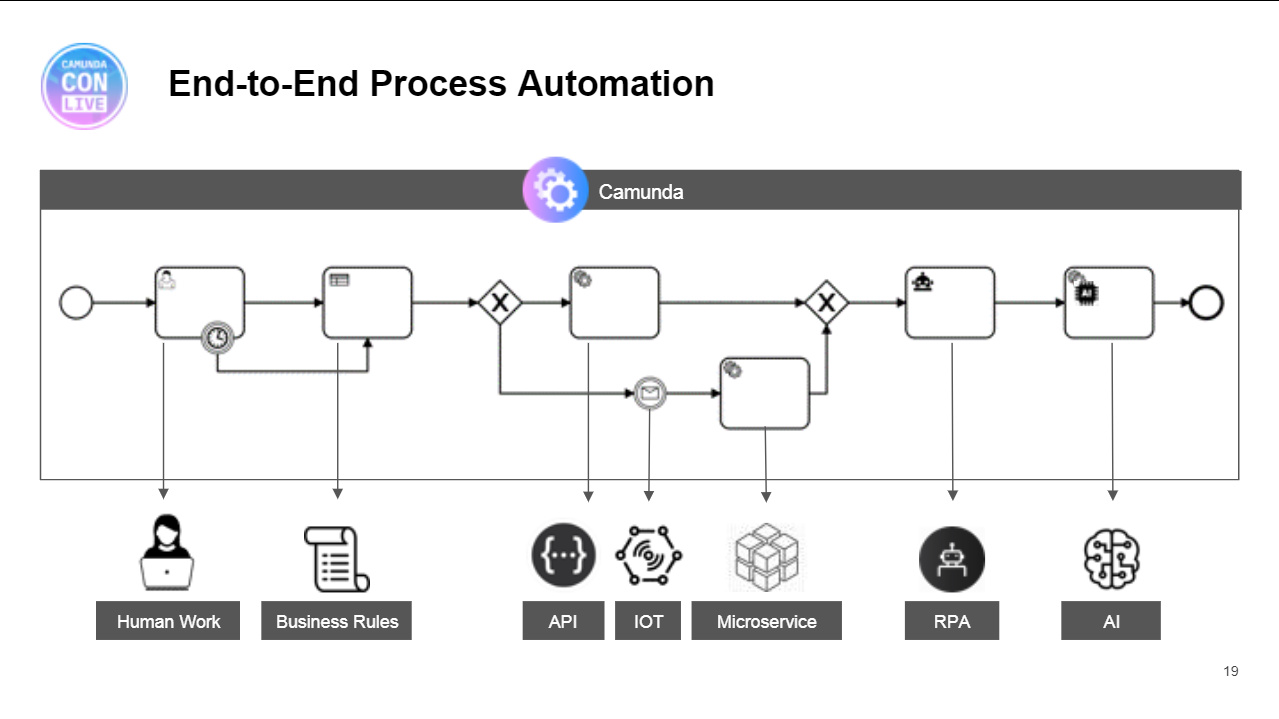
The morning session continued with CTO Daniel Meyer on some of the new product capabilities. Camunda’s goal has moved from just being a BPM engine for Java developers to a much broader orchestration platform that can integrate any technology stack and any endpoints.
He introduced a new distribution called Camunda Run (or Lil’ Camboot, as Niall Deehan calls it) provides a lightweight package (50MB) that includes the BPMN and DMN workflow and decision engines, Cockpit, Tasklist and the REST API. It can even be run in headless mode, which disables the web apps, if you just want the engines. It’s Open API enabled, CORS enabled, and SSL enabled out of the box. He gave a quick demo of downloading, starting and running Camunda Run: it’s pretty familiar if you’ve spent any time with Camunda, and it starts fast. From the blog post announcement, the target audience for Run is if at least one of the following is true:
You need a standalone process engine accessible via REST API
You don’t have extensive Java knowledge (or none at all) but still want to use Camunda BPM
You don’t want to configure an application server yourself
You want to configure everything in one place
You just want to Run Camunda BPM
Meyer also talked about Camunda Optimize, specifically the event-based process monitoring. We saw a bit of that yesterday in Felix Müller’s presentation, and I had a more complete view of the event-based features of Optimize a few weeks ago on the 3.0 release webinar. Basically, you add the event source to Optimize (such as Kafka), and Optimize exposes messages and allows them to be attached to the entry/exit points of elements on a BPMN diagram that represents the event-driven process. They are offering a 30-day free trial for Optimize now if you want to try it out.
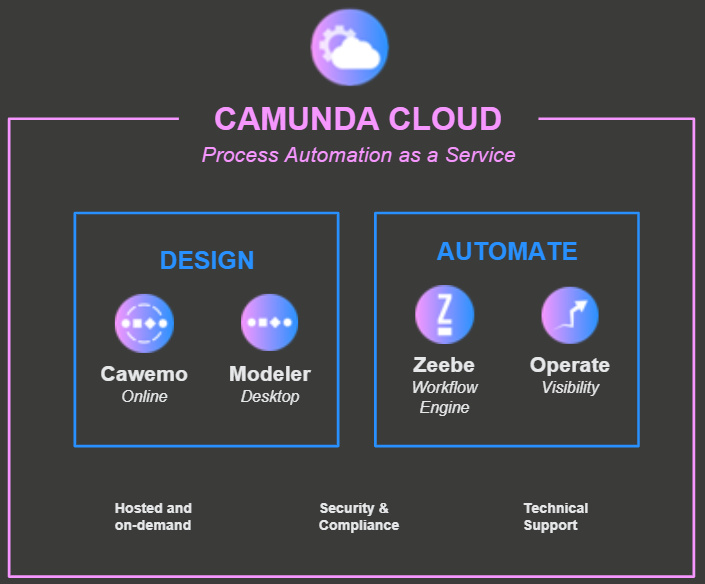
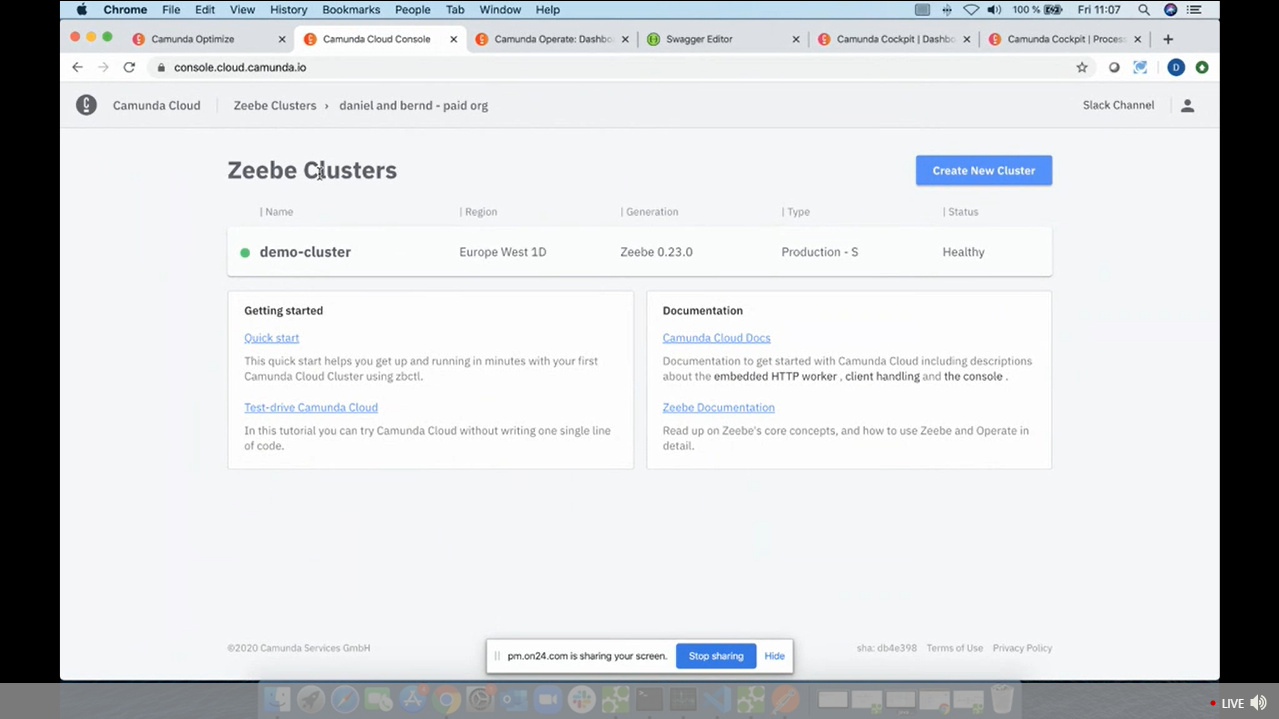
Meyer’s third topic was about process automation as a service via Camunda Cloud, which is powered by Zeebe (rather than Camunda BPM). Having cloud-native Zeebe behind the scenes means that it’s highly scalable and fault-tolerant, and uses pub-sub orchestration to let you include endpoints from anywhere. He demonstrated how to spin up a new Zeebe cluster, then deploy a BPMN model that was created in the Zeebe Modeler and start instances of the process using the zbctl command line. These instances were then visible in Camunda Operate (the Zeebe process monitoring tool), and he ran JavaScript workers and published messages to complete tasks in the process and show the instance progressing through the process model. There’s a free trial for Camunda Cloud, and an early access version for $699/month that includes access to larger clusters and technical support.
He fielded some questions that came up on the Slack workspace during his talk. Moving from an existing Camunda BPM implementation to Camunda Run is apparently as easy as just redirecting to the new application server. You can’t use Java delegates, but will have to switch those out for external tasks. There was a question about BPM versus Zeebe, which I think is a question that a lot of Camunda customers have: although most are likely familiar with the technical and functional differences, there is an open question of whether Camunda will continue to support two workflow engines in the future, and if they are going to shift focus more towards Zeebe use cases.
The morning finished by breaking out into two tracks; I stayed with the customer presentations rather than the technical breakout to hear some of the case studies. The one that I was most interested in was Fareed Saeed, head of Product and Tools for Advanced Process Solutions at Fidelity Investments, talking about migrating their monolithic legacy BPM to Camunda, in part because I did some early technical architecture consulting with them on their digital process automation platform over a year ago, although I’m not involved at this time. For those of you who know me mostly through this blog and as an independent industry analyst, you may not be aware that the other half of my business is as a consultant to large enterprises, mostly financial services and insurance, on technical architecture and strategy, or anything else to help make their process-centric implementation projects a success.
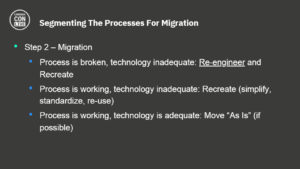
James Watson of Doculabs, who advised Fidelity on migration strategies, joined him on the discussion. Saeed talked about their current home-built workflow system, which runs thousands of different processes for most of their back office operations, and the need to move away from monolithic architecture and fragile, non-agile systems to a more flexible platform. This talk was not about the architecture or platform, but about the migration planning and execution: a key subject for any large enterprise moving off a legacy platform, but one that is often not fully considered during new digital automation platform implementation.
There are a few different strategies for migrating process-based applications, and it’s not the same story for each process. Watson shared his thoughts on this (see the slide at right), but this is my take on it:
High-volume processes, that usually represent a smaller number of process models but most of the transaction volume, are usually rewritten from scratch while incorporating some degree of re-engineering and process improvement along the way. These are the core business processes that need to be done right, and will most benefit from the more agile and scalable new platform.
Lower volume processes can be reviewed to see if they’re still required, may possible be combined into similar processes, then a straightforward “lift and shift” rewrite done to just duplicate the functionality as is. In short, these aren’t worth the time to do the re-engineering unless there are obvious wins, since the volume is relatively low. These are also candidates for low-code business-led development if that’s available on the automation platform, rather than the professional development teams required for the high-volume transactional processes.
Very low volume processes can be retired, especially if their functionality can be rolled into processes in one of the first two categories.
Although they are looking at a “factory model” for some level of automation around the migration, Saeed believes that this is an opportunity to re-engineer the processes rather than just rewriting the same (broken) process on a new platform. They want to have smaller, distributed groups for developing and delivering new applications, which means that they need to have the right governance and standards in place to support a distributed model. He sees the need for early pilots and successes to allow everyone to see how this can work, and learn how to make it successful. A strong diverse team of business leaders is also a plus, since there will be some degree of pain in the business units as the migration happens.
That’s it for the morning of Day 2, they must have read my comments yesterday and actually made sure that we finished on time so that we get our 15 minute lunch break. 🙂 I’ll be back for the afternoon to finish off CamundaCon Live 2020.
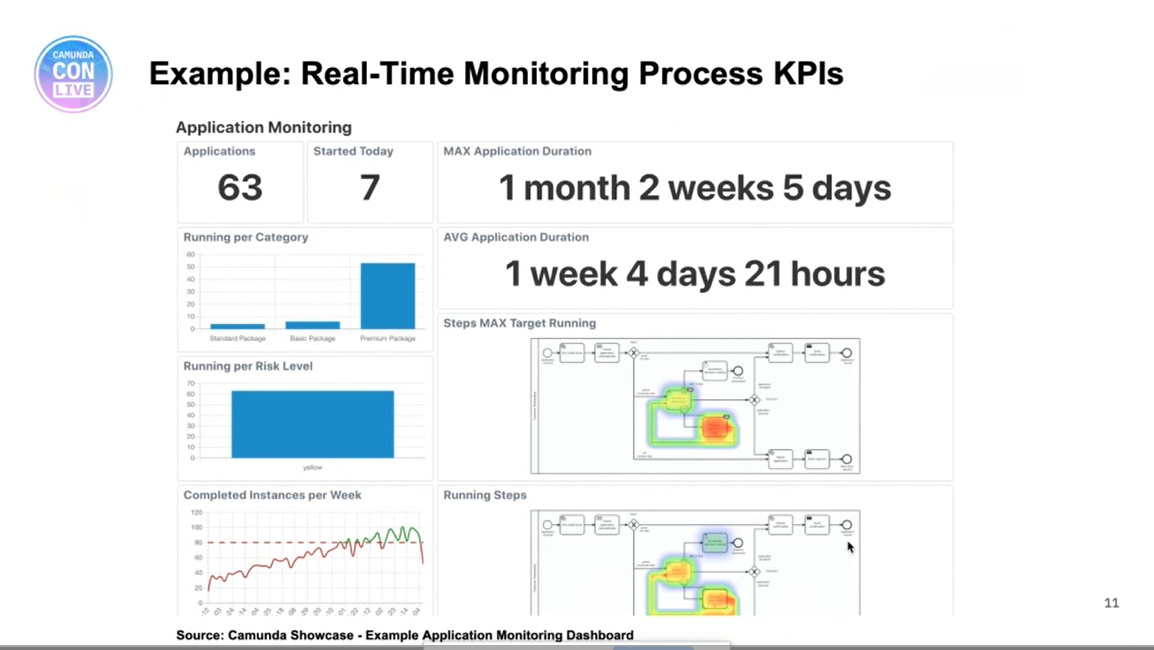
We continued the first day of CamundaCon Live (virtual) 2020 with Felix Mueller, senior product manager, presenting on how to use Camunda Optimize for driving continuous improvement in processes. I attended the Optimze 3.0 release webinar a couple of weeks ago, and saw some of the new things that they’re doing with monitoring and optimization of event-based processes — this allows processes that are not part of Camunda to be included in Optimize. The CamundaCon session started with a broader view of Optimize functionality, showing how it collects information then can be used for root cause analysis of process bottlenecks as well as displaying realtime metrics. They have some good case studies for Optimize, including insurance provider Visana Group.
He then moved to show the event-based process monitoring, and how Optimize can ingest and aggregate information from any external system with a connector, such as RabbitMQ (which they have built). His demo showed a customer onboarding process that could be triggered either by an online form that would be a direct Camunda process instantiation, or via a mailed-in form that was scanned into another system that emitted an event that would trigger the process.
It was very obvious that this was a live presentation, because Mueller was scrambling against the clock since the previous session went a bit long, having to speed through his demo and take a couple of shortcuts. Although you might think of this as a logistical “bug”, I maintain that it’s an interactivity “feature”, and made the experience much closer to an in-person conference than a set of pre-recorded presentations that were just queued up in sequence.
This was followed by a presentation by Kris Barczynski of Nokia Bell Labs about a really interesting use case: they are using Camunda to guide visiting groups on tours through the Nokia Campus customer experience spaces, and interact with devices including the guests’ wearables, drones and robots. Visitors are welcomed and guided by a robot, and they can interact with voice-controlled drones; Camunda is orchestrating the processes behind the scenes. He talked about some of their design decisions, such as using Camunda JavaScript workers to call external services, and building a custom Android app. Really interesting combination of physical and virtual processes.
Next was a panel discussion on the future of RPA, with Vittorio Dal Bianco of Nokia, Marco Einacker of Deutsche Telekom, Paul Jones of NatWest Group, and Camunda CEO Jakob Freund, moderated by Jason Bloomberg of Intellyx Research. The three customer presenters are involved with the RPA initiatives at their own organizations, and also looking at how to integrate that with their Camunda processes. Panels are always a challenge to live-blog, but here’s some of the points discussed (attributed where I remembered):
The customer panelists agreed that RPA has allowed people to move to more interesting/valuable work, rather than doing routine tasks such as copying and pasting between application screens. Task automation through RPA reduces resources/costs, decreases cycle time, and also improves quality/compliance.
RPA is a “short-term bandaid” driven from outside the IT organization in order to get some immediate efficiency benefits. It’s maintenance-intensive, since any changes to the appliations being integrated means that the bots need to be reprogrammed. Deutsche Telekom is moving from RPA front-end integration/automation to drive the more strategic BPMS/API automation, so sees that RPA has been an important step on the strategic journey but not the endpoint. NatWest recognizes RPA as a key automation tool, but see it as a short-term tactical tool; they classify RPA as part of their technical debt, and it is not a part of their long-term architecture. Nokia thinks that RPA will remain in niche pockets for applications that will never have a proper API, such as Excel-based applications.
Nokia uses Blue Prism for RPA. NatWest uses UIPath RPA, and has a group that is building the integration for having Camunda execute a UIPath task — although I would have thought this would be a relatively simple service call or external task. Deutsche Telekom is using seven different RPA platforms, three of which are commercial including Another Monday and Kryon; they are just starting to look at the integration between Camunda and RPA with a plan to have Camunda orchestrate steps, and one “microbot” performing an atomic task at that step. As their core system offers an API for that task, the RPA bot will be replaced with a direct API call. This last approach is definitely aligned with Camunda’s vision of how their BPM can work with RPA bots as well as any other “task performers”.
More discussion on the role of RPA in digital transformation: recommendations to go ahead and use it, but consider it as a stop-gap measure to get a quick win before you can get the APIs built out in the systems that are being integrated. It’s considered technical debt because it will be replaced in the future as the APIs of the core systems become available. It’s a painkiller, not a cure.
Although some of the companies are using business people to build their own bots, that has a mixed degree of success and other companies do not classify RPA as citizen developer technology. This is pretty much the same as we’re seeing with other low-code environments, where they are often sold as application development platforms for non-professional developers, but the reality is that many applications require a professional developer because of the technical complexity of systems being integrated.
Cost and effort of RPA bot maintenance can be significant, in some cases more than back-end integration. Bot fixes may be fairly quick, but are required much more frequently such as when a password changes: bots require babysitting.
The customers had a few Camunda product requests, such as better connectors to more of the RPA tools. In general, however, they don’t want Camunda to build/acquire their own RPA offering, but just see it as another example of where you can pick a best-of-breed RPA tool and use it for task automation at individual steps within a Camunda process.
Best practices/lessons learned:
Separate the process orchestration layer from the bot execution layer from the beginning, with the process orchestration being done by Camunda and the bot task execution being done by the RPA tool.
Use process mining first to objectively identify what should be automated; of course, this would also require that you mine the user interaction processes that would be automated with bots, not just the system logs.
Have a centralized control center for bot control.
Develop bot templates that can be more quickly modified and deployed.
Looking at how the panel worked, there are definitely aspects of online panels that work better than in-person panels, specifically how they respond to audience questions. Some people don’t want to speak up in front of an audience, while others get up and bloviate without actually asking a question. With online-only questions, the moderator can browse through and aggregate them, then select the ones that are best suited to the panel. With video on each of the presenters (except for one who lost his connection and had to dial in), it was still possible to see reactions and have a sense of the live nature of the panel.
The last session of the day was Jimmy Floyd of 24 Hour Fitness on their massive Camunda implementation of five billion (with a “B”) process node executions per month. You can see his presentation from CamundaCon Berlin 2018 as a point of comparison with today’s numbers. Pretty much everything that happens at 24 Hour Fitness is controlled by a Camunda process, from their internal processes to customer-facing activities such as a member swiping their card to gain access to a club. It hasn’t been without hiccups along the way: they had to turn off process history logging to attain this volume of data, and can’t easily drill down into processes that call a lot of other processes, but the use of BPMN and DMN has greatly improved the interactions between product owners and developers, sometimes allowing business people to make a rule change without involving developers.
He had a lot of technical information on how they built this and their overall architecture. Their use is definitely custom code, but using Camunda with BPMN and DMN gave them a huge step-up versus just writing code. Even logic inside of microservices is implemented with Camunda, not written in code. Their entire architecture is based on Camunda, so it’s not a matter of deciding whether or not to use it for a new application or to integrate in a new external solution. They are taking a look at Zeebe to decide if it’s the right choice of them moving forward, but it’s early days on that: it would be a significant migration for them, they would likey lose functionality (for BPMN elements not yet implemented in Zeebe, among other things), and Zeebe has only just achieved production readiness.
Camunda is changing how they handle history data relative to the transactional data, in part likely due to input from high-throughput customers, and this may allow 24 Hour Fitness to turn history logging back on. They’re starting to work with Optimize via Kafka to gain insights into their processes.
Day 1 finished with a quick wrapup from Jakob Freund; in spite of the fact that it’s probably been a really long day for him, he seemed pretty happy about how well things went today. Tomorrow will cover more on microservices orchestration, and have customer case studies from Cox Automotive, Capital One and Goldman Sachs.
As you probably gather from my posts today, I’m finding the CamundaCon online format to be very engaging. This is due to most of the presentations being performed live (not pre-recorded as is seen with most of the online conferences these days) and the use of Slack as a persistent chat platform, actively monitored by all Camunda participants from the CEO on down. They do need a little bit more slack in the schedule however: from 10am to 3:45pm there was only one 15-minute break scheduled mid-way, and it didn’t happen because the morning sessions ran overtime. If you’re attending tomorrow, be prepared to carry your computer to the kitchen and bathroom with you if you don’t want to miss a minute of the presentations.
As I finish off my day at the virtual CamundaCon, I notice that the videos of presentations from earlier today are already available — including the panel session that only happened an hour ago. Go to the CamundaCon hub, then change the selection from “Upcoming” to “On Demand” above the Type/Day/Track selectors.