There are a lot of interesting case studies being presented here in New York this week, and I’ll be checking back for the videos of ones that I missed when they’re published next week.
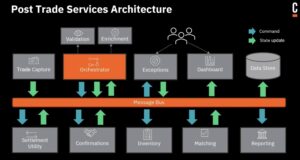
I attended the Barclay’s session on their post-trade processes, presented by Shakir Ahmed, Head of International securities Settlements Technology, and Larisa Kvetnoy, Managing Director of Markets Post Trade Technology. Although trading processes are not handled with a BPMN engine like Camunda, the post-trade processes are an important part of ensuring that trades settle correctly. Given the move to T+1 settlements, it’s critical that all of the exception handling and due diligence is completed in time to execute the settlement on time. There are a lot of complex activities that must be performed, often in a specific order, and many of these have relied on aging legacy systems and manual processes in the past.
Now, they use Camunda to orchestrate services, and have created separate services for each function that must be performed in the post-trade processes. They also created a centralized exception handling service — which relies heavily on human work — to bring together all of the exceptions regardless of the system or step where they occur.
They are definitely seeing improvements in agility and time to market, but also in operational oversight: making sure that transactions don’t “fall through the cracks” and fail to settle on time. This reduces their financial risk as well as their overall costs.
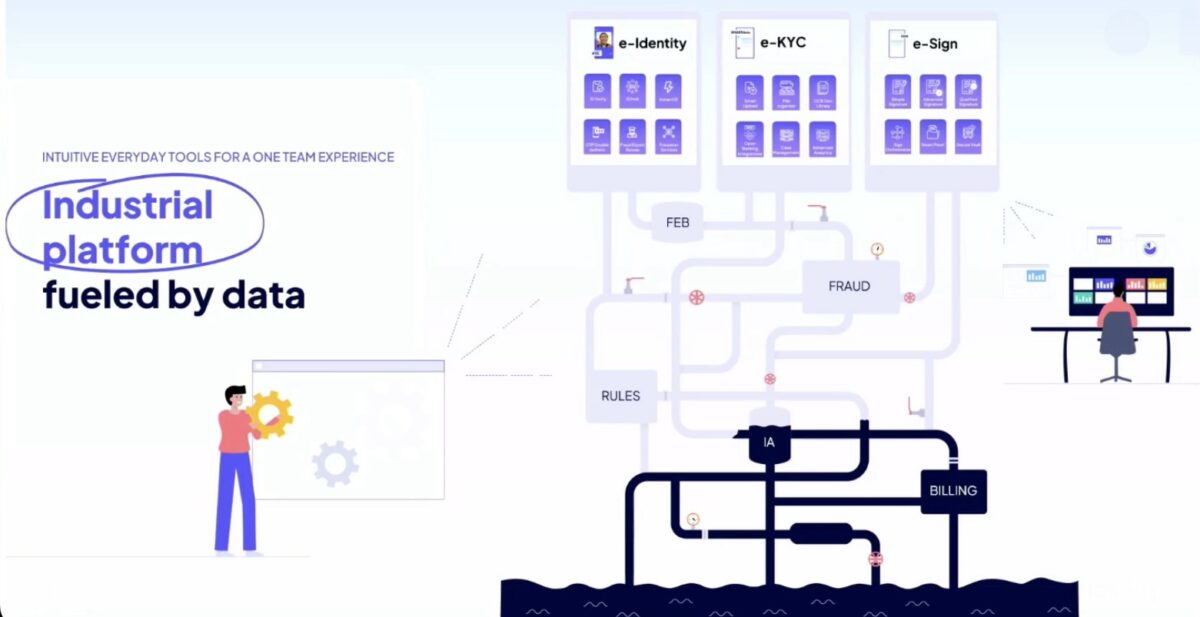
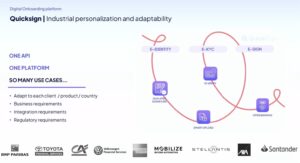
Next was QuickSign, a European digital onboarding provider, presented by founder Thibaut Ravise and CMO Charlotte Stril. They provide services to large financial institutions such as BNP Paribas, allowing these FIs to outsource the onboarding of customers almost instantly. This is essential for being able to provide credit solutions in the course of a retail transaction, where the customer is offered the option to use a credit option during online checkout when they are buying (for example) the latest iPhone. This is also used for fast bank account opening, immediate expense payments for insurance claims, and other situations where an onboarding experience needs to be much faster than could be offered by the FIs directly with their legacy processes. Since they’re based in France, they provide services that adhere to the strict EU standards and regulations, and are expanding into the US with some of their products.
Part of their solution is an orchestration layer that is based on Camunda, which brings together the digital identification, KYC (know your client) and signing services. This in turn helps their FI clients to win new retail clients such as Apple and Amazon, where near-instant credit account opening and onboarding is a necessary part of online purchasing. When Camunda 8 was released in 2020, they made the move from their own internal workflow to the Camunda BPMN engine on premise. The use of BPMN has allowed them to rework and release customer workflows quickly, and Camunda Optimize allows them to gather information and optimize processes. For them, scalability and resiliency of the platform is critical: workloads can increase by several times on heavy shopping days such as Black Friday.
The last customer case study session that I attended today was with Dutch energy infrastructure company Alliander on their migration from Camunda 7 to 8, presented by Floris van der Meulen, Business Analyst System Operations, and Eric Hendriks, Senior Software Engineer. They were one of the first companies to migrate a production process from 7 to 8, and likely have the scars to prove it.
From a business standpoint, they operate large energy distribution grids throughout the Netherlands, with one component of that being their autonomous grid manager that includes Camunda. They were originally using open source Camunda 7 to respond to Kafka messages and manage security and load changes required to the grid as load and supply conditions fluctuate.
Factors driving their decision to move off the open source Camunda 7 included lack of operational insights, transactional locking, no commercial support, and scalability, all ofwhich had them decide to move to Camunda 8. They were in production with Camunda 7 but hadn’t scaled up so did not consider the processes mission critical; in order to move to the next stage, they felt it necessary to shift platforms before investing more in the older platform. They did an evaluation of what would change as a result of the migration: at the time, some BPMN features were not (yet) in Camunda 8, such as execution listeners, but they would have the benefit of scalability as well as being able to use Optimize for operational insights.
They used a gradual “new world” approach to migration, and even created a BPMN diagram to illustrate their migration process. They ended up having to do a manual conversion of their BPMN models because of the execution listeners: this required them to rethink and completely redesign their processes.
Once they redesigned the BPMN processes and reconnected them to their UI, they needed to overhaul their testing procedures. They started with “black box” tests on their old processes, and ran them against the new processes to ensure that the same inputs resulted in the same outputs. Following the confirmation that the new processes behaved the same as the old processes, they could migrate in the new V8 processes and decommission the V7 processes. Their process instances are all short-running, so there was no requirement to migrate work in progress, which made the migration more straightforward. Also, they only had about a dozen process models to migrate.
They were pretty open about some of the problems that they had with the migration: it’s not automated by any stretch of the the imagination, and it’s a non-trivial project that will almost certainly include process redesign and retooling. However, they now have cleaner models and code, and a much more robust and scalable environment.
As as aside, I’m attuned to the challenges of migrating customers between product versions when it’s a complete replatforming exercise, and interested to see how well Camunda handles this over the next few years as they sunset Camunda 7 support. A lot of companies don’t do this very well — see the history of TIBCO with migrating Staffware customers to ActiveMatrix BPM, for example, or the IBM BPM “three engines under the covers” fiasco — and it’s no longer enough to just tell customers to build their new processes on the new platform while sticking their heads in the sand over the existing processes. Given that Camunda has really focused on being the orchestration engine in the past, the shift from 7 to 8 should be a bit less painful than replatforming with some other vendor products: no UI to redevelop, and some ability to export/import BPMN processes directly as long as all of the BPMN elements are supported. Maybe they can use AI for this? 😉
We’ve started the breakout paper presentations and I’m in the session on design patterns and modeling. For these breakouts, I’ll mostly just offer a few notes since it’s difficult to get an in-depth sense in such a short time. I’ll provide the paper and author names in case you want to investigate further. Note that some of the images that I include are screenshots from the conference proceedings: although the same information was shown in the presentations, the screenshots are much more legible than my photos made during the presentations.
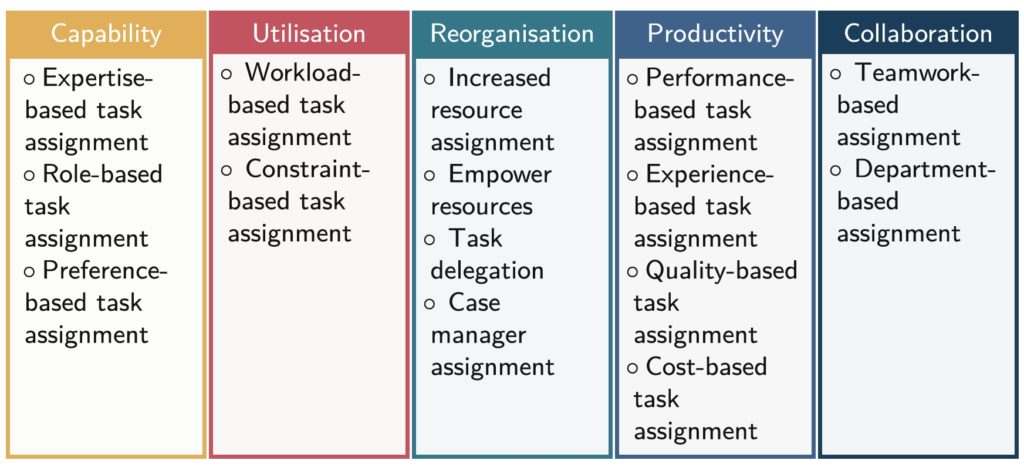
The first paper is “Not Here, But There: Human Resource Allocation Patterns” (Kanika Goel, Tobias Fehrer, Maximilian Röglinger, and Moe Thandar Wynn), presented by Tobias Fehrer. Patterns help to document BPM best practices, and they are creating a set of patterns specifically for human resource allocation within processes. They did a broad literature review and analysis to distill out 15 patterns, then evaluated and refined these through interviews with process improvement specialists to determine usefulness and pervasiveness. The resulting patterns fall into five categories: capability (expertise, role, preference), utilization (workload, execution constraints), reorganization (empower individual workers to make decisions to avoid bottlenecks), productivity (efficiency/quality based on historical data), and collaboration (based on historical interactions within teams or with external resources). This is a really important topic in human tasks within processes: just giving the same work to the same person/role all the time isn’t necessarily the best way to go about it. Their paper summarizes the patterns and their usefulness and pervasiveness measures, and also considers human factors such as the well-being and “happiness” of the process participants, and identifying opportunities for upskilling. Although he said explicitly that this is intended for a priori process design, there’s likely knowledge that can also be applied to dynamic runtime resource allocation.
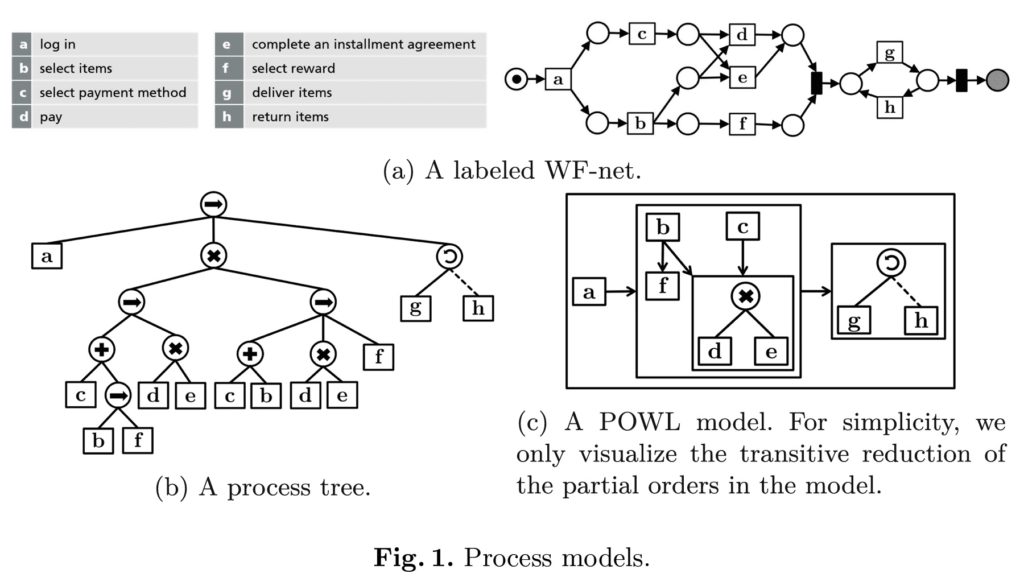
The second presentation was “POWL: Partially Ordered Workflow Language” (Humam Kourani and Sebastiaan van Zelst), presented by Humam Kourani. He introduced their new modeling language, POWL, that allows for a better discovery and representation of partial orders, that is, where some activities have a strict order, while others may happen in any order. This is fairly typically in semi-structured case management, where there can be a combination of sets of tasks that can be performed in any order plus some predefined process segments.
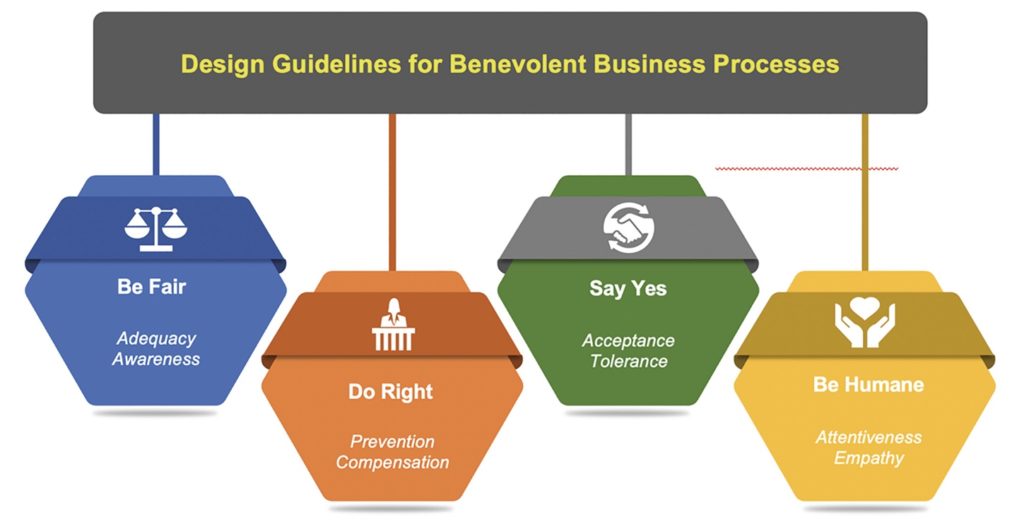
The third presentation was “Benevolent Business Processes – Design Guidelines Beyond Transactional Value” (Michael Rosemann, Wasana Bandara, Nadine Ostern, and Marleen Voss), presented by Michael Rosemann. Benevolent processes consider the needs of the customer as being as important as (or even more important) the needs of the “provider”, that is, the organization that owns the process. BPM has historically been about improving efficiency, but many are looking at other metrics such as customer satisfaction. In my own writing and presentations, I make an explicit link between customer satisfaction and high-level revenue/cost metrics, and the concept of benevolent processes fits well with that. Benevolence goes beyond customer-centric process design to provide an immediate, unexpected and optional benefit to the recipient. A thought-provoking view on designing processes that will create fiercely loyal customers.
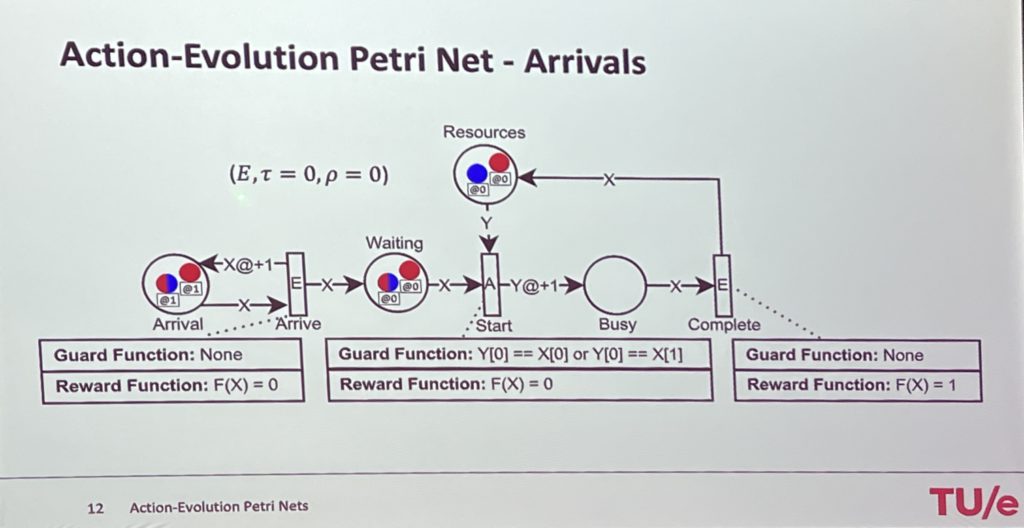
The final presentation in this session was “Action-Evolution Petri Nets: a Framework for Modeling and Solving Dynamic Task Assignment Problems” (Riccardo Lo Bianco, Remco Dijkman, Wim Nuijten, and Willem Van Jaarsveld), presented by Riccardo Lo Bianco. Petri nets have no mechanisms for calculating assignment decisions, so their work looks at how to model task assignment that attempts to optimize that assignment. For example, if there are two types of tasks and two resources, where one resource can only perform one type of task, and another resource can perform either type of task, how is the work best assigned? A standard assignment would just randomly assign tasks to resources, filtered by resource capability, but that may result in poor results depending on the composition of the tasks waiting in the queue. They have developed and shared a framework for modeling and solving dynamic task assignment problems.
Good start to the breakout sessions, and excellent insights on some difficult process modeling research problems.
If there’s something that the last 1.5 years has taught me, it’s that speaking for online conferences and even recorded video can be almost as much fun as giving a presentation in person. I give partial credit for that observation to Denis Gagne of Trisotech, who encouraged me to turn my guest posts on their blog into short videos. He also provided some great feedback on making a video that is more like me just chatting about a topic that I’m interested in, and less like a formal presentation.
And most recently, I asked the question “What are you modeling for“, and how that impacts your model design:
In addition to these videos, I’m working with Bizagi to publish a series of eight short video interviews about citizen development, and I’ll be keynoting with a summary of those topics at their Catalyst conference on October 14.
I’m calling this a DIY Mask for Techies because the basic materials are something that every techie has in their drawer: a t-shirt, a couple of conference lanyards, and a paperclip. Of course, you don’t have to be a techie to make one. 🙂
I realize that this is way, way off topic for this blog, and for me in general, but unusual times lead to unusual solutions. This is a long, DIY instructional post, and if you prefer to watch it instead of read it, I’ve recorded the same information as a video. Click on any of the photos in this post to see it at full resolution.
There’s a variety of recommendations on whether or not to wear a mask if you are not exhibiting any symptoms of illness. In some countries that have had success in reducing infection rates, they have a general policy of wearing a mask in public regardless of symptoms, since carriers can be asymptomatic.
I’m choosing to wear a mask when I leave home, or when I greet people who come to the door. Since it’s very difficult to buy medical-grade masks now, I’ve opted to make my own. I’ve also made a few for friends, especially those who have to walk their dogs, or work in an essential service that requires them to leave home.
I’m going to take you through the method that I used, with photos of each step, so that you can make your own. Although I use a sewing machine here, you can sew these by hand, or you could even use fabric glue or staples if you don’t have a needle and thread, or are in a hurry.
Design considerations
I did a lot of research before I started making masks, but my final design was based on these two references.
I went through several iterations to try and make the materials something that a lot of people would already have, since it’s hard to get out shopping these days. Based on the suggested materials, I started with a large t-shirt from my husband’s collection of the many that I have brought home to him from conferences. To all of you vendors who provided me with t-shirts in the past, we thank you!
Next, I needed something to make ties, since these work better than elastic, and I didn’t have a lot of elastic on hand. Remember all of those conferences I went to? Yup, I still had a lot of the conference lanyards hanging in a closet. I provide a hack at the end of these instructions to use the bottom hem of the t-shirt if you don’t have conference lanyards, or you can use other types of ties such as shoelaces.
The paperclip was added in the third-to-last design iteration after I went out for a walk and found that my glasses steamed up due to a gap between the mask and the sides of my nose. It’s sewn into the top edge of the mask to create a bendable nose clip that can be adjusted for each wearer.
Caveats
Just a few caveats, since these are NOT medical-grade masks and I make no specific claims about their effectiveness:
They do not form a tight seal with your face, although they hug pretty closely.
They do not use medical-grade materials, and are not going to be as effective at filtering out the bad stuff.
In general, these masks may not provide complete protection. If you have medical-grade or N95 masks at home, you could use those and they would be better than these, but I recommend that you donate the medical-grade and N95 masks to your local healthcare organization so that front-line doctors and nurses are protected.
All in all, not perfect, but I believe that wearing a DIY fabric mask is better than wearing no mask at all.
Getting started and installing the nose clip
Let’s get started with the basic measuring and installing the nose clip.
Here’s the fabric pattern: it’s a 20cm by 37cm square cut from a t-shirt. Depending on your t-shirt size, you may get four or five of these out of a single shirt.
If you are using a double-knit material like a t-shirt, then you don’t need to hem the edges because it doesn’t ravel at the edges very much. If you are using a different fabric that will ravel, then cut slightly larger and hem the edges. I like to optimize the process so opted for the t-shirt with no hemming.
Next is our basic standard-sized paperclip. I don’t have a lot to say about this, expect that the first paperclip version used a larger paperclip and the wire was too stiff to easily bend while adjusting.
Next thing is to straighten the paperclip. Mine ended up about 10cm long, but plus or minus a centimetre isn’t going to matter.
Putting the paperclip aside for a moment, here’s how to fold the fabric to prepare for sewing. The 20cm length is the width of the mask from side to side on your face, and the 37cm length allows you to fold it so that the two ends overlap by about 1cm. In this case, I’ve overlapped by about 1.5cm, which means that the total height of the mask is 17cm, or 37/2 – 1.5.
I used these measurements because they fit both myself and my husband, so likely work for most adults. If you’re making a mask for a child, measure across their face from cheekbone to cheekbone to replace the 20cm measurement, then measure from the top of their nose to well under their chin, double it and add a centimeter to replace the 37cm measurement.
This next part is a bit tricky, and hard to see in the photos.
This is where we sew the paperclip into the top fold of the mask to create a bendable nose clip. What you’re seeing on the right is the fold at the top of the mask with the straightened paperclip rolled right up into the fold.
To prepare for sewing, I pinned the fabric below the paperclip, pushing the paperclip right into the inside of the fold. In the photo on the left, the paperclip is inside the folded material above the pins.
Now we move to the sewing machine, although this could be done by hand-stitching through the edge of the fabric and around the paperclip. In fact, after having done this a few times, I think that hand-sewing may be easier, since the feed mechanism on most home machines don’t work well when you have something stiff like a paperclip inside your fabric.
If you’re using a sewing machine, put on the zigzag foot and set the width of the stitch to as wide as it will go, so that the two sides of the zigzag stitches will go on either side of the paperclip. Start sewing and guide it through so that the fabric-covered paperclip tucked into the fold is in the centre, and the zigzag stitches go to either side of it: first to the left on the main part of the fabric, and then to the right where there is no fabric but the stitch will close around it.
That may not have been the best explanation, but here’s what you end up with. The straightened paperclip is inside the fold at the top of the fabric, and the zigzag stitches go to either side of it, which completely encloses the paperclip with fabric.
If you have fabric glue, you could definitely try that to hold the paperclip in place instead, although I haven’t tried that. You could also, as I mentioned before, hand-sew it into place.
And here’s why we went to all that work: a bendable nose clip. This is looking from the top of the mask, so you can see that the paperclip is completely sewn into the fold of the fabric, and when you bend the paperclip, it’s going to let you mold it to fit your own nose.
Now here’s what you have, and the hard part is over. You have the folded fabric like we saw earlier, with a straightened paperclip sewn inside the top fold. Lay out your fabric like this again for the next steps.
Adding ties and stitching sides
We’re now going to add ties and stitch the sides to create the mask. I used a sewing machine, but you could do all of this with hand sewing, or you could some type of craft adhesive such as a hot glue gun or fabric glue. You could even staple it together, although if you opt for that, make sure that the smooth (top) side of the staples are facing inwards so that they don’t scratch your face.
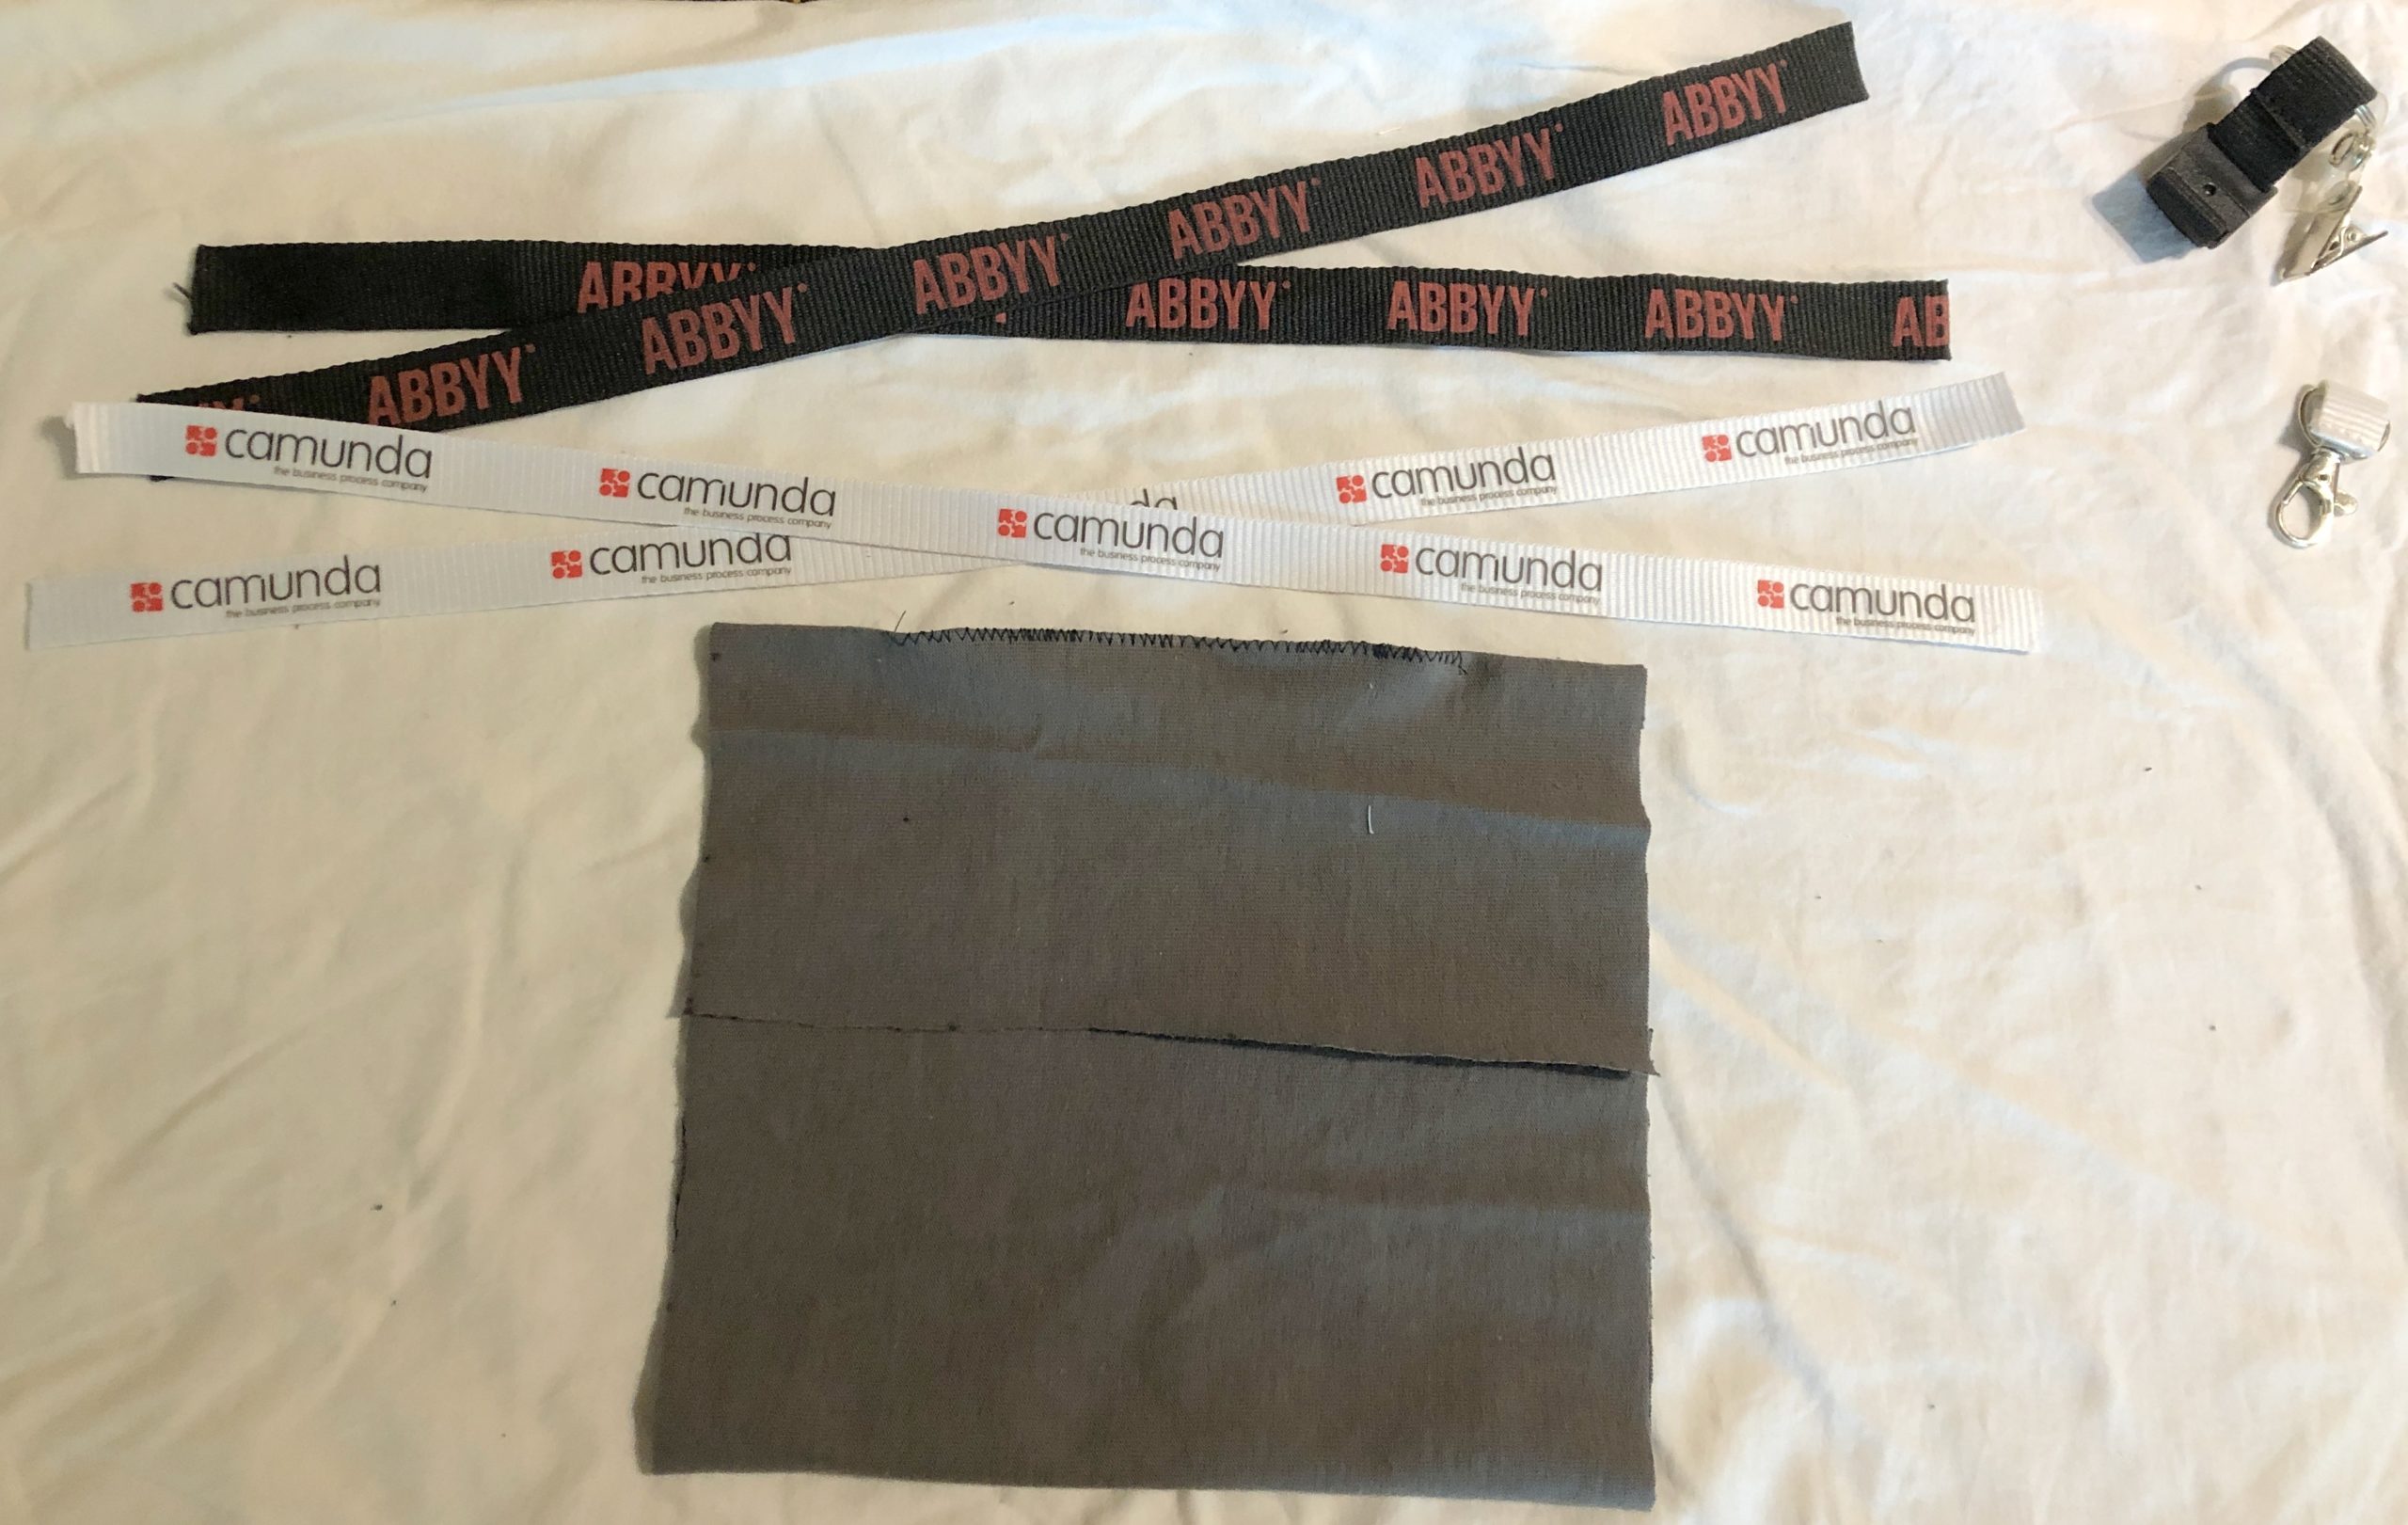
Here’s where the conference lanyards come in: who doesn’t have a couple of these hanging around? You’ll need two of them, and I’ve selected two from past vendor clients of mine where I’ve also attended their conferences: Camunda and ABBYY. Thanks guys!
Cut off all that cool stuff at the end of the lanyard and throw it away. Cut each lanyard in half. These will be the four ties that attach to each corner of the mask, and tie behind your head. If one set is slightly longer than the other, use it at the top of the mask since it’s a bit further around the back of your head than around your neck where the other one ties.
To prepare for sewing the edges I’ve started with the right side, and you’re looking at it from the back side, that is, the side that will touch your face. Slide about 1 or 1.5cm of the tie into the fold of the fabric (that is, between the layers) at the top and bottom, and pin in place. I made mine so that the logos on the ties are facing out and right-side up when the mask is on, but the choice is yours.
Also put a pin where the fabric overlaps in the middle of that edge to hold it in place while sewing.
Now, it’s just a straight shot of sewing from top to bottom. I went back and forth over the ties a couple of times to make sure that they’re secure, then just stitched the rest of the way.
Once it’s sewn, if you flip it over, it will look like the photo on the right. This is the outside of the mask, now with the ties sewn in place and the entire edge stitched closed.
Now, pin the ties in place on the second edge, and pin the fabric overlap at the centre to prepare for sewing, just like you did with the first edge.
Sew that one just like you did the other, and you know have an almost completed mask. The photo to the right shows the side of the mask that faces outwards, with the nose clip in the edge at the top.
Some of the fabric designs that I’ve seen online stop with a simple version like this, but I find it leaves large gaps at the sides, so I wanted to tighten it up like what the Taiwanese doctor did by adding tucks to his.
Adding side tucks
There are other ways to do this rather than the tucks that I’m going to show you. I did a couple of masks using elastic, but I don’t have a lot of elastic on hand and thought that most people wouldn’t unless they do a lot of sewing or crafts. If you have a shirring foot on your sewing machine, you can definitely use that. If you don’t know what a shirring foot is, then you probably don’t have one. I recall a hand-shirring technique that I learned in Home Economics class in junior high, but that part of my memory was overwritten when I learned my 4th programming language.
Basically, I wanted to reduce the 17cm height of the mask that is required to stretch from nose to chin down to about 10cm at the edges. I added two large-ish tucks/pleats, angling them slightly in, and pinned them in place. This is shown from the inside of the mask, since I want the tucks to push out.
You’ll see what I mean when we flip the mask over, still just pinned, and you can see that the two tucks will cause the mask to pleat it out away from your face towards the centre.
Sew across the two tucks to hold them in place. There’s not going to be a lot of strain on these, so hand-sew them if that’s easier. The photo on the right shows what it looks like on the inside of the mask after stitching the tucks.
And when we flip it over, the photo on the left is what it looks like from the outside after stitching.
Do the same on the other side, and the mask is essentially done. This is the completed mask with ties at each corner, and a bendable nose clip at the top:
Filter insert
We’re not quite done. Remember that open fold at the back of the mask? We’re going to insert an extra layer of filter material inside the mask, between the two layers of t-shirt fabric.
The mask would work just fine as it is, but will work better with an additional layer of a non-woven material inside to stop transmission of aerosolized particles. The doctor from the original design said that you could use a few layers of tissue that had been wet and then dried, so that it melded together. I was also talking with a friend about using a paper coffee filter. Use your imagination here, as long as it isn’t embedded with any chemicals and air can pass through it sufficiently for breathing.
I found a great suggestion online, however…a piece of a Swiffer Sweeper cloth, cut to fit. It’s unscented and likely contains little in the way of harmful chemicals, although I might try out a few other things here.
With the inside of the mask facing up, open the pocket formed by the overlapping edges of the fabric that we left across the middle of the mask. This is where the filter is going to go, and then the fabric will close around it.
Push the filter into the opening, flattening it out so that you’re only breathing through a single layer of it. It’s going to be a bit harder than usual to breathe through the mask anyway, so you don’t want to make it worse.
Now the filter is all the way inside the mask. Flatten it out and push it up into the corners for best coverage. If it’s too big, take it out and trim it rather than having rolls of extra filter material inside the mask.
If you just tug gently at the sides of the mask, the opening closes over the filter, and you’re ready to go. I did one model that put a snap in the middle so that the opening was held closed, but it’s not necessary and the snap pressed up against my nose in an annoying fashion.
Adjusting and wearing
Time to finally put the mask on. Before tying it on the first time, put the nose clip up to the top of your nose and mold it to fit over your nose. Once you’ve done this once, you probably only need to make minor adjustments, if any, when you put it on again.
On the left, you can see how I’ve bent the nose clip down the sides of my nose, then flattened the ends of it to follow the edge of my cheek. This closes most of the gap between the mask and my face at the top edge, which reduces the opportunity for aerosol particles to get in, and also means that my glasses don’t fog up every time I exhale.
Next, tie the top tie around your head. Make it nice and high so that it won’t slip down. This should be fairly snug but not uncomfortably so. Readjust the nose clip, since tying the top tie will usually pull it up a bit.
The bottom tie goes around and ties at the back of your neck, and can be fairly loose. Notice how the tucks conform to the side of my face so that the mask fits closely there. I’m thinking in the next version to add a tuck right in the middle of bottom edge to have it hug the chin closer, but this is pretty good.
General wearing instructions
A few tips about wearing, then I’ll show you a final hack in case you don’t have a conference lanyard.
Always put a clean mask on with clean hands.
Try not to adjust the mask once your hands may no longer be clean. In general, put the mask on before you leave home, and take it off when you come back.
Since the outside of the mask may have picked up something, be sure to wash your hands after you take it off. If you have to take it off while outside, you can untie the top tie and let the mask hang forward over your chest while it’s still tied around your neck, then wash your hands or use hand sanitizer before touching your face. To put it back on, just pull up and tie.
There are a few different ways to clean the mask.
If it’s not dirty but may have contacted the virus, you can just leave it for 24 hours. I’m basing that recommendation on the time that it takes for the virus to deteriorate on a porous material such as cardboard.
You can wash it in warm soapy water while you’re washing your hands. Rinse in clear water, squeeze out and hang to try.
You can also do the equivalent of a medical autoclave, and steam it over boiling water for 10 minutes. Obviously, don’t put it in the microwave because of the metal paperclip.
Here’s the final hack. If you don’t have a conference lanyard, or a pair of bootlaces or the drawstring from your pajamas, you can create ties by trimming the bottom (hemmed) edge off the t-shirt and cutting it to the right length. If you trim it a little bit away from the stitching, as you can see at the bottom, it won’t even need to be hemmed.
You can also fold and sew strips into ties, but probably you can find something already made to use instead.
That’s it for my DIY mask for techies, made from a t-shirt, 2 conference lanyards and a paperclip. I don’t plan to start any series of DIY coronavirus supplies, but if you’re interested in business process automation and how our world of work is changing in these changing times, check out some of my other work.
I’m spending the last session of the last day at DST’s AWD Advance conference with Arti Deshpande and Karla Floyd as they talk about how their more flexible user experience came to be. They looked at the new case management user experience, which is research-driven and requires very little training to use, and compared it to the processor workspace, which looks kind of like someone strapped the Windows API onto a green screen.
To start on the redesign of the processor workspace, they did quite a bit of usability evaluation, based on a number of different channels, and laid out design principles and specific goals that they were attempting to reach. They focused on 12 key screens and the navigation between them, then expanded to the conceptual redesign of 66 screens. They’re currently continuing to research and conceptualize, and doing iterative usability testing; they actively recruited usability testers from their customers in the audience during the presentation. They’ve worked with about 20 different clients on this, through active evaluations and visits but also through user forums of other sorts.
We saw a demo of the new screens, which started with a demo of the existing screens to highlight some of the problems with their usability, then moved on to the redesigned worklist grid view. The grid column order/presence is configurable by the user, and saved in their profile; the grid can be filtered by a few attributes such as how the work item was assigned to the worklist, and whether it is part of a case. Icons on the work items indicate whether there are comments or attachments, and if they are locked. For a selected work item, you can also display all relationships to that item as a tree structure, such as what cases and folders are associated with it. Reassigning work to another user allows adding a comment in the same action. Actions (such as suspending a work item) can be done from the worklist grid or from the banner of the open work item. The suspend work item action also allows adding a comment and specifying a time to reactivate it back to the worklist – combining actions into a single dialog like this is definitely a time-saver and something that they’ve obviously focused on cleaning up. Suspended items still appear in the worklist and searches but are in a lighter font until their suspense expires – this saves adding another icon or column to indicate suspense.
Comments can be previewed and pinned open by hovering over the work item icon in the worklist, and the comments for a work item can be sorted and filtered. Comments can be nested; this could cause issues for customers who are generating custom reports from the comments table in the database, at least one of whom was in the audience. (For those of you who have never worked with rigid legacy systems, know that generating reports from comment fields is actually quite common, with users being trained to enter some comments in a certain format in order to be picked up in the reports. I *know*.)
The workspace gains a movable vertical divider, allowing the space to be allocated completely to the worklist grid, or completely to the open work item; this is a significant enhancement since it allows the user to personalize their environment to optimize for what they’re working on at the time.
The delivery goal for all of this is Q4 2014, and they have future plans for more personalization and improved search. Some nice improvements here, but I predict that the comments thing is going to be a bit of a barrier for some customers.
That’s it for the conference; we’re all off to the Hard Rock Café for a private concert featuring the Barenaked Ladies, a personal favorite of mine. I’ll be quiet for a few days, then off to bpmNEXT in Monterey next week.
Blogging around here has been sporadic, to say the least. I have several half-finished posts about product reviews and some good BPM books that I’ve been reading, but I have that “problem” that independent consultants sometimes have: I’m too busy doing billable work to put up much of a public face, both with work with vendors and some interesting end-customer projects.
Today, I’ll be presenting the second in a series of three webinars for Progress Software, focused on how BPM fits with more traditional application development environments and existing custom applications. Progress continues to integrate the Savvion and Corticon acquisitions into their product set, and wanted to put forward a webinar series that would speak to their existing OpenEdge customers about how BPM can accelerate their application development without having to abandon their existing custom applications. I really enjoyed the first of the series, because Matt Cicciari (Progress product marketing manager) and I had a very conversational hour – except for the part where he lost his voice – and this time we’ll be joined by Ken Wilmer, their VP of technology, to dig into some of their technology a bit more. My portion will focus on generic aspects of combining BPM and traditional application development, not specific to the Progress product suite, so this may be of use even if you’re not using Progress products but want to understand how these seemingly disparate methodologies and technologies come together.
We’re doing today’s webinar twice: once at 11am Eastern to cover Europe and North America, then a repeat at 7pm ET (that’s 11AM tomorrow in Sydney) for the Asia Pacific region or those of you who just didn’t get enough in the first session. It will be live both times, so I will have the chance to think about what I said the first time around, and completely change it. 😉
You can sign up for today’s session here, plus the next session on February 29th that will include more about business rules in this hybrid environment.
I just found my notes from a Salesforce.com lunch event that I went to in Toronto back in April, where Peter Coffee spoke enthusiastically while we ate three lovingly-prepared courses at Bymark, and was going to just pitch them out but found that there was actually quite a bit of good material in there. Not sure how I managed to write so much while still eating everything in front of me.
This came just a few days after the SF.com acquisition of Radian6, a move that increased the Canadian staff to 600. SF has about 1,500 customers in Canada, a few of whom where in the room that day. Their big push with these and all their customers is on strategic IT in the cloud, rather than just cost savings. One of the ways that they’re doing this is by incorporating process throughout the platform, allowing it to become a global user portal rather than just a collection of silos of information.
Coffee discussed a range of cloud platform types:
Infrastructure as a service (IAAS) provides virtualization, but persists the old IT and application development models, combining the weaknesses of all of them. Although you’ve outsourced your hardware, you’re still stuck maintaining and upgrading operating systems and applications.
Basic cloud application development, such as Google apps and their add-ons.
SF.com, which provides a full application development environment including UI and application support.
The old model of customization, that most of us are familiar with in the IT world, has led to about 1/3 of all enterprise software running on the current version, and the rest stuck with a previous version, unable to do the upgrade because the customization has locked it in to a specific version. This is the primary reason that I am so anti-customization: you get stuck on that old version, and the cost of upgrading is not just the cost of upgrading the base software, but of regression testing (and, in the worst case, redeveloping) all the customization that was done on top of the old version. Any wonder that software maintenance ends up costing 10x the original purchase cost?
The SF.com model, however, is an untouchable core code base sitting on managed infrastructure (in fact, 23 physical instances with about 2,000 Dell servers), and the customization layer is just an abstraction of the database, business logic and UI so that it is actually metadata but appears to be a physical database and code. In other words, when you develop custom apps on the SF.com platform, you’re really just creating metadata that is fairly loosely coupled with the underlying platform, and resistant to changes therein. When security or any other function on the core SF.com platform is upgraded, it happens for all customers; virtualization or infrastructure-as-a-service doesn’t have that, but requires independent upgrades for each instance.
Creating an SF.com app doesn’t restrict you to just your app or that platform, however: although SF.com is partitioned by customer, it allows linkages between partners through remapping of business objects, leveraging data and app sharing. Furthermore, you can integrate with other cloud platforms such as Google, Amazon or Facebook, and with on-premise systems using Cast Iron, Boomi and Informatica. A shared infrastructure, however, doesn’t compromise security: the ownership metadata is stored directly with the application data to ensure that direct database access by an administrator doesn’t allow complete access to the data: it’s these layers of abstraction that help make the shared infrastructure secure. Coffee did punt on a question from the (mostly Canadian financial services) audience about having Canadian financial data in the US: he suggested that it could be encrypted, possibly using an add-on such as CipherCloud. They currently have four US data centers and one in Singapore, with plans for Japan and the EU; as long as customers can select the data center country location that they wish (such as on Amazon), that will solve a lot of the problem, since the EU privacy laws are much closer to those in Canada. However, recent seizures of US-owned offshore servers brings that strategy into question, and he made some comments about fail-overs between sites that makes me think that they are not necessarily segregating data by the country specified by the customer, but rather picking the one that optimizes performance. There are other options, such as putting the data on a location-specific Amazon instance, and using SF.com for just the process parts, although that’s obviously going to be a bit more work.
Although he was focused on using SF.com for enterprises, there are stories of their platform being used for consumer-facing applications, such as Groupon using the Force.com application development platform to power the entire deals cycle on their website. There’s a lot to be said for using an application development environment like this: in addition to availability and auto-upgrading, there’s also built-in support for multiples mobile devices without changing the application, using iTunes for provisioning, and adding Chatter for collaboration to any application. Add the new Radian6 capabilities to monitor social media and drive processes based on social media interactions and mentions, and you have a pretty large baseline functionality out of the box, before you even start writing code. There are native ERP system and desktop application connectors, and a large partner network offering add-ins and entire application suites.
I haven’t spent any time doing evaluation specifically of Salesforce or the Force.com application development platform (except for a briefing that I had over a year ago on their Visual Process Manager), but I’m a big fan of building applications in the cloud for many of the reasons that Coffee discussed. Yes, we still need to work out the data privacy issues; mostly due to the potential for US government intervention, not hackers. More importantly, we need to get over the notion that everything that we do within enterprises has to reside on our own servers, and be built from the metal up with fully customized code, because that way madness lies.
I’m presenting a webinar tomorrow together with Sanjay Shah of Skelta – makers of one of the few Microsoft-centric BPM suites available – on Tuesday at noon Eastern time. The topic is BPM and application composition, an area that I’ve been following closely since I asked the question five years ago: who in the BPM space will jump on the enterprise mashup bandwagon first? Since then, I’ve attended some of the first Mashup Camps (1, 2 and 4) and watched the emerging space of composite applications collide with the world of BPM and SOA, to the point where both Gartner and Forrester consider this important, if not core, functionality in a BPM suite.
I’ll be talking about the current state of composite application development/assembly as it exists in BPM environments, the benefits you can expect, and where I see it going. You can register to attend the webinar here; there will be a white paper published following the webinar.
With the morning workshop (and lunch) behind us, the first part of the afternoon is the opening keynote, starting with Judy Huber, who oversees the 5,000 people at the IBM Canada software labs, which includes the Centre for Advanced Studies (CAS) technology incubation lab that spawned this conference. This is the 20th year of CASCON, and some of the attendees have been here since the beginning, but there are a lot of younger faces who were barely born when CASCON started.
To recognize the achievements over the years, Joanna Ng, head of research at CAS, presented awards for the high-impact papers from the first decade of CASCON, one each for 1991 to 2000 inclusive. Many of the authors of those papers were present to receive the award. Ng also presented an award to Hausi Müller from University of Victoria for driving this review and selection process. The theme of this year’s conference is smarter technology for a smarter planet – I’ve seen that theme at all three IBM conferences that I’ve attended this year – and Ng challenged the audience to step up to making the smarter planet vision into reality. Echoing the words of Brenda Dietrich that I heard last week, she stated that it’s a great time to be in this type of research because of the exciting things that are happening, and the benefits that are accruing.
Following the awards, Rod Smith, VP of IBM emerging internet technologies and an IBM fellow, gave the keynote address. His research group, although it hasn’t been around as long as CAS, has a 15-year history of looking at emerging technology, with a current focus on “big data” analytics, mobile, and browser application environments. Since they’re not a product group, they’re able to take their ideas out to customers 12-18 months in advance of marketplace adoption to test the waters and fine-tune the products that will result from this.
They see big data analytics as a new class of application on the horizon, since they’re hearing customers ask for the ability to search, filter, remix and analyze vast quantities of data from disparate sources: something that the customers thought of as Google’s domain. Part of IBM’s BigInsights project (which I heard about a bit last week at IOD) is BigSheets, an insight engine for enabling ad hoc discovery for business users, on a web scale. It’s like a spreadsheet view on the web, which is a metaphor easily understood by most business users. They’re using the Hadoop open source project to power all of the BigInsights projects.
It wouldn’t be a technical conference in 2010 if someone didn’t mention Twitter, and this is no exception: Smith discussed using BigSheets to analyze and visualize Twitter streams related to specific products or companies. They also used IBM Content Analytics to create the analysis model, particularly to find tweets related to mobile phones with a “buy signal” in the message. They’ve also done work on a UK web archive for the British Library, automating the web page classification and making 128 TB of data available to researchers. In fact, any organization that has a lot of data, mostly unstructured, and wants to open it up for research and analysis is a target for these sort of big data solutions. It stands to reason that the more often you can generate business insights from the massive quantity of data constantly being generated, the greater the business value.
Next up was Christian Couturier, co-chair of the conference and Director General of the Institute of Information Technology at the Canada’s National Research Council. NRC provides some of the funding to IBM Canada CAS Research, driven by the government’s digital economy strategy which includes not just improving business productivity but creating high-paying jobs within Canada. He mentioned that Canadian businesses lag behind other countries in adoption of certain technologies, and I’m biting my tongue so that I don’t repeat my questions of two years ago at IT360 where I challenged the Director General of Industry Canada on what they were doing about the excessively high price of broadband and complete lack of net neutrality in Canada.
The program co-chairs presented the award for best paper at this show, on Testing Sequence Diagram to Colored Petri Nets Transformation, and the best student paper, on Integrating MapReduce and RDBMSs; I’ll check these out in the proceedings as well as a number of other interesting looking papers, even if I don’t get to the presentations.
Oh yeah, and in addition to being a great, free conference, there’s birthday cake to celebrate 20 years!
Darrell Fernandes, SVP of advisory solutions technology at Fidelity Investments, finished up the morning at Forrester’s BP&AD Forum with a discussion of their IT transformation: how they changed their software delivery process to become more like a software product company. They created “fences” around their projects in terms of centers of excellence and project management offices, with the idea that this would drive excellence on their projects; what they found is that the communication overhead started to bog them down, and that the silos of technology expertise became obsolete as technologies became more integrated. This is a really interesting counterpoint to Medco’s experience, where they leveraged the centers of excellence to create a more agile enterprise.
For Fidelity, the answer was to structure their software delivery to look more like that of a software product company, rather than focusing specifically on projects. They looked at and introduced best practices not just from other organizations like themselves, but also from software companies such as Microsoft. Taking a broader product portfolio view, they were able to look for synergies across projects and products, as well as take a longer-term, more disciplined view of the product portfolio development. A product vision maps to the product roadmap, then to the release plans, then ties into the project high-level plans. They’ve created an IT product maturity model, moving through initiation, emerging, defined, managed and optimizing; Fernandes admitted that they don’t have any in the optimizing category, but told about how they’ve moved up the maturity scale significantly in the past few years. They also started as an IT-led initiative before coming around to a business focus, and he recommends involving the business from the start, since their biggest challenges came when they started the business engagement so far along in their process.
They’ve had some cultural shifts in moving to the concept of IT products, rather than IT providing services via projects to the business, and disengaged the project/product cycle from annual IT budgets. Also, they drove the view of business capabilities that span multiple IT products, rather than a siloed view of applications that tended to happen with a project and application-oriented view. Next up for them is to align the process owners and product owners; he didn’t have any answers yet about how to do that, since they’re just starting on the initiative. They’re a long way from being done, but are starting to shift from the mode of IT process transformation to that of it just being business as usual.
Interesting view of how to shift the paradigm for software development and delivery within large organizations.